


微软已经修改了IT专业人员和Exchange管理员将邮箱项目导出到PST文件的流程。在本地Exchange Server环境中,可以通过Exchange管理中心(EAC)快速完成。然而,在Office 365中,情况就变得有点复杂了。实际上,它相当复杂。不用担心-在本指南中,我将解释导出Office 365邮箱到PST的所有不同方法,从eDiscovery内容搜索开始。
导出邮箱到PST的历史:发生了什么变化?
Exchange Server(本地)历来有一个非常简单的流程,可以将用户的邮箱导出到PST文件中。
- 使用Exchange管理中心(EAC),您需要转到收件人 -> 邮箱。
- 从那里,您需要搜索您的用户,选择他们,点击“…”(省略)按钮,然后点击导出到PST文件。
- A wizard would open with a few questions including requesting a network UNC path for the location of the PST file. That was it!
由于安全性逐渐成为合规性和基于角色的管理的重点,Microsoft已经将这项“易于访问”的任务转移到了Microsoft 365安全性和合规性领域的更深层。正如您将在下文中看到的,IT专业人员必须执行相当多的步骤才能将邮箱导出为PST文件。让我们开始吧,我们将踏上一段波澜壮阔的旅程!
如何通过eDiscovery内容搜索将Office 365邮箱导出为PST
正如我上面提到的,Microsoft已将主要访问方法转移到了导出用户邮箱内容(包括邮件、日历项,甚至是归档邮箱)到Microsoft Purview(原Microsoft 365合规中心网站)。这是我们进行合规性搜索的地方。
在左侧的“解决方案”类别下是内容搜索。但是,在进行搜索之前,我们必须向我们的管理员帐户添加一个特定角色,以便获得执行搜索的权限。让我们从那里开始。
使用Microsoft Purview确认安全性
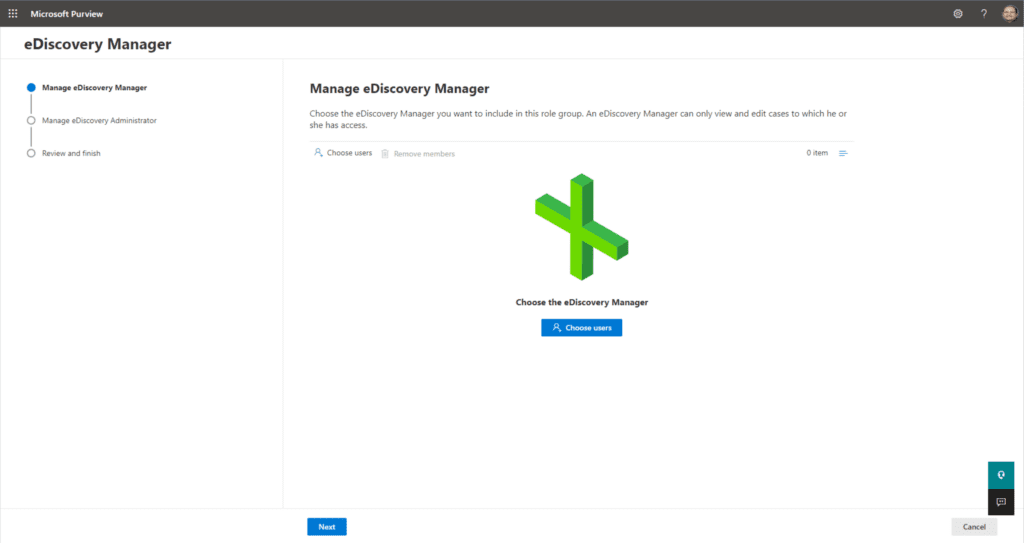
在启动搜索之前,我们需要向我们的管理员帐户添加两个特定角色 – eDiscovery管理员角色和eDiscovery管理员角色。此角色不会默认分配给任何帐户,需要显式添加。
- 让我们从Microsoft Purview 网站开始。
- 从这里,我们将扩展‘角色 & 范围’并点击权限。
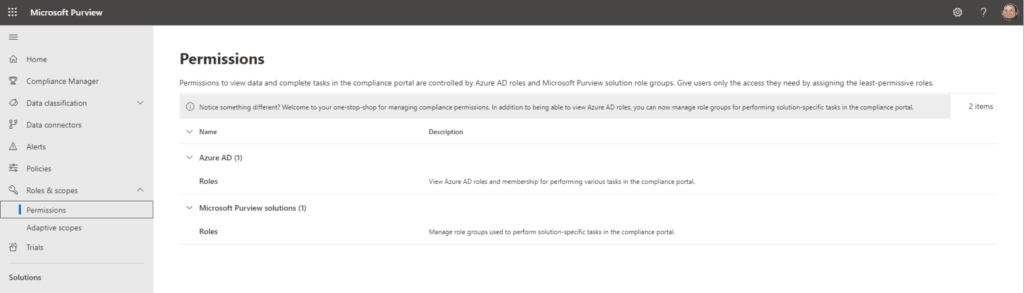
- 在Microsoft Purview 解决方案下,点击角色。在这里,我们有各种权限在Microsoft 365生态系统中指定的所有角色和角色组。
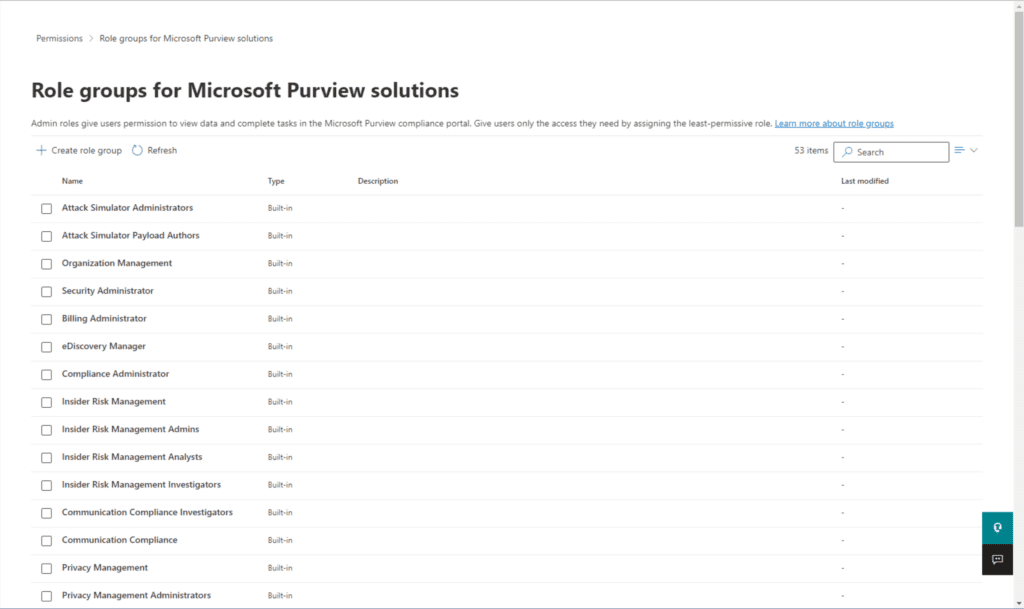
- 我们正在寻找eDiscovery 管理器角色。在这里,点击它,然后点击编辑按钮。
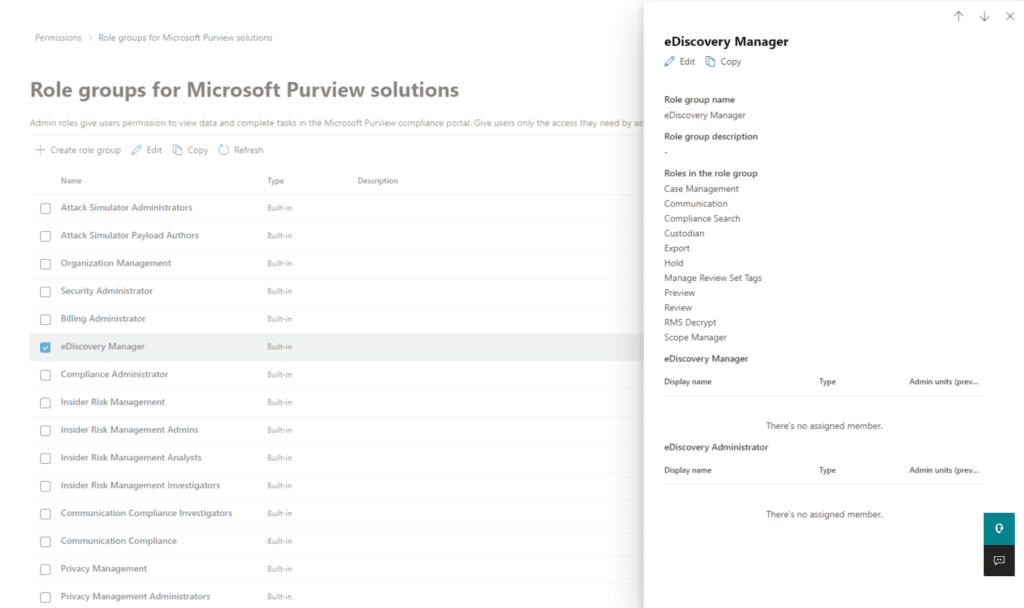
- 这将打开另一个向导。让我们点击中间的选择用户。
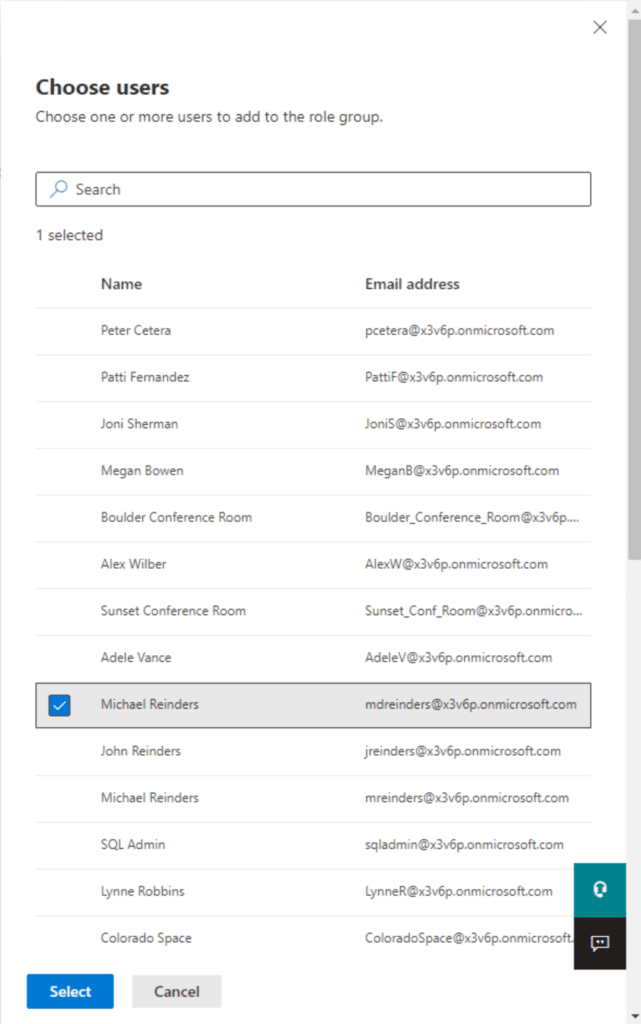
- 接下来,我会选择我的名字,然后点击选择。
- I did the same for ‘eDiscovery Administrator’. Click Next a few more times, then click Save.
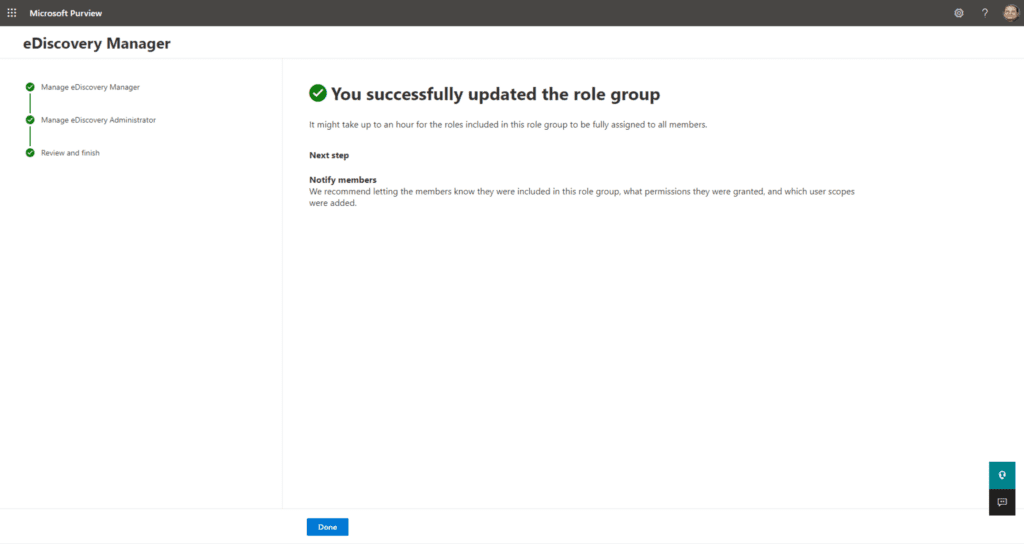
我们几乎准备就绪,除了向导说我们可能需要等待最多一个小时,以便更改传播到系统中。
启动内容搜索
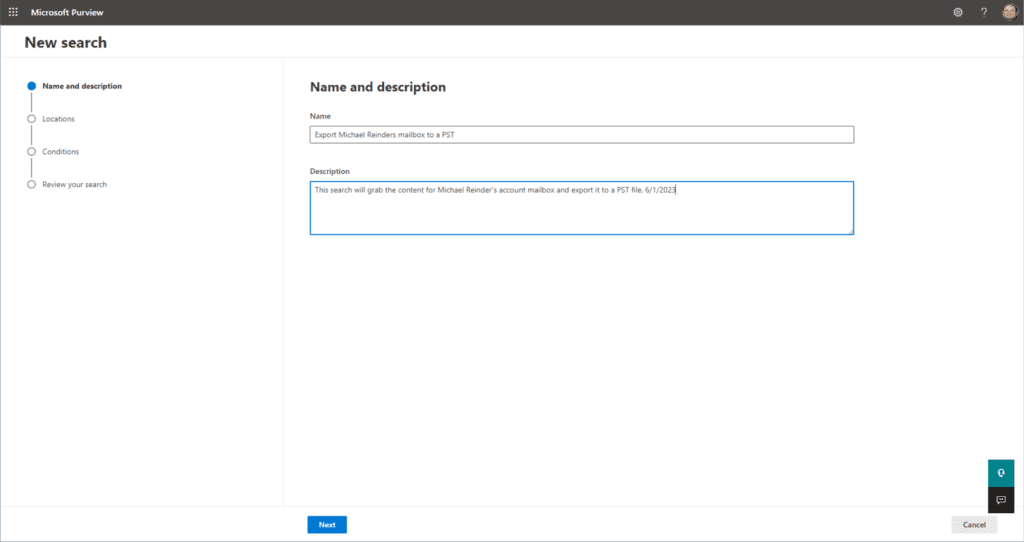
下一步是通过创建内容搜索来启动搜索。
- 在同一个门户中,在解决方案类别下,点击内容搜索,然后点击+ 新搜索按钮。

- 根据需要输入名称和描述。
- 在位置屏幕上,将交换邮箱的状态更改为开启。然后,点击选择用户、组或团队链接。
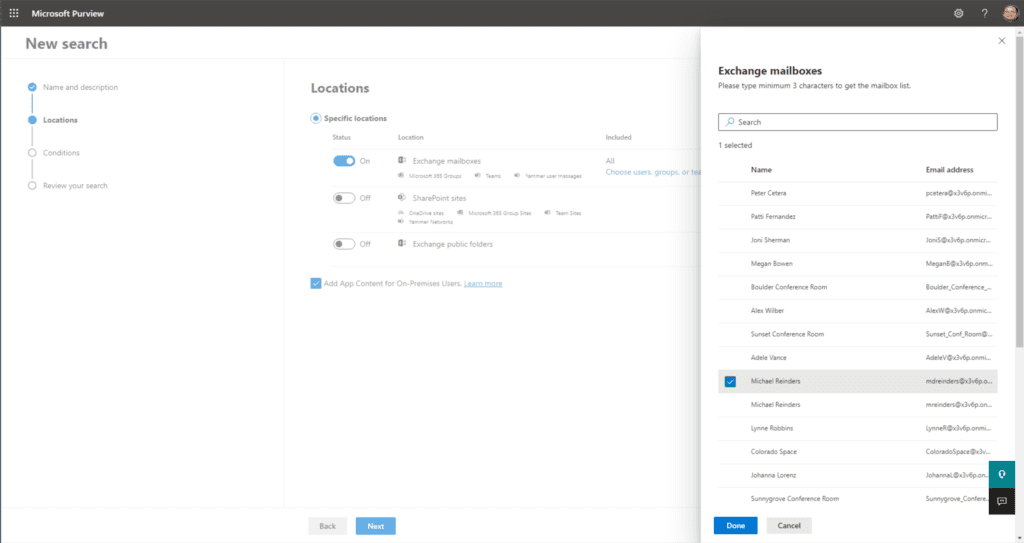
- I have selected my mailbox (Michael Reinders) and clicked Done. Then, I clicked Next.
- 因为我们想要导出完整邮箱,我们会保持条件屏幕为空。如果我们需要过滤或搜索特定主题的电子邮件,我们可以这样做。这对于需要搜索整个租户邮箱中具有特定主题的电子邮件的情况特别有用。您可以轻松找到它们并选择性地删除它们!
- 在审查您的搜索屏幕上,确认一切正常并点击提交。
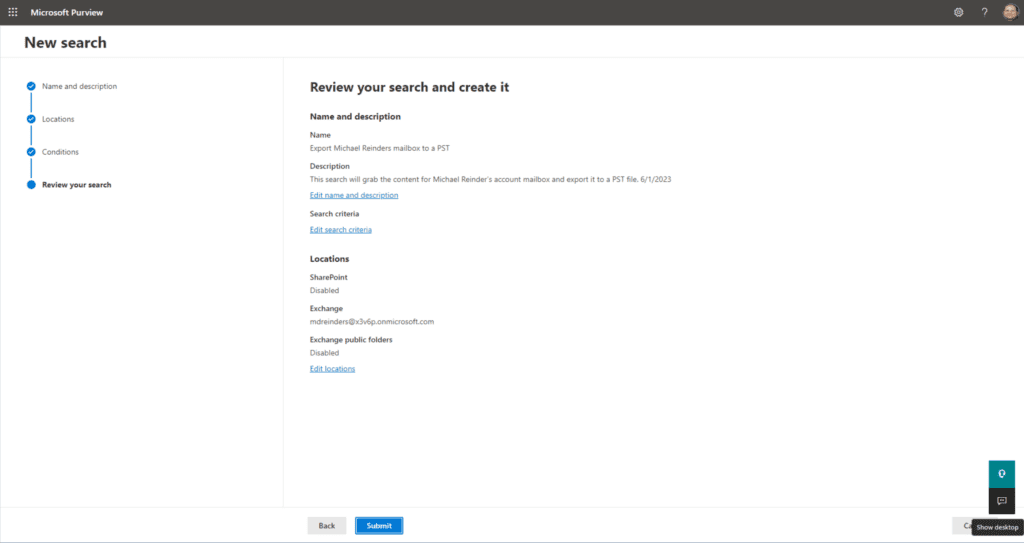
- 在“审查您的搜索”屏幕上,确认一切正常并点击提交。
- 我们的新搜索现在显示为“开始”状态。

因为我的租户和邮箱很小,所以只需几秒钟即可完成搜索,但您的情况可能有所不同。
导出和下载PST文件
下一阶段包括从云端运行导出并下载PST文件。
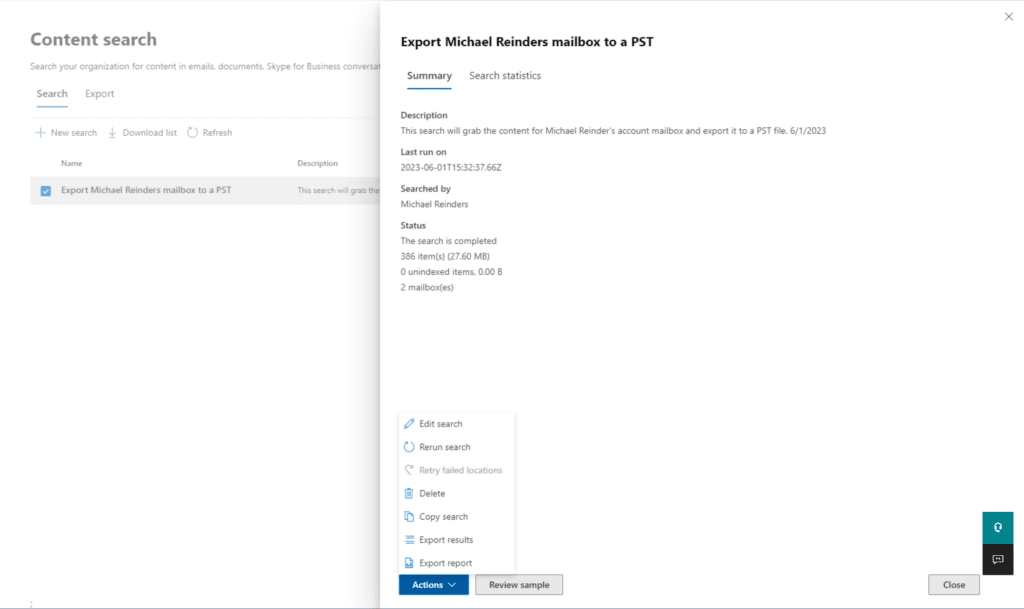
- 首先,点击已完成搜索,点击底部的操作菜单,然后选择导出结果。
- 接下来,在“导出结果”飞出窗口中,大多数默认设置对我们的目的来说都是可以的。我通常选择输出选项下的中间选项:所有项目,包括未识别格式、加密或由于其他原因未被索引的项目。个人而言,我想尽可能多地获取数据,不管实际上会得到什么。完成后,点击导出。

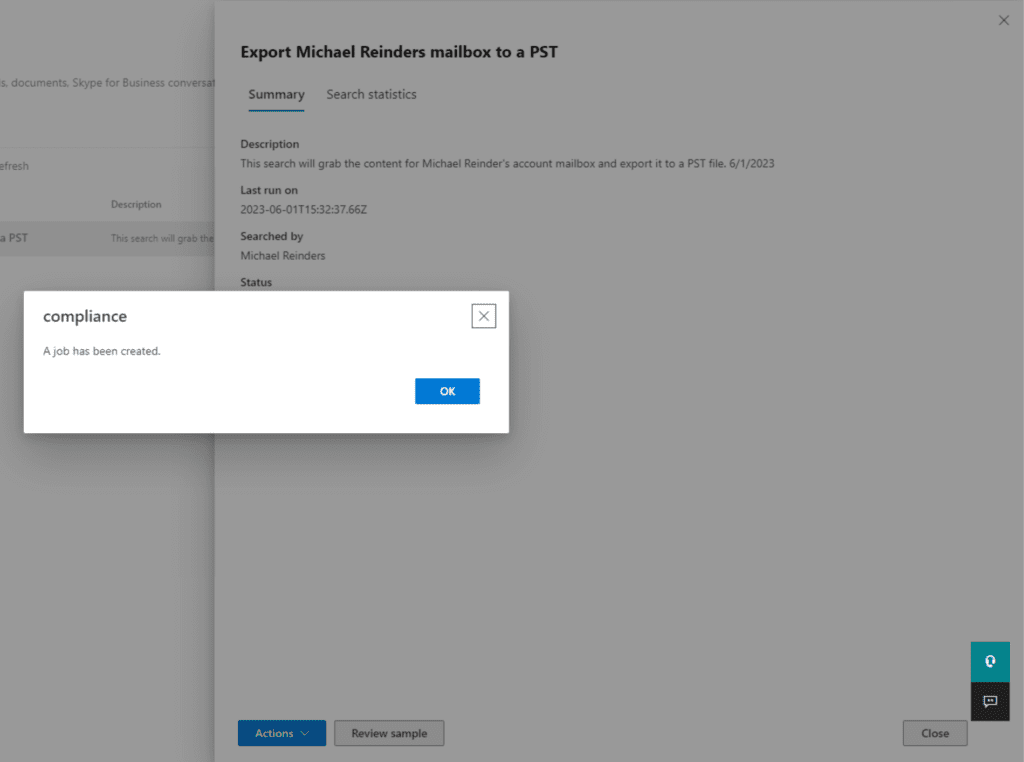
- 过一会儿,我们会收到一个新作业已创建的确认通知。点击对话框中的确定。
- 接下来,点击顶部的导出选项卡。我点击了我们的导出,可以看到当前的进度。
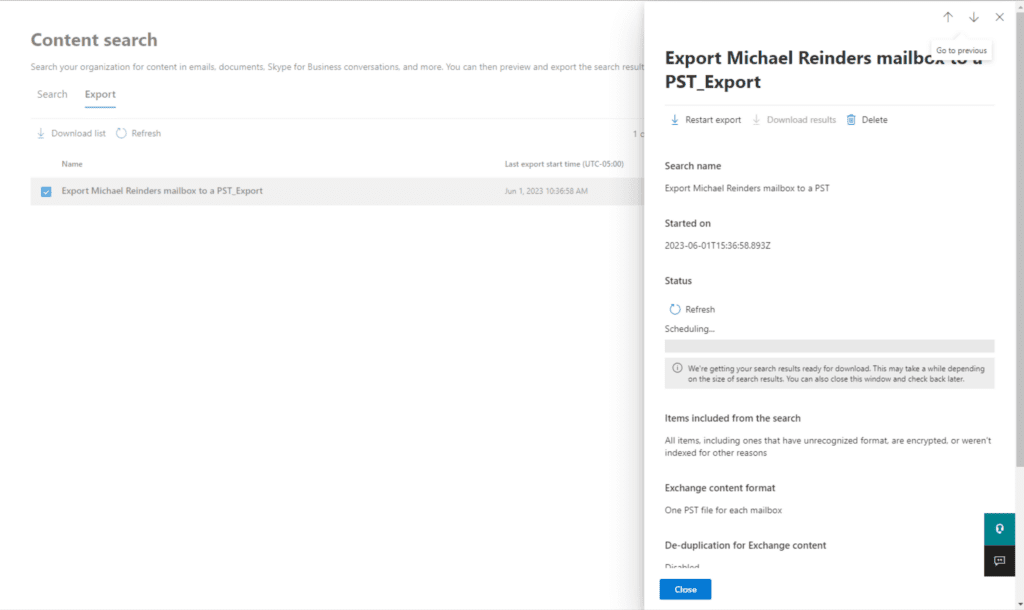
- 计划阶段已经开始。最终,它会完成。点击刷新按钮,最终会显示已完成。再次点击以查看详细信息。
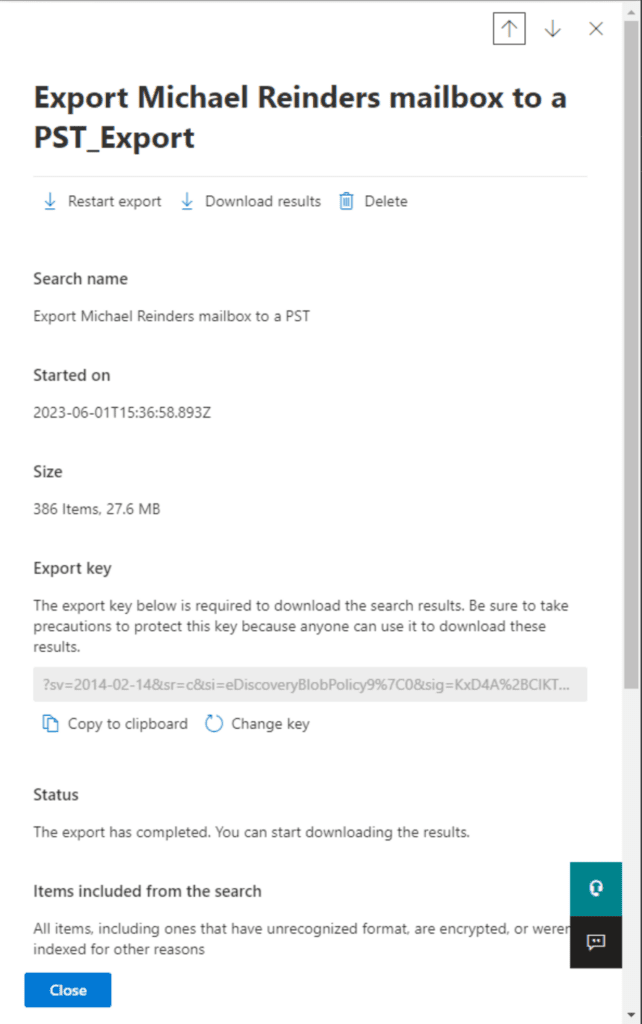
- 现在,我们可以看到一些好的细节。PST 导出已准备好下载。首先,我们需要将“导出密钥”复制到剪贴板上,因此点击中间的“复制到剪贴板”按钮。然后在飞出窗口顶部点击下载结果。
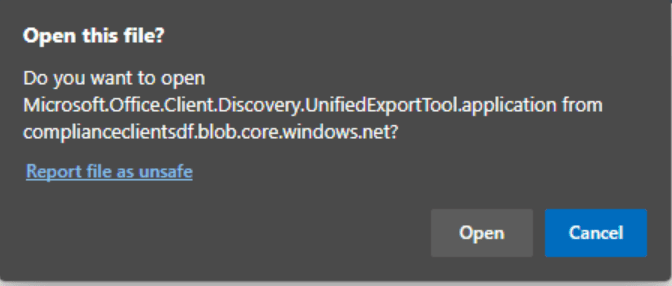
- 然后,您将被提示打开一个文件。这是“Microsoft Office 365 eDiscovery 导出工具”的下载。您始终可以信赖微软的工程师和市场营销人员不会言简意赅!
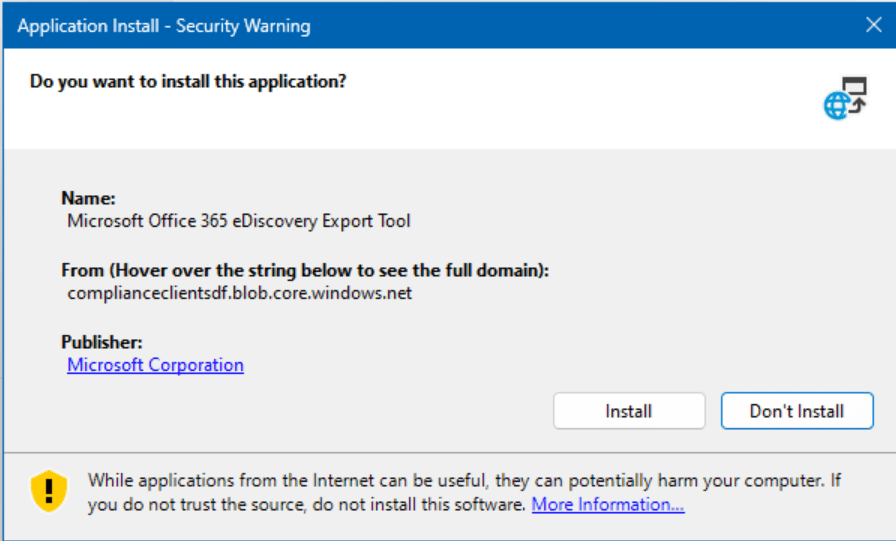
- 当您看到“应用安装 – 安全警告”对话框时,请点击安装按钮。
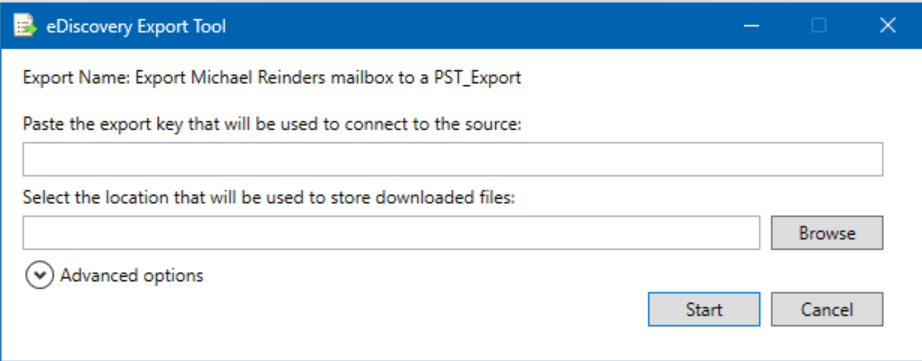
- A new ‘eDiscovery Export Tool‘ dialog will open. Paste the export key into the first field, then click the Browse button to choose a location for the PST file.
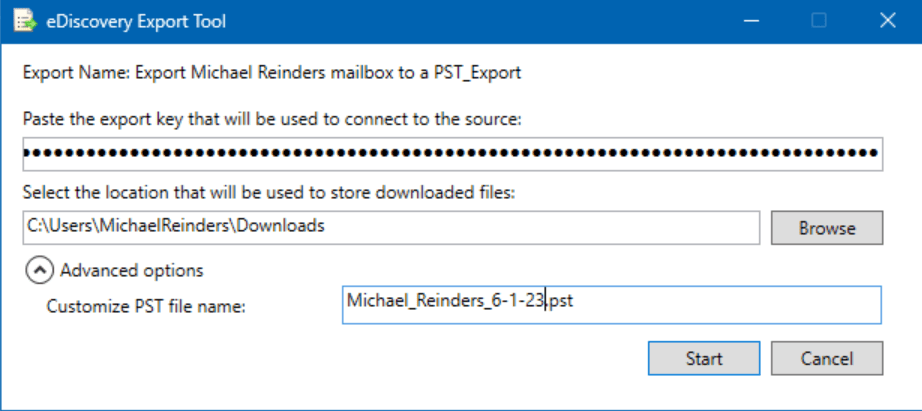
- 在这里,我还展开了高级选项并按如下方式自定义了 PST 文件名。当您准备好开始导出时,请点击开始。
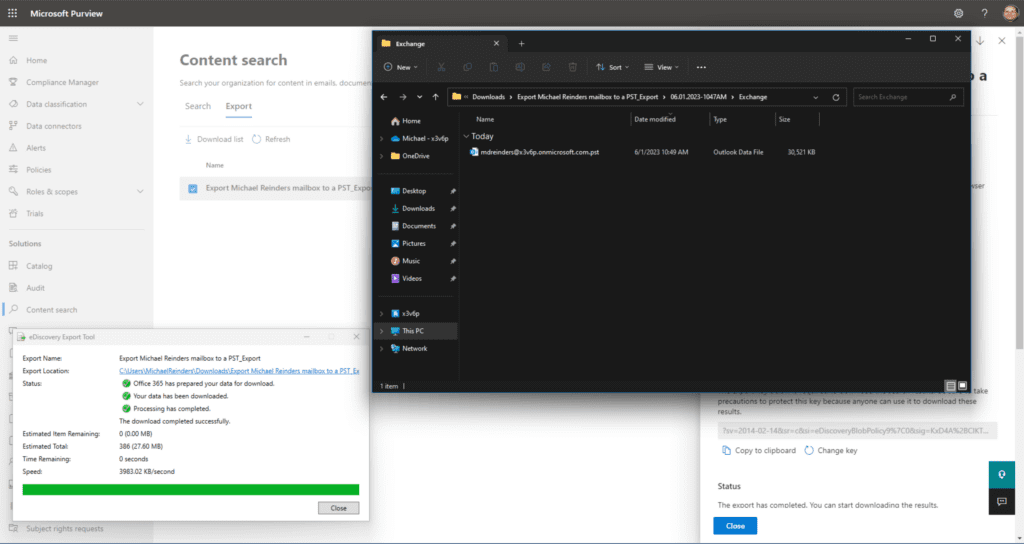
- 这将准备数据然后保存到您的位置。我们完成了!
看,即使在这个过程中涉及很多步骤,这也相当容易。
您能从Exchange Online导出Office 365邮箱到PST吗?
是的和不。正如我在本文开始时提到的,Exchange管理中心(在云中)没有直接的GUI来将邮箱导出到PST。所以从技术上讲,答案是否定的。
然而,在某种程度上,Exchange Online服务正在被利用来提供来自eDiscovery内容搜索的数据。所以,在技术上,答案是肯定的。我知道,这有点令人困惑。
如何使用Outlook将Office 365邮箱导出到PST
将Office 365邮箱导出到PST的另一种主要的“传统”方法是使用内置于Outlook桌面客户端的导入/导出功能。这在Outlook网页版和新的基于Web的Windows Outlook中不可用。
这不是一个理想的方法,原因有几个 – 主要的原因是管理员无法直接执行此操作。他们必须在用户的计算机前面或远程连接到用户的计算机来进行操作。这并不高效。但是,让我们为了完整起见,按照以下步骤进行。
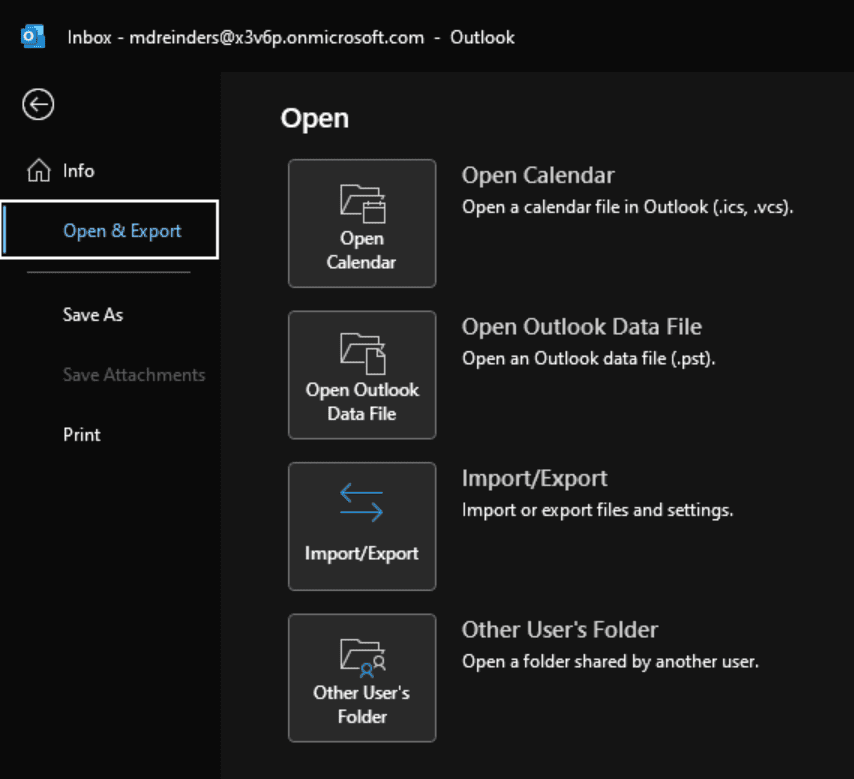
- 在Outlook中,点击左上角的文件菜单。

- 在左侧,点击打开和导出,然后选择导入/导出。
- 将打开一个导入和导出向导对话框。选择导出到文件,然后点击下一步。
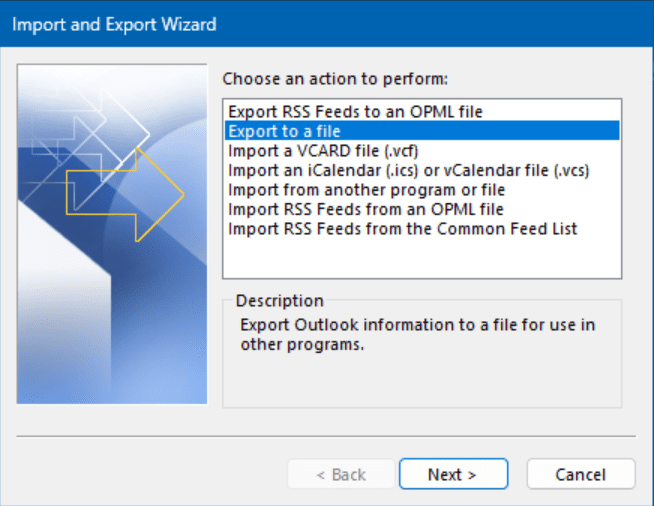
- 在导出到文件屏幕上,选择Outlook数据文件(.pst)选项,然后点击下一步。

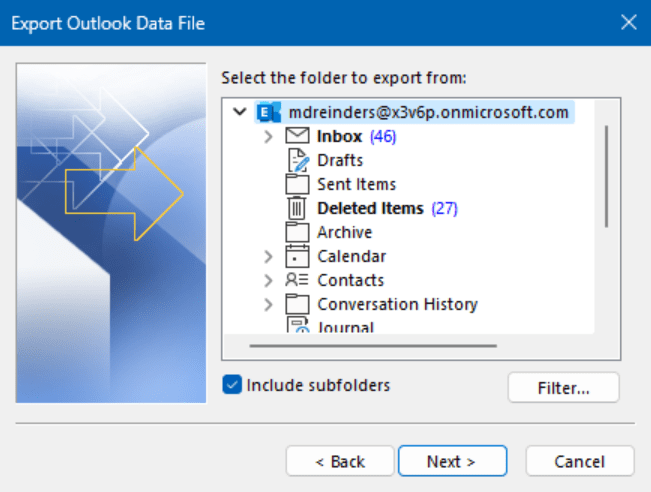
- 在导出Outlook数据文件屏幕上,确保点击顶部行。应该是问题用户的电子邮件地址。这只是告诉向导抓取邮箱的所有内容。另外,请确保包括子文件夹已被选中,然后点击下一步。
- 在最后一个屏幕上,只需点击浏览按钮选择PST文件要保存的位置。
- 点击完成,然后会提示您输入一个可选密码。您可以选择输入密码或留空。在这里要小心,出于明显的原因。
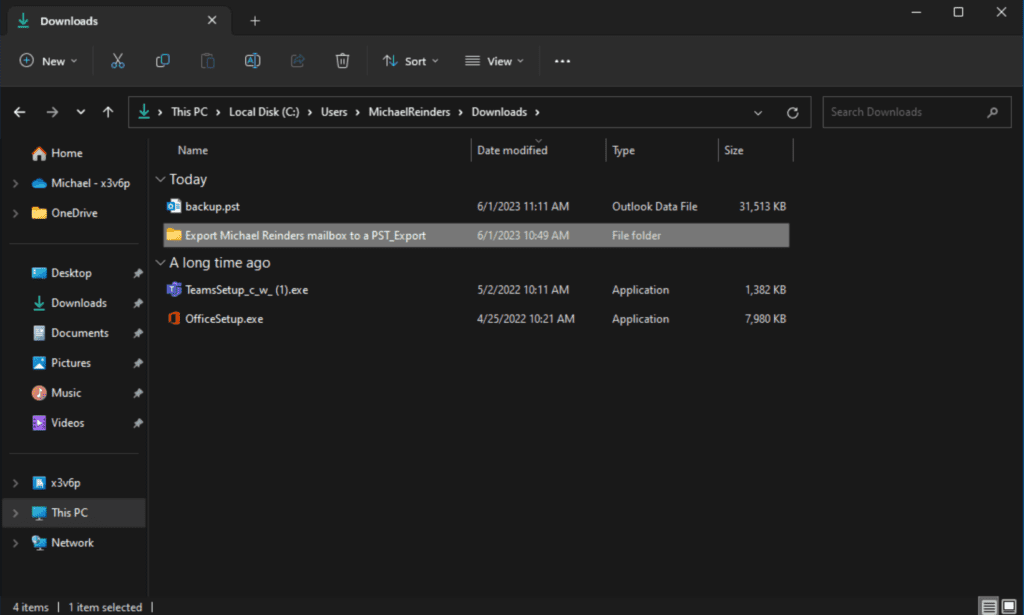
在我的下载文件夹中有一个backup.pst文件。大功告成!
您能使用PowerShell将Office 365邮箱导出为PST文件吗?
I will have to say Yes. However, the process is rather extensive, and the complete procedure is outside the scope of this particular post. I could certainly write an entire post on this topic alone!
但现在,可以随意查看这篇Microsoft Learn文档以获取更多信息。
如何最好地将Office 365邮箱导出为PST文件?
总之,有几种方法可以将Office 365邮箱导出为PST文件。最适合您的方法取决于您的具体需求。我建议您在Microsoft 365 Purview网站上使用eDiscovery导出工具。将邮箱导出为PST文件后,您可以将其用于多种用途,如备份数据、迁移到新的电子邮件系统,或仅仅是存档旧邮件。
以下是在需要将Office 365邮箱导出为PST文件时的一些建议:
- 如果要导出大量邮箱,可能需要一些时间来完成该过程。
- 确保您的计算机有足够的存储空间来存储PST文件。
- 如果要导出敏感数据,可能需要加密PST文件。
I hope this helps! Please leave a question or comment below and thanks for reading!
相关文章: