


Proxmox Virtual Environment (VE) is a free, open-source virtualization management platform based on Debian Linux with a custom kernel. This solution fully integrates the KVM hypervisor, allowing users to deploy and manage virtual machines via a user-friendly GUI web interface.
Proxmox comes with Proxmox Backup Server, a native tool to back up virtual machines. However, you may need to use advanced backup/recovery features such as direct backup to the cloud, application-aware backup, flexible scheduling and retention, immutability, granular recovery, etc. Moreover, in hybrid and mixed environments, it is easier to use a single third-party backup solution like NAKIVO Backup & Replication to manage all data protection activities from a centralized interface.
This post provides a detailed walkthrough for backing up and recovering Proxmox VM data using an agent-based approach in NAKIVO Backup & Replication.
Prerequisites
The environment used in this walkthrough:
- NAKIVO Backup & Replication deployed on Linux Ubuntu, which is running on a Proxmox VM. The full solution of NAKIVO Backup & Replication is installed with the onboard backup repository (we renamed the “Onboard repository” to “Proxmox Onboard”).
NOTE: For details on installing NAKIVO Backup & Replication, refer to the user guide. You can install the NAKIVO solution on any supported machine or device.
- A bare-metal Proxmox server based on Proxmox 8.1.4
- Local datastores:
- Local
- Local-lvm
- Shared datastores configured on TrueNAS:
- NFS_truenas (NFS)
- Truenas (iSCSI)
Adding Proxmox VMs to the Inventory
Let’s start by adding Proxmox virtual machines that we want to back up to the NAKIVO Backup & Replication inventory:
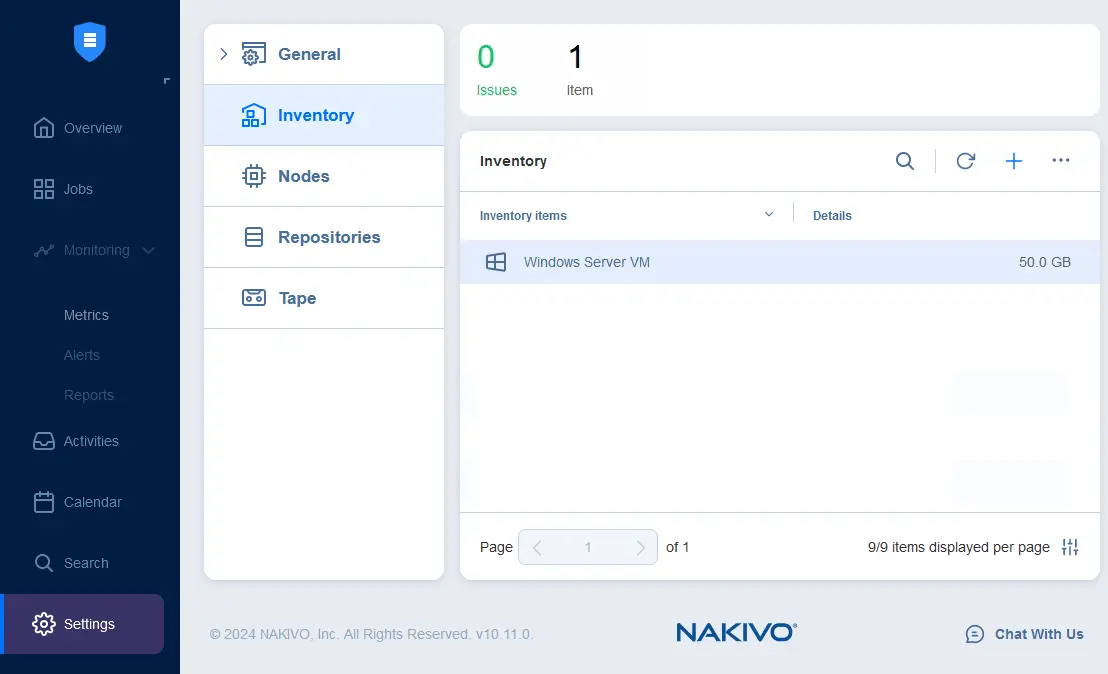
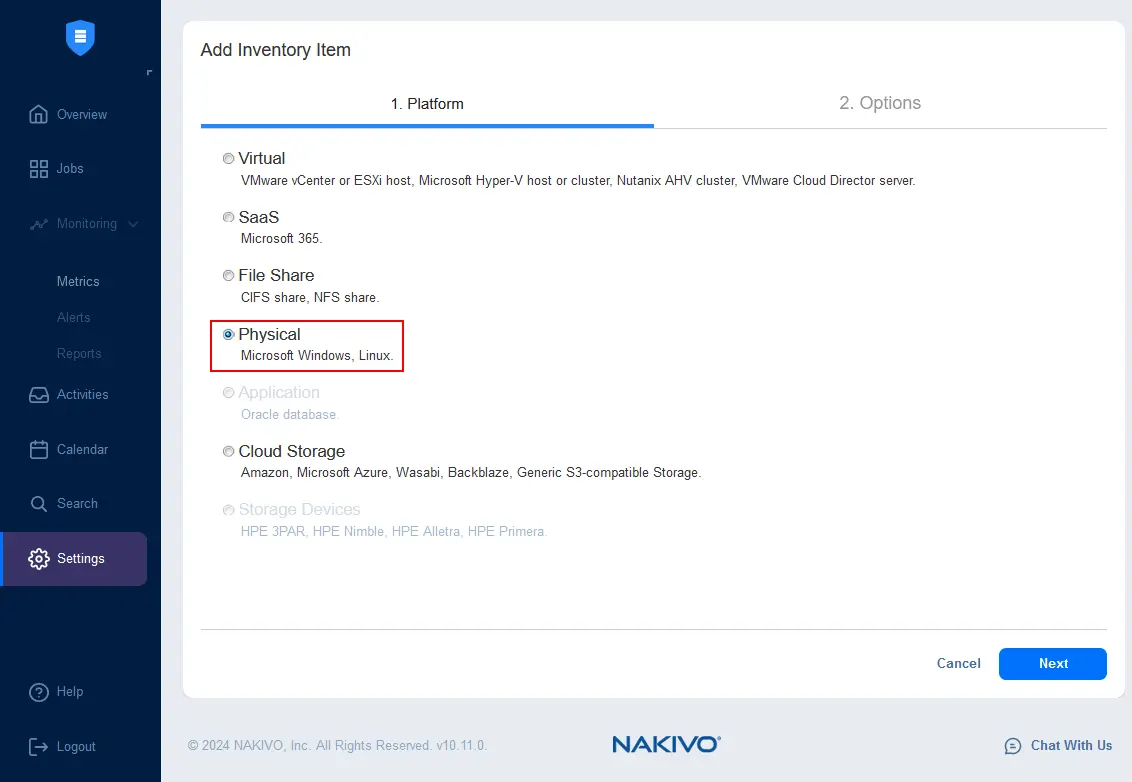
- Go to Settings > Inventory in the web interface of NAKIVO Backup & Replication and click + to add a new item to the inventory. We will add a Linux VM deployed on a Proxmox server.
- Select Physical because we are using an agent-based approach to add Proxmox VMs as physical machines.
NOTE: We are using the agent-based backup approach, which involves a physical machine agent/Transporter being installed in each Proxmox VM that we want to protect. This means that you add Proxmox VMs the way you add physical Linux or Windows machines to the NAKIVO Backup & Replication inventory.
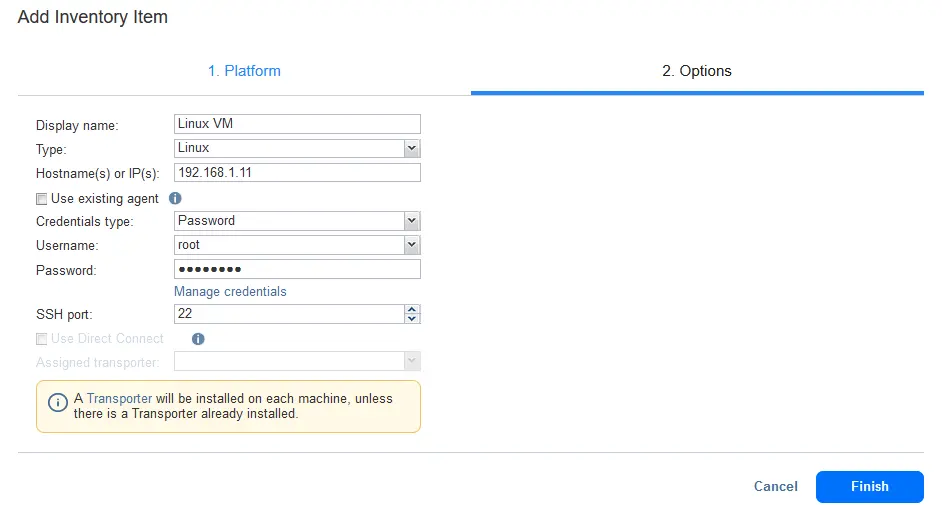
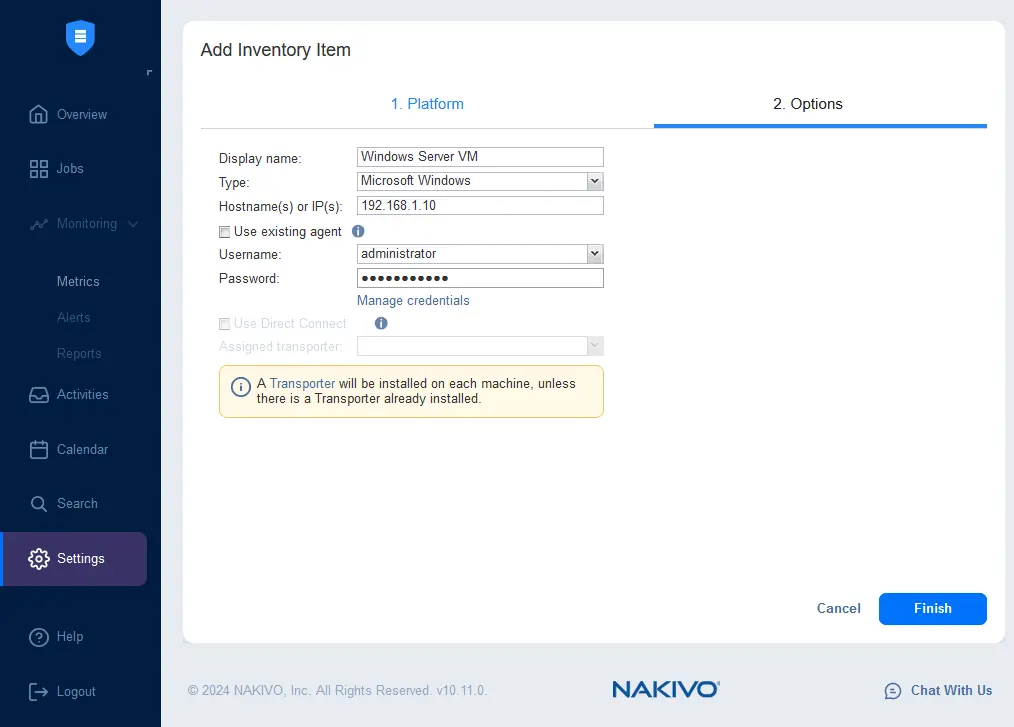
- Define the options to add the machine to the inventory. We will add a Linux machine using the default SSH port:
- Display name: Linux VM
- Type: Linux
- Credentials type: Password
- Username: root
- Password: *********
- SSH port: 22
A NAKIVO Transporter will be installed on the machine. If, for some reason, a Transporter cannot be automatically injected into the machine, you can download and install a Transporter on Windows and Linux manually.
Hit Finish.
- The Transporter is deployed as a physical machine agent in this case.
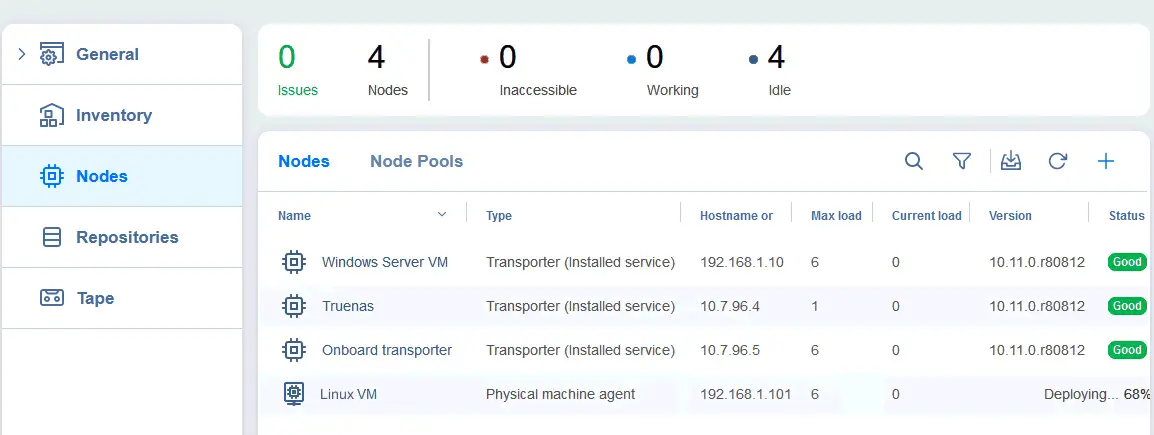
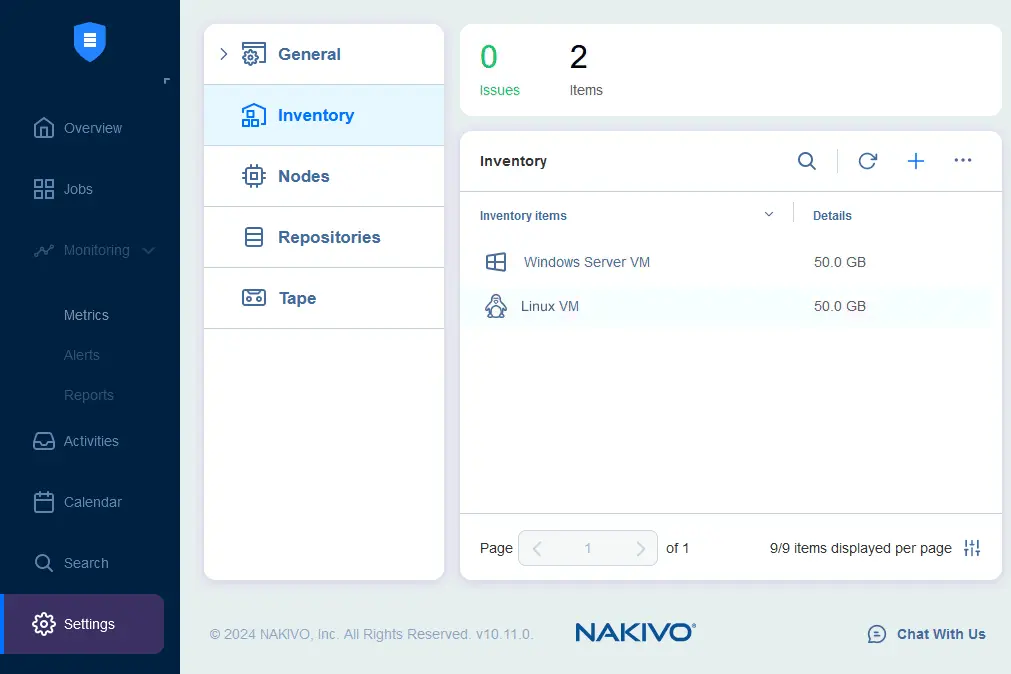
The Linux machine we want to back up has been added to the NAKIVO inventory.
NOTE: You can follow the same steps to add a Windows machine to the inventory. The only difference is that you have to select Microsoft Windows, and then enter the IP address and the credentials for connecting to the Windows machine at the Options step of the Add Inventory Item wizard.
At this point, two machines running on the Proxmox server have been added to the NAKIVO inventory. You can add more machines to protect to the inventory.
Creating a Backup Job
The workflow to create a backup job is identical for Linux and Windows VMs running on a Proxmox server.
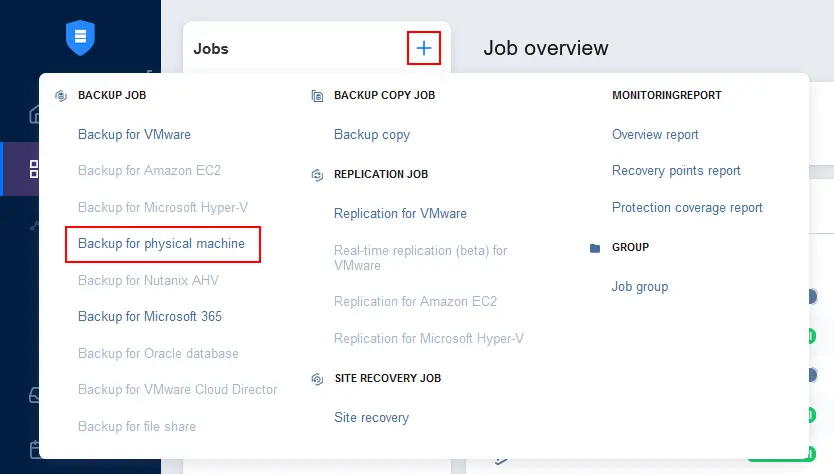
- Go to Jobs, click + and click Backup for physical machine.
- Select the Proxmox VM(s) you want to back up. We select the Linux VM in this example.

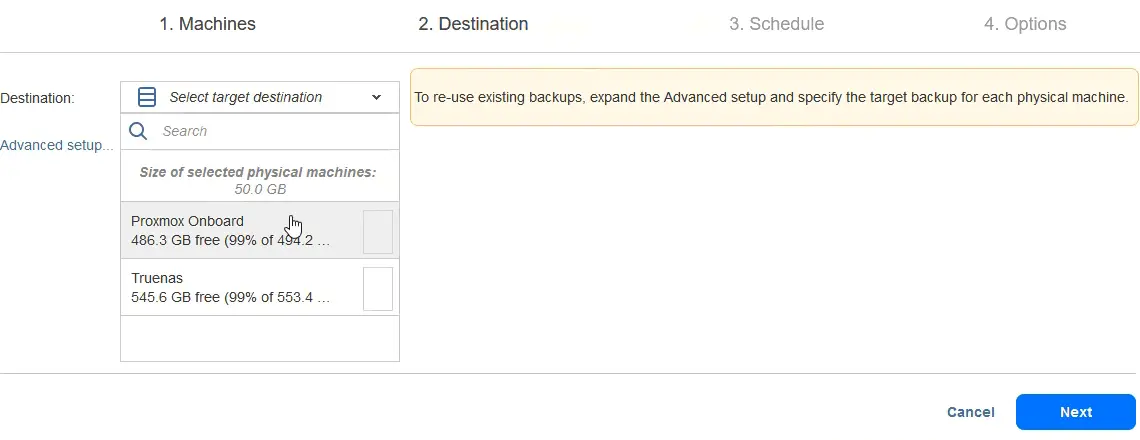
- Select the destination to store backups of the selected machine. We select the Proxmox Onboard backup repository. Then, we can create a backup copy job to a remote iSCSI repository on TrueNAS. Hit Next at each step to continue.
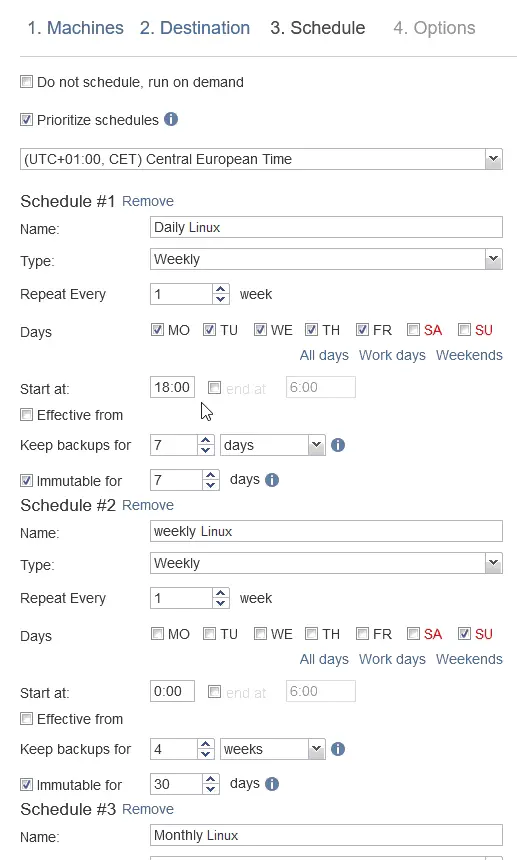
- Configure the schedule and retention settings or select to run the backup job on demand. We use a schedule based on the grandfather-father-son retention scheme.
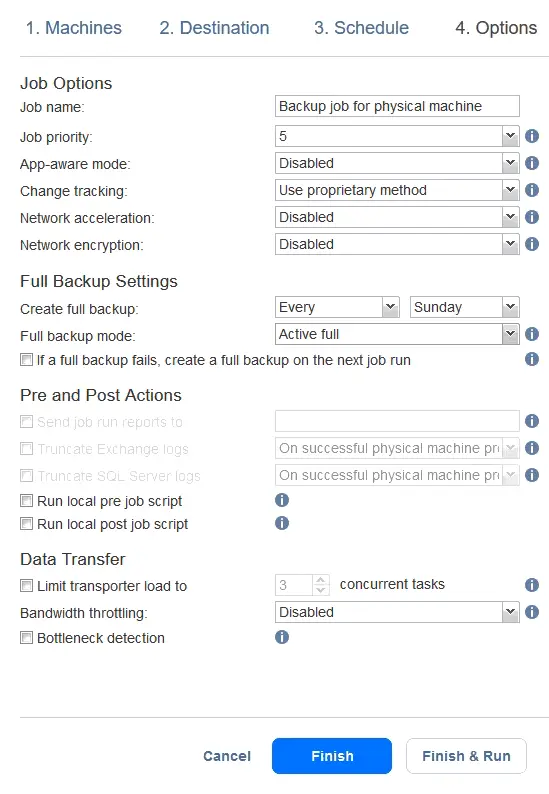
- Configure backup job options:
- Enter a job name.
- Change tracking – only the proprietary method can be selected to back up VM data on Proxmox.
- Select intervals to create a full backup and a full backup type.
Click Finish & Run.
- A confirmation message with job scope, scheduling, and retention is displayed when running a job manually. Click Run.

Similarly, you can create a backup job for a Windows VM. In our example, we have one backup job for a Linux VM and one backup job for a Windows Server VM.
Granular Recovery of Proxmox VM Data
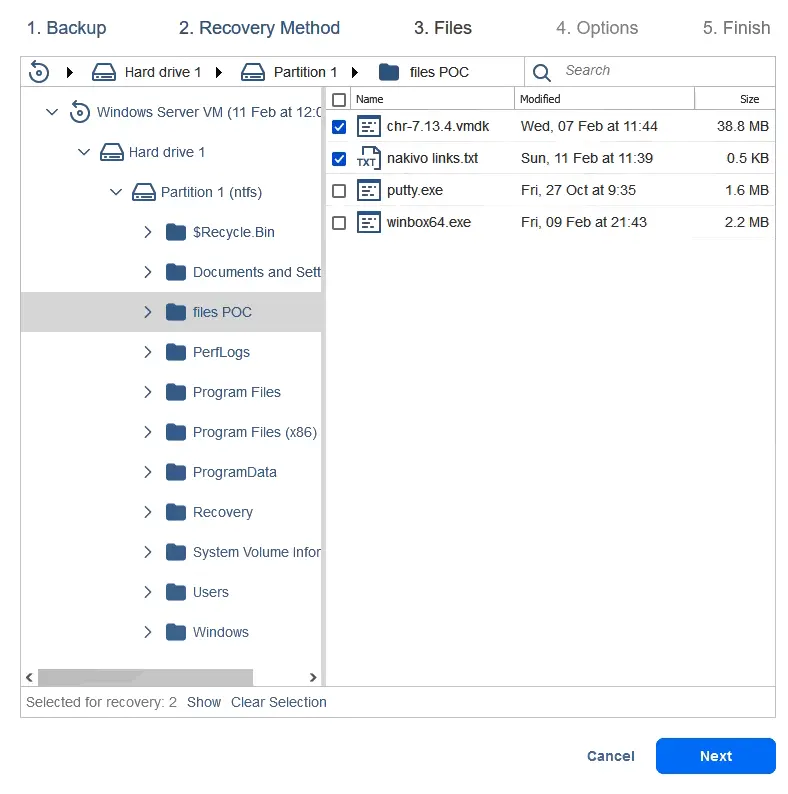
Suppose that you have lost a few files on the Windows VM. Let’s look at how to recover these particular files in the “C:\Files Poc\” directory of the VM by using the granular recovery functionality in NAKIVO Backup & Replication.
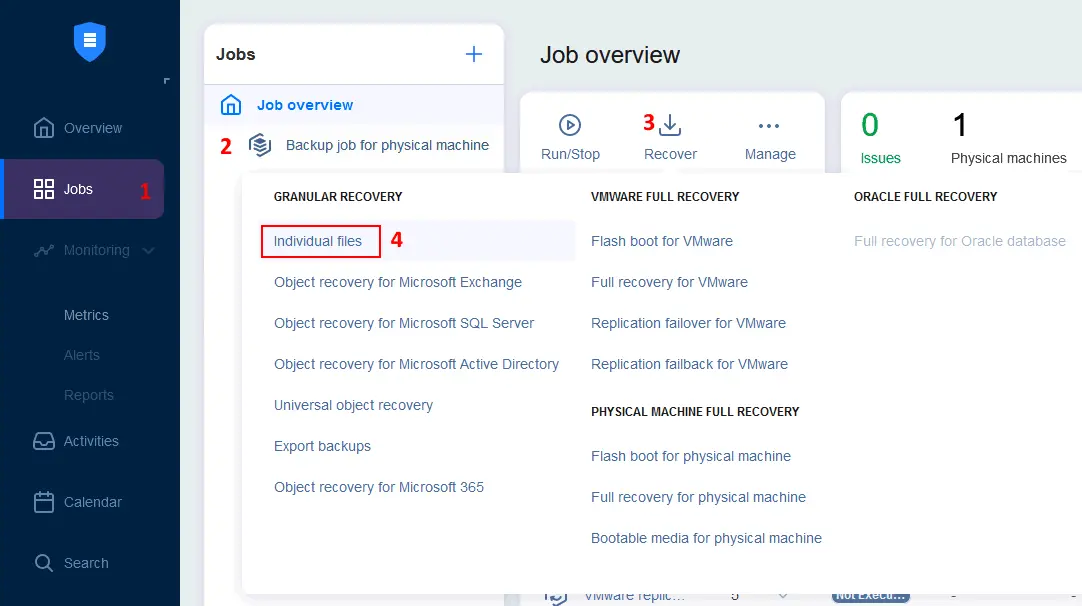
- Go to Jobs and select a backup job for your Proxmox Windows VM. Click Recover > Individual files.
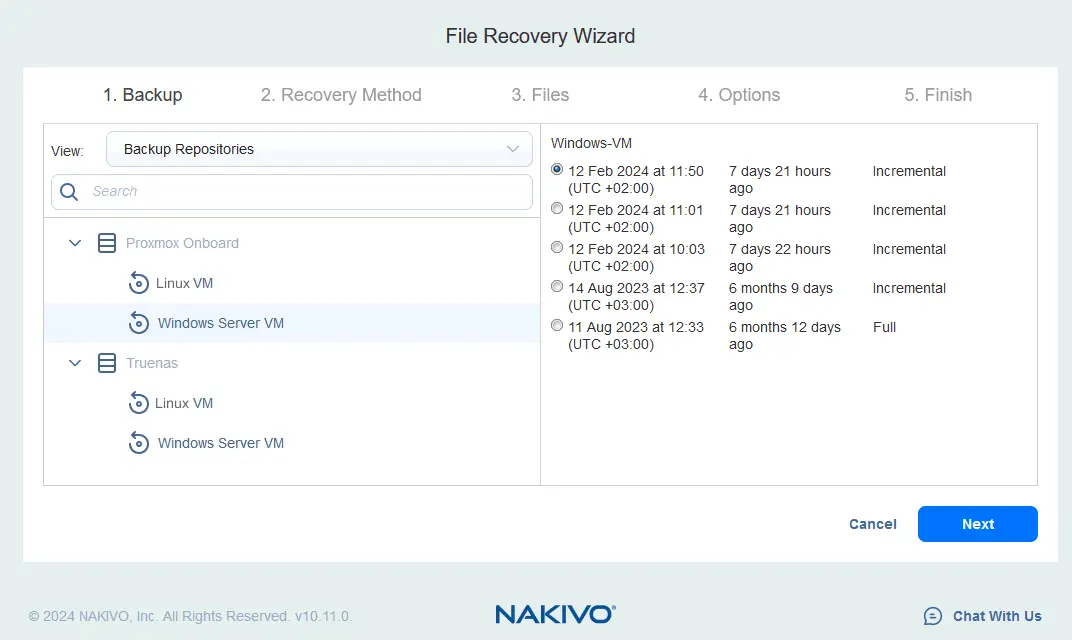
- You can select the Backup Repositories view instead of the Jobs & Groups view and select the needed backup. We select our Proxmox Windows Server VM backup on the onboard backup repository located on the Proxmox server. Click Next at each step of the recovery wizard to continue.
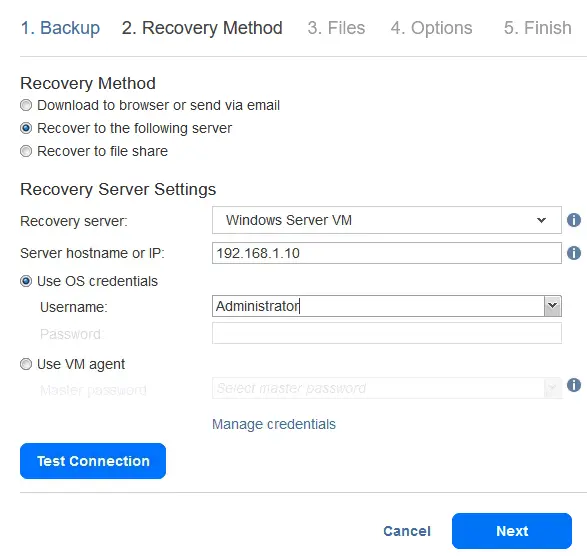
- Select a recovery method:
- Download to browser or send via email
- Recover to the following server
- Recover to file share
Let’s select the second option and recover our files to our Proxmox Windows Server VM.
- Select the Windows Server VM as the recovery server in the drop-down menu from the inventory.
- Enter the IP address of the machine to which to recover the needed files.
- Enter OS credentials of the account with administrative privileges
If the credentials are saved in the credentials store of NAKIVO Backup & Replication, you can select them from the list.
- Click Test connection.
Check that you meet the requirements for recovering files to the source machine.
If the connection test is successful, hit Next to continue.
- Wait until the NAKIVO solution displays the file system structure of the Proxmox VM by reading the backup data. Once the directory tree with files is displayed, go to the needed directory and select the files that you want to recover.
- Define the recovery options. Select Recover to original location, check the overwrite behavior, and click Recover.

Wait until the files have been recovered. You can see the progress of the recovery job on the Activities page. Then, you can check the recovered files in the original location on the Proxmox VM.
Full Recovery Using Bare Metal Restore
To fully recover Proxmox VM data to a VM, you can use the bare metal recovery functionality, which involves preparing a bootable ISO image with NAKIVO Backup & Replication, booting a Proxmox VM from this media, and connecting to the NAKIVO solution via the network.
For bare metal recovery, proceed as follows:
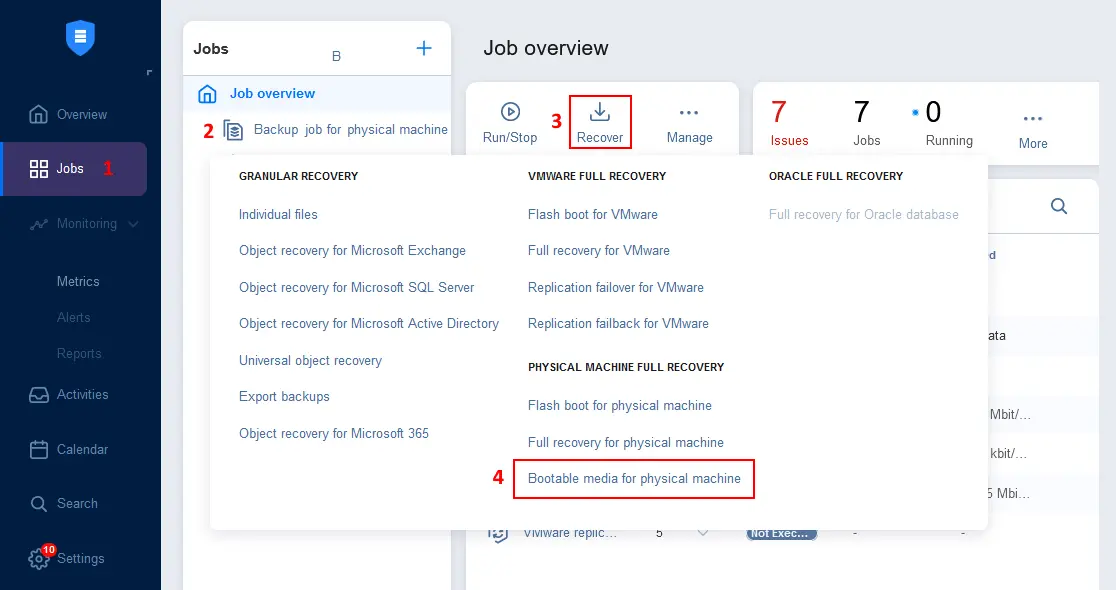
- Open the web interface of NAKIVO Backup & Replication. Go to Jobs, select the backup job you created for the Proxmox VM, click Recover, and hit Bootable media for physical machine.
- Select Get ISO (download to browser) in the Bootable Media creation wizard and hit Next.
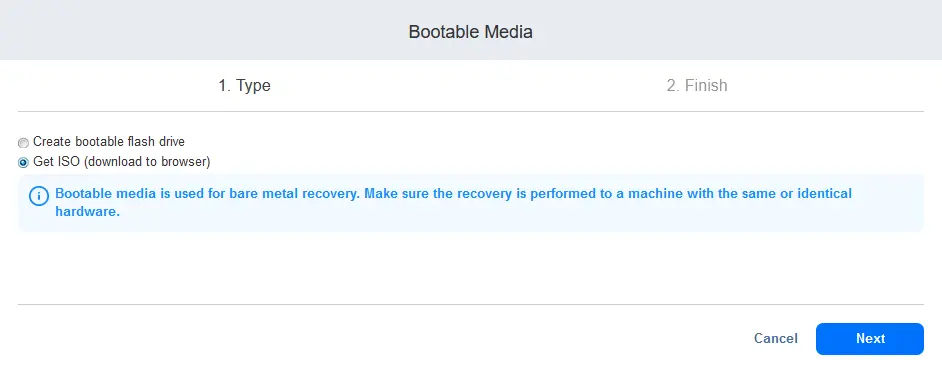
- Wait for the ISO image to be ready and save the file. The bootable image is based on Ubuntu Linux. You can see the IP address of the NAKIVO Backup & Replication Director in the name of the ISO file for more convenience, for example:
BMR appliance v10.11.0.80830 (192.168.101.211).iso
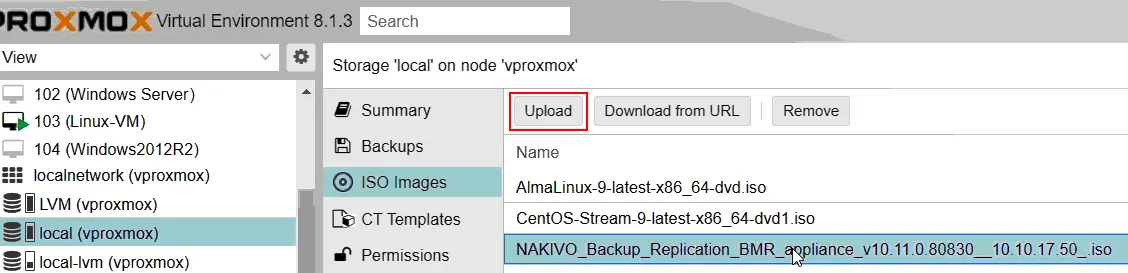
- Upload the ISO image of the NAKIVO rescue boot media to the Proxmox datastore as follows:
- Select the needed datastore in the left pane of the Proxmox web interface and select the ISO Images tab.
- Click Upload, select the BMR rescue appliance bootable ISO image, and confirm uploading.
- Select the Proxmox VM that you want to fully recover using the bare metal recovery method. Click Hardware and double-click CD/DVD Drive.
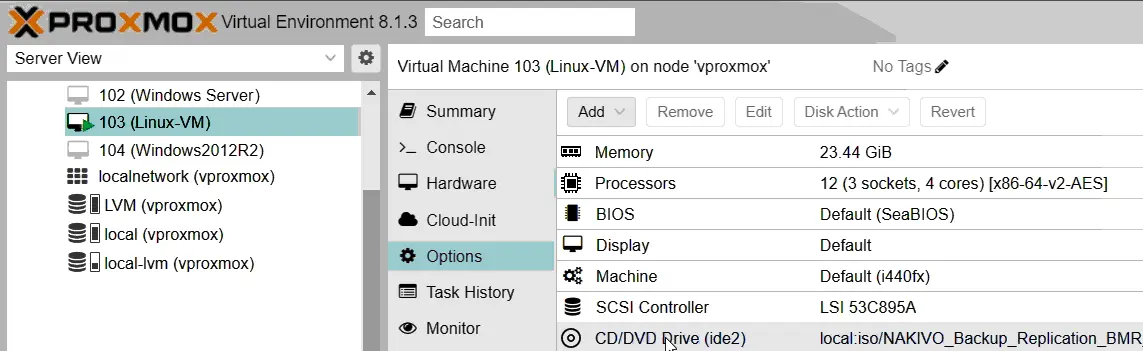
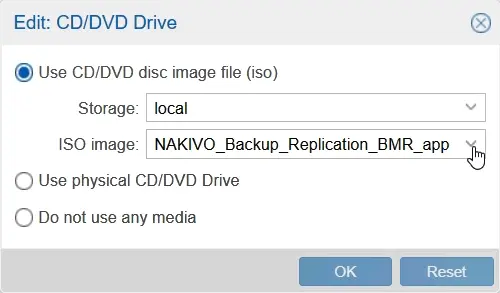
- In the CD/DVD Drive window that opens, select a datastore where the bare metal rescue ISO image file is located and select this ISO file. Hit OK to save settings.
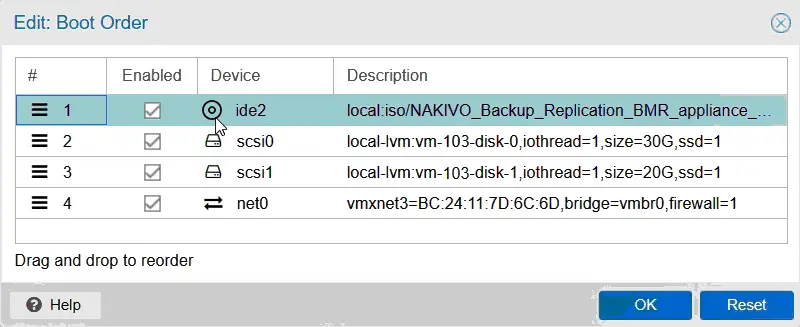
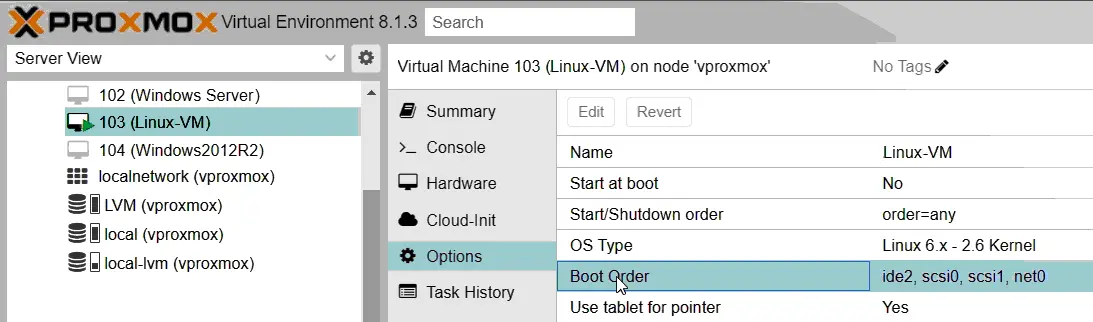
- Click Options of the VM you want to recover and double-click Boot Order to edit the VM boot order.
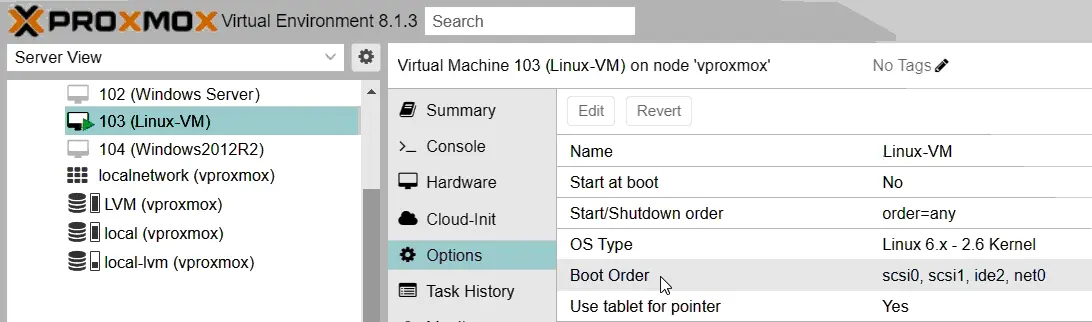
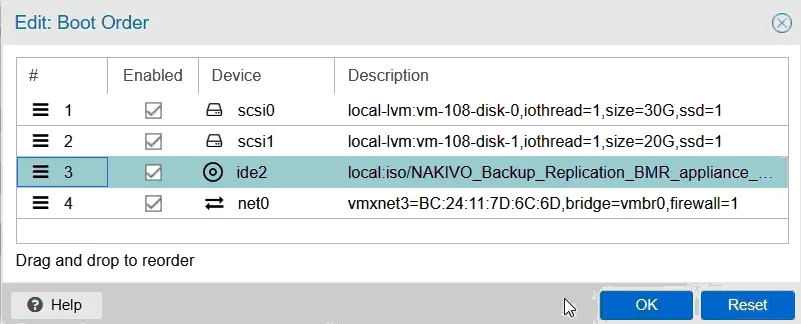
- Move the CD/DVD drive of the virtual machine to the first place in the boot order list to boot from the bootable ISO media. Hit OK to save settings.
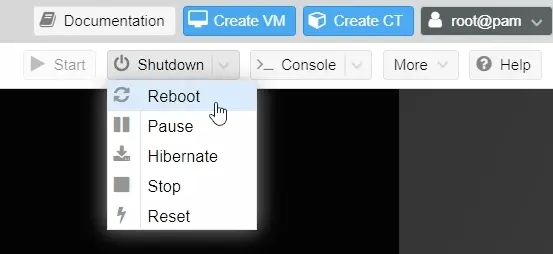
- Reboot the VM and boot from the bare metal bootable image.
- Once the Ubuntu operating system is booted from the live recovery media, open the VM console in the Proxmox web interface (to open the virtual monitor of the VM). Then, open Firefox, a web browser, in the VM.
- The tab with the link to the installed instance of NAKIVO Backup & Replication (that was used to create the bootable ISO image) opens by default in Firefox. Make sure that the URL entered in the web browser points to the NAKIVO Backup & Replication backup appliance (where the Director is running).
- Log in to the NAKIVO Backup & Replication web interface.
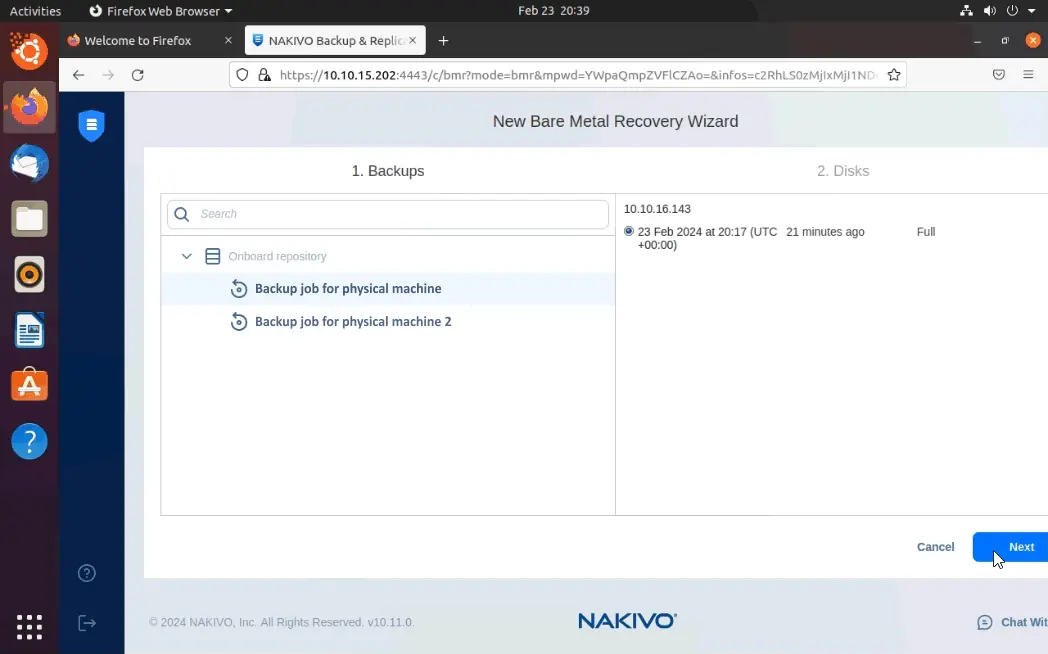
- Select a backup of your Proxmox VM and select a recovery point. Hit Next to continue.
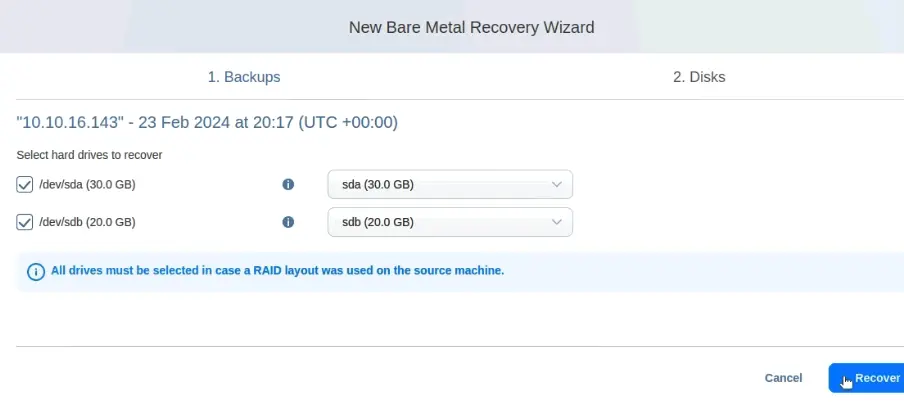
- Make sure that the disks from the backup match the target disks to recover (in our case, they are selected automatically). Click Recover.
- Wait until the full recovery is completed. When done, you should see the message:
Recovery was successful.
- Once you have finished the full recovery of the Proxmox VM data, the VM should boot from its own disk. Booting from the ISO recovery media is not needed anymore. You need to edit the boot order for the VM.
- Select your recovered VM in the Proxmox web interface, select Options, and double-click Boot Order.
- Move the virtual CD/DVD drive with the ISO image inserted into it to the bottom of the boot order list of the VM. Hit OK to save settings.
Reboot the virtual machine to boot in normal mode from a virtual disk after full data recovery.