오늘은 Android 앱에서 Android 토글 버튼 및 스위치에 대해 학습합니다. 앱에서 Switch 버튼 위젯과 ToggleButton 위젯을 논의하고 구현할 것입니다.
Android 토글 버튼
Android 토글 버튼은 버튼에 켜짐 및 꺼짐 상태를 표시하는 데 사용됩니다. Switch는 Android 4.0 이후 주로 사용되는 또 다른 유형의 토글 버튼입니다. Android Switch는 슬라이더 컨트롤을 제공합니다. ToggleButton과 Switch는 모두 CompoundButton 클래스의 하위 클래스입니다. ToggleButton을 정의하는 데 사용되는 XML 속성은 아래에 설명되어 있습니다.
android:disabledAlpha: 비활성화될 때 표시에 적용할 알파값android:textOff: 확인란이 선택되지 않은 경우 버튼에 대한 텍스트android:textOn: 확인란이 선택된 경우 버튼에 대한 텍스트
ToggleButton을 프로그래밍 방식으로 수정하려면 다음 메서드를 사용합니다.
CharSequence getTextOff(): 버튼이 선택되지 않은 상태일 때 텍스트를 반환합니다CharSequence getTextOn(): 버튼이 선택된 상태일 때 텍스트를 반환합니다void setChecked(boolean checked): 이 버튼의 선택 상태를 변경합니다
안드로이드 스위치
안드로이드 스위치 또는 SwitchCompat 위젯(AppCompat 라이브러리의 일부로, 안드로이드 API v7까지 하위 안드로이드 버전에 대한 역방향 호환성을 제공)은 일반적으로 전화 설정에서 볼 수 있는 사용자 정의 On-Off 슬라이더입니다. Android 스위치 위젯의 장점:
- 체크박스 및 라디오 버튼에 대한 최상의 대체재입니다.
- 구현에는 1분 미만이 소요됩니다.
- 많은 드로어블 및 기타 리소스를 사용할 필요가 없습니다.
SwitchCompat의 xml 레이아웃은 다음과 같습니다:
<android.support.v7.widget.SwitchCompat
        android:id="@+id/switchButton"
        android:layout_width="wrap_content"
        android:layout_height="wrap_content"
        android:textAppearance="?android:attr/textAppearanceMedium"
        android:text="Switch example"
        />
android:text는 슬라이더 스위치 버튼 옆에 텍스트를 표시하는 데 사용됩니다.
안드로이드 토글 버튼 및 스위치 예제
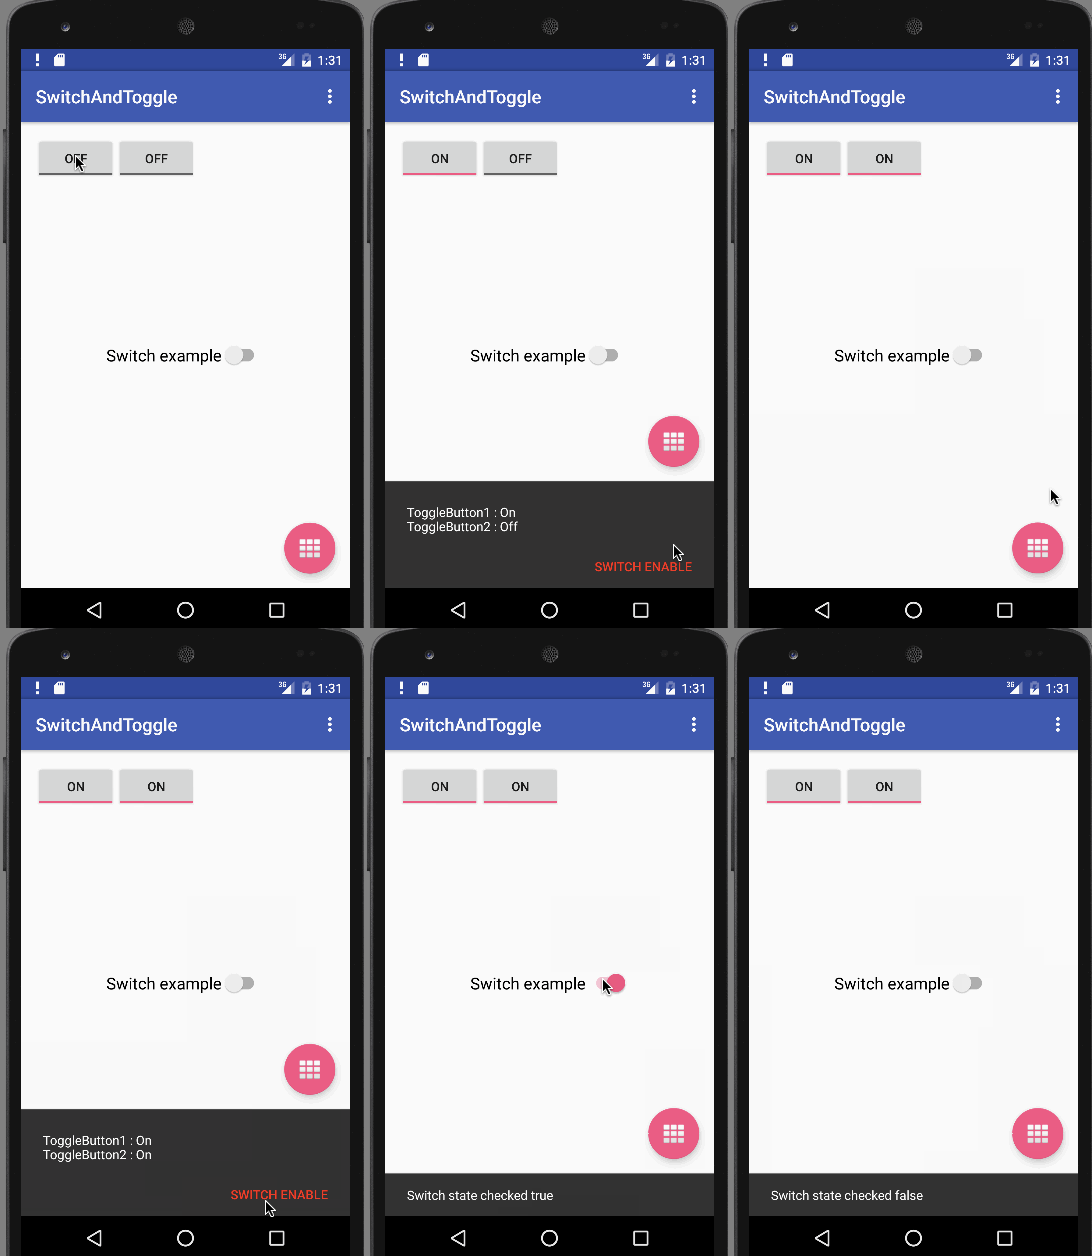
이 응용 프로그램에서는 두 개의 토글 버튼과 하나의 스위치 버튼을 표시합니다. 토글 버튼의 상태는 FloatingActionButton을 누를 때 SnackBar에 표시됩니다. 스위치 버튼의 상태는 스낵바의 작업 버튼을 클릭할 때마다 true로 변경됩니다. 또는 스위치를 슬라이딩하여 스낵바에 표시됩니다.
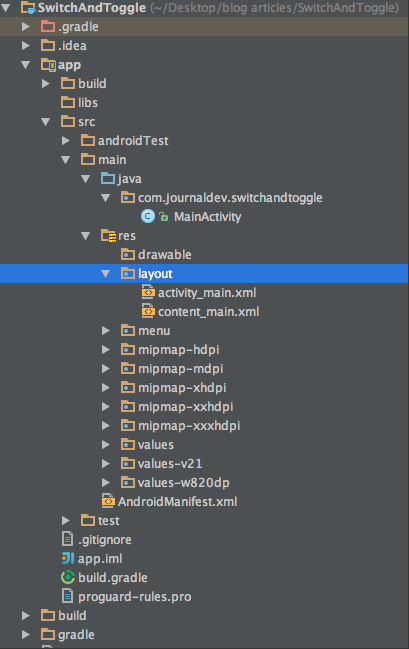
Android 토글 버튼 및 스위치 프로젝트 구조
Android 토글 버튼 코드
activity_main.xml은 동일한 상태로 유지됩니다. content_main.xml에는 기본적으로 false로 설정된 두 토글 버튼과 스위치가 포함되어 있습니다. 아래의 코드 스니펫에서 확인할 수 있습니다:
<?xml version="1.0" encoding="utf-8"?>
<RelativeLayout xmlns:android="https://schemas.android.com/apk/res/android"
    xmlns:app="https://schemas.android.com/apk/res-auto"
    xmlns:tools="https://schemas.android.com/tools"
    android:layout_width="match_parent"
    android:layout_height="match_parent"
    android:paddingBottom="@dimen/activity_vertical_margin"
    android:paddingLeft="@dimen/activity_horizontal_margin"
    android:paddingRight="@dimen/activity_horizontal_margin"
    android:paddingTop="@dimen/activity_vertical_margin"
    app:layout_behavior="@string/appbar_scrolling_view_behavior"
    tools:context="com.journaldev.switchandtoggle.MainActivity"
    tools:showIn="@layout/activity_main">

    <ToggleButton
        android:id="@+id/tb1"
        android:layout_width="wrap_content"
        android:layout_height="wrap_content"
        android:layout_alignParentLeft="true"
        android:layout_alignParentTop="true"
        android:text="ToggleButton 1"
        android:textOff="Off"
        android:textOn="On" />

    <ToggleButton
        android:id="@+id/tb2"
        android:layout_width="wrap_content"
        android:layout_height="wrap_content"
        android:layout_alignBaseline="@+id/tb1"
        android:layout_alignBottom="@+id/tb1"
        android:layout_toRightOf="@+id/tb1"
        android:text="ToggleButton 2"
        android:textOff="Off"
        android:textOn="On" />

    <android.support.v7.widget.SwitchCompat
        android:id="@+id/switchButton"
        android:layout_width="wrap_content"
        android:layout_centerInParent="true"
        android:checked="false"
        android:layout_height="wrap_content"
        android:textAppearance="?android:attr/textAppearanceMedium"
        android:text="Switch example"
        />


</RelativeLayout>
MainActivity.java는 다음과 같습니다:
package com.journaldev.switchandtoggle;

import android.graphics.Color;
import android.os.Bundle;
import android.support.design.widget.FloatingActionButton;
import android.support.design.widget.Snackbar;
import android.support.v7.app.AppCompatActivity;
import android.support.v7.widget.SwitchCompat;
import android.support.v7.widget.Toolbar;
import android.view.View;
import android.view.Menu;
import android.view.MenuItem;
import android.widget.CompoundButton;
import android.widget.ToggleButton;

public class MainActivity extends AppCompatActivity {

    ToggleButton tb1, tb2;
    SwitchCompat switchCompat;

    @Override
    protected void onCreate(Bundle savedInstanceState) {
        super.onCreate(savedInstanceState);
        setContentView(R.layout.activity_main);
        Toolbar toolbar = (Toolbar) findViewById(R.id.toolbar);
        setSupportActionBar(toolbar);

        FloatingActionButton fab = (FloatingActionButton) findViewById(R.id.fab);
        fab.setOnClickListener(new View.OnClickListener() {
            @Override
            public void onClick(View view) {

                StringBuilder result = new StringBuilder();
                result.append("ToggleButton1 : ").append(tb1.getText());
                result.append("\nToggleButton2 : ").append(tb2.getText());

               Snackbar snackbar= Snackbar.make(view, result.toString(), Snackbar.LENGTH_LONG)
                        .setAction("SWITCH ENABLE", new View.OnClickListener() {
                            @Override
                            public void onClick(View v) {
                                switchCompat.setChecked(true);
                            }
                        });

                snackbar.setActionTextColor(Color.RED);
                snackbar.show();
            }
        });

        tb1= (ToggleButton)findViewById(R.id.tb1);
        tb2=(ToggleButton)findViewById(R.id.tb2);
        switchCompat=(SwitchCompat)findViewById(R.id.switchButton);

        switchCompat.setOnCheckedChangeListener(new CompoundButton.OnCheckedChangeListener() {
            @Override
            public void onCheckedChanged(CompoundButton buttonView, boolean isChecked) {

                Snackbar.make(buttonView, "Switch state checked "+isChecked, Snackbar.LENGTH_LONG)
                        .setAction("ACTION",null).show();
            }
        });


    }

    @Override
    public boolean onCreateOptionsMenu(Menu menu) {
        // 메뉴를 팽창시킵니다. 이것은 작업 표시줄에 항목을 추가합니다(있는 경우).
        getMenuInflater().inflate(R.menu.menu_main, menu);
        return true;
    }

    @Override
    public boolean onOptionsItemSelected(MenuItem item) {
        // 여기서 작업 표시줄 항목 클릭을 처리합니다. 작업 표시줄은
        // Home/Up 버튼에 대한 클릭을 자동으로 처리합니다.
        // AndroidManifest.xml에서 부모 활동을 지정하는 한.
        int id = item.getItemId();

        //noinspection SimplifiableIfStatement
        if (id == R.id.action_settings) {
            return true;
        }

        return super.onOptionsItemSelected(item);
    }
}
A String builder is used to get the current state of the toggle buttons and append them to display in the snackbar. Switch button being a subclass of Compound Button, an OnCheckChangeListener is implemented as shown in the code above. The output below is the app in action.  This brings an end to android toggle button and switch in android tutorial. You can download the final Android SwitchAndToggle Project from the link below.
Source:
https://www.digitalocean.com/community/tutorials/android-toggle-button-switch-example


