오늘은 Android Floating Action Button에 대해 배우겠습니다. 우리는 FloatingActionButton을 다룰 것이며, 이는 Material Design 가이드라인에 포함된 새로운 구성 요소입니다. 또한 SnackBar에 대해서도 다룰 것입니다. 이는 Toast의 Material Design 대체품입니다.
Android Floating Action Button
Android Floating Action Button은 화면에서 가장 중요한 기능에 강조를 줄 때 사용됩니다. 이는 사용자의 관심을 끌기 위한 멋진 스타일의 방법입니다.
Android Floating Action Button 개요
프로젝트에서 Material Design 위젯을 사용하려면 다음 종속성을 build.gradle 파일에 컴파일해야 합니다. 아래에 표시된대로요.
compile 'com.android.support:design:23.1.1'
FloatingActionButton 위젯은 다음과 같이 xml 레이아웃에서 정의됩니다.
<android.support.design.widget.FloatingActionButton
      android:id="@+id/fab"
      android:layout_width="wrap_content"
      android:layout_height="wrap_content"
      android:src="@android:drawable/ic_dialog_email"
      android:layout_gravity="bottom|end"
      app:elevation="6dp"
      app:pressedTranslationZ="12dp"/>
위에서 정의된 xml 레이아웃에서 관찰된 몇 가지 사항은 다음과 같습니다:
- FloatingActionButton은 ImageView 클래스를 확장합니다. 이는 정의된
android:src속성에서 확인할 수 있습니다. - 위의 xml 레이아웃에서는 elevation 속성을 사용하여 버튼 위에 그림자를 만들고, pressedTranslationZ는 눌렸을 때 그림자가 커지도록 합니다.
A FloatingActionButton is placed within a CoordinatorLayout. A CoordinatorLayout helps facilitate interactions between views contained within it, which will be useful later to describe how to animate the button depending on scroll changes. SnackBar is a more enhanced widget when compared to a Toast. A SnackBar is invoked as follows:
Snackbar.make(view, "Replace with your own action", Snackbar.LENGTH_LONG)
                        .setAction("Action", null).show();
우리는 다른 튜토리얼에서 SnackBar에 대해 자세히 논의했습니다. 중요한 참고: 안드로이드 튜토리얼을 잘 따라오셨다면, 새로운 빌드 도구 업데이트인 23.1.1로 인해 새로운 빈 프로젝트의 프로젝트 구조가 변경되었고, 위에서 언급한 위젯들이 새로운 안드로이드 스튜디오 프로젝트에 기본적으로 포함되어 있음을 알아차리셨을 것입니다. 따라서 위에서 언급한 위젯들을 구현하는 대신, 새로운 프로젝트 구조에 대해 간단히 살펴보겠습니다.
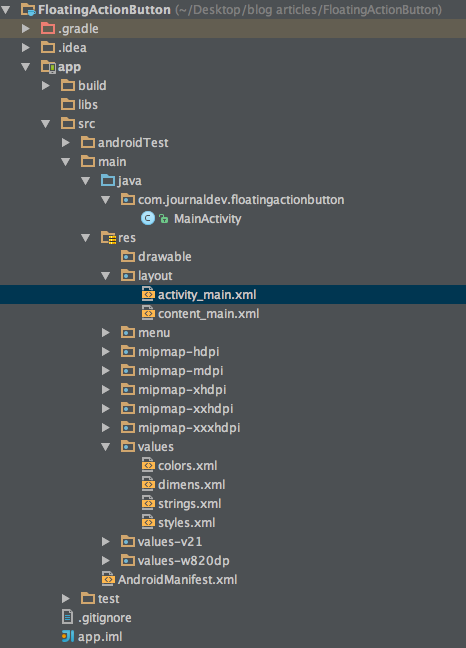
Android Floating Action Button 예제 프로젝트 구조
 보시다시피,
 content_main.xml이라는 새로운 xml 레이아웃 파일이 추가되었습니다. 이전의 activity_main.xml과 동일합니다.
Android Floating Action Button 예제
새로운 activity_main.xml은 아래와 같이 제공됩니다:
<?xml version="1.0" encoding="utf-8"?>
<android.support.design.widget.CoordinatorLayout xmlns:android="https://schemas.android.com/apk/res/android"
    xmlns:app="https://schemas.android.com/apk/res-auto"
    xmlns:tools="https://schemas.android.com/tools"
    android:layout_width="match_parent"
    android:layout_height="match_parent"
    android:fitsSystemWindows="true"
    tools:context="com.journaldev.floatingactionbutton.MainActivity">

    <android.support.design.widget.AppBarLayout
        android:layout_width="match_parent"
        android:layout_height="wrap_content"
        android:theme="@style/AppTheme.AppBarOverlay">

        <android.support.v7.widget.Toolbar
            android:id="@+id/toolbar"
            android:layout_width="match_parent"
            android:layout_height="?attr/actionBarSize"
            android:background="?attr/colorPrimary"
            app:popupTheme="@style/AppTheme.PopupOverlay" />

    </android.support.design.widget.AppBarLayout>

    <include layout="@layout/content_main" />

    <android.support.design.widget.FloatingActionButton
        android:id="@+id/fab"
        android:layout_width="wrap_content"
        android:layout_height="wrap_content"
        android:layout_gravity="bottom|end"
        android:layout_margin="@dimen/fab_margin"
        android:src="@android:drawable/ic_dialog_email" />

</android.support.design.widget.CoordinatorLayout>
A toolbar is added by default as a replacement of an ActionBar. It’s added inside an AppBarLayout which is a direct child of CoordinatorLayout The AppBarLayout is used to achieve various scrolling behaviours such as collapse, flex space, and quick return. The MainActivity.java is defined as given below:
package com.journaldev.floatingactionbutton;

import android.os.Bundle;
import android.support.design.widget.FloatingActionButton;
import android.support.design.widget.Snackbar;
import android.support.v7.app.AppCompatActivity;
import android.support.v7.widget.Toolbar;
import android.view.View;
import android.view.Menu;
import android.view.MenuItem;

public class MainActivity extends AppCompatActivity {

    @Override
    protected void onCreate(Bundle savedInstanceState) {
        super.onCreate(savedInstanceState);
        setContentView(R.layout.activity_main);
        Toolbar toolbar = (Toolbar) findViewById(R.id.toolbar);
        setSupportActionBar(toolbar);

        FloatingActionButton fab = (FloatingActionButton) findViewById(R.id.fab);
        fab.setOnClickListener(new View.OnClickListener() {
            @Override
            public void onClick(View view) {
                Snackbar.make(view, "Replace with your own action", Snackbar.LENGTH_LONG)
                        .setAction("Action", null).show();
            }
        });
    }

    @Override
    public boolean onCreateOptionsMenu(Menu menu) {
        // 메뉴를 인플레이트합니다; 이렇게 하면 작업 표시줄에 항목이 추가됩니다.
        getMenuInflater().inflate(R.menu.menu_main, menu);
        return true;
    }

    @Override
    public boolean onOptionsItemSelected(MenuItem item) {
        // 여기에서 작업 표시줄 항목 클릭을 처리합니다. 작업 표시줄은
        // AndroidManifest.xml에서 부모 활동을 지정하는 한 홈/위 버튼 클릭을
        // 자동으로 처리합니다.
        int id = item.getItemId();

        //noinspection SimplifiableIfStatement
        if (id == R.id.action_settings) {
            return true;
        }

        return super.onOptionsItemSelected(item);
    }
}
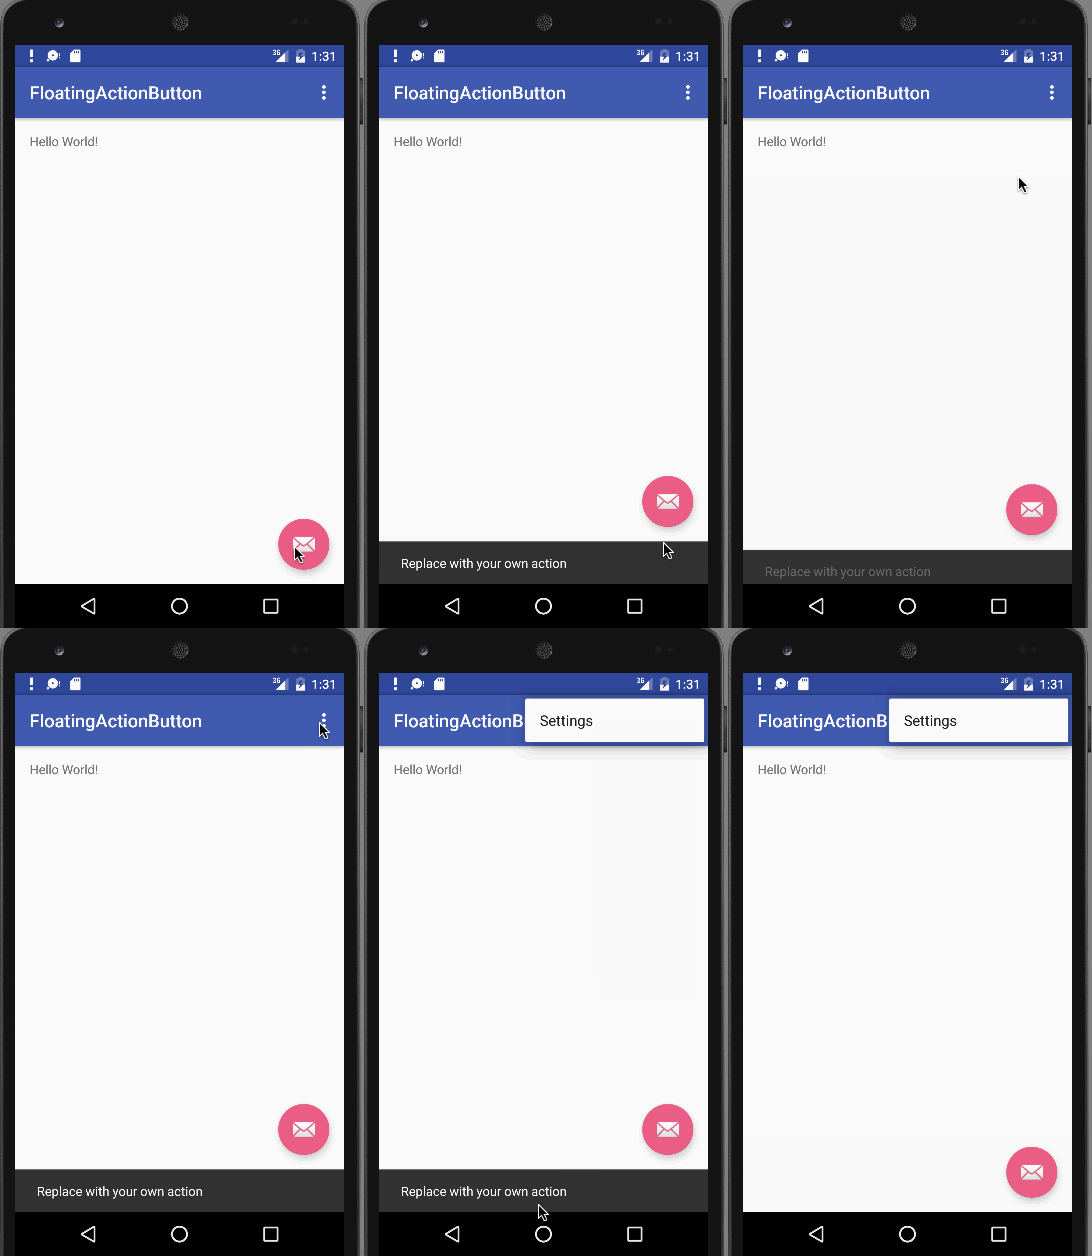
A new attribute is added to the application tag inside the AndroidManifest.xml named android:supportsRtl="true". This enables right to left layouts in the application. Running this default application produces an output like below:  As you can see, on clicking the floating action button, a SnackBar is displayed. This brings an end to this tutorial. You can create a new project in Android Studio and run it to see these features. Note: Make sure that you’re using the latest build tools. Reference: Android Reference Doc
Source:
https://www.digitalocean.com/community/tutorials/android-floating-action-button-example-tutorial


