今日は、AndroidアプリでのAndroidトグルボタンとスイッチについて学びます。アプリケーションにスイッチボタンウィジェットとToggleButtonウィジェットを実装して説明します。
Androidトグルボタン
Androidトグルボタンは、ボタン上でオンとオフの状態を表示するために使用されます。スイッチはAndroid 4.0以降で主に使用されるもう一つのトグルボタンのタイプです。Androidスイッチはスライダーコントロールを提供します。ToggleButtonとSwitchは、CompoundButtonクラスのサブクラスです。ToggleButtonを定義するために使用されるXML属性は以下の通りです。
android:disabledAlpha: 無効時に適用するインジケータの透明度android:textOff: ボタンがチェックされていないときのテキストandroid:textOn: ボタンがチェックされているときのテキスト
ToggleButtonをプログラムで変更するためには、以下のメソッドが使用されます。
CharSequence getTextOff(): ボタンがチェックされていない状態のテキストを返しますCharSequence getTextOn(): ボタンがチェックされている状態のテキストを返しますvoid setChecked(boolean checked): このボタンのチェック状態を変更します
Androidスイッチ
AndroidスイッチまたはSwitchCompatウィジェット(AppCompatライブラリの一部であり、Android API v7までの下位Androidバージョンに対して後方互換性を提供する)は、電話の設定でよく見られるカスタムのオンオフスライダーです。Androidスイッチウィジェットの利点:
- チェックボックスやラジオボタンの最適な代替です。
- 実装には1分未満しかかかりません。
- 多くのドローアブルやその他のリソースを使用する必要はありません。
SwitchCompatのXMLレイアウトは以下のようになります:
<android.support.v7.widget.SwitchCompat
        android:id="@+id/switchButton"
        android:layout_width="wrap_content"
        android:layout_height="wrap_content"
        android:textAppearance="?android:attr/textAppearanceMedium"
        android:text="Switch example"
        />
android:textは、スライダースイッチボタンの横にテキストを表示するために使用されます。
Androidトグルボタンとスイッチの例
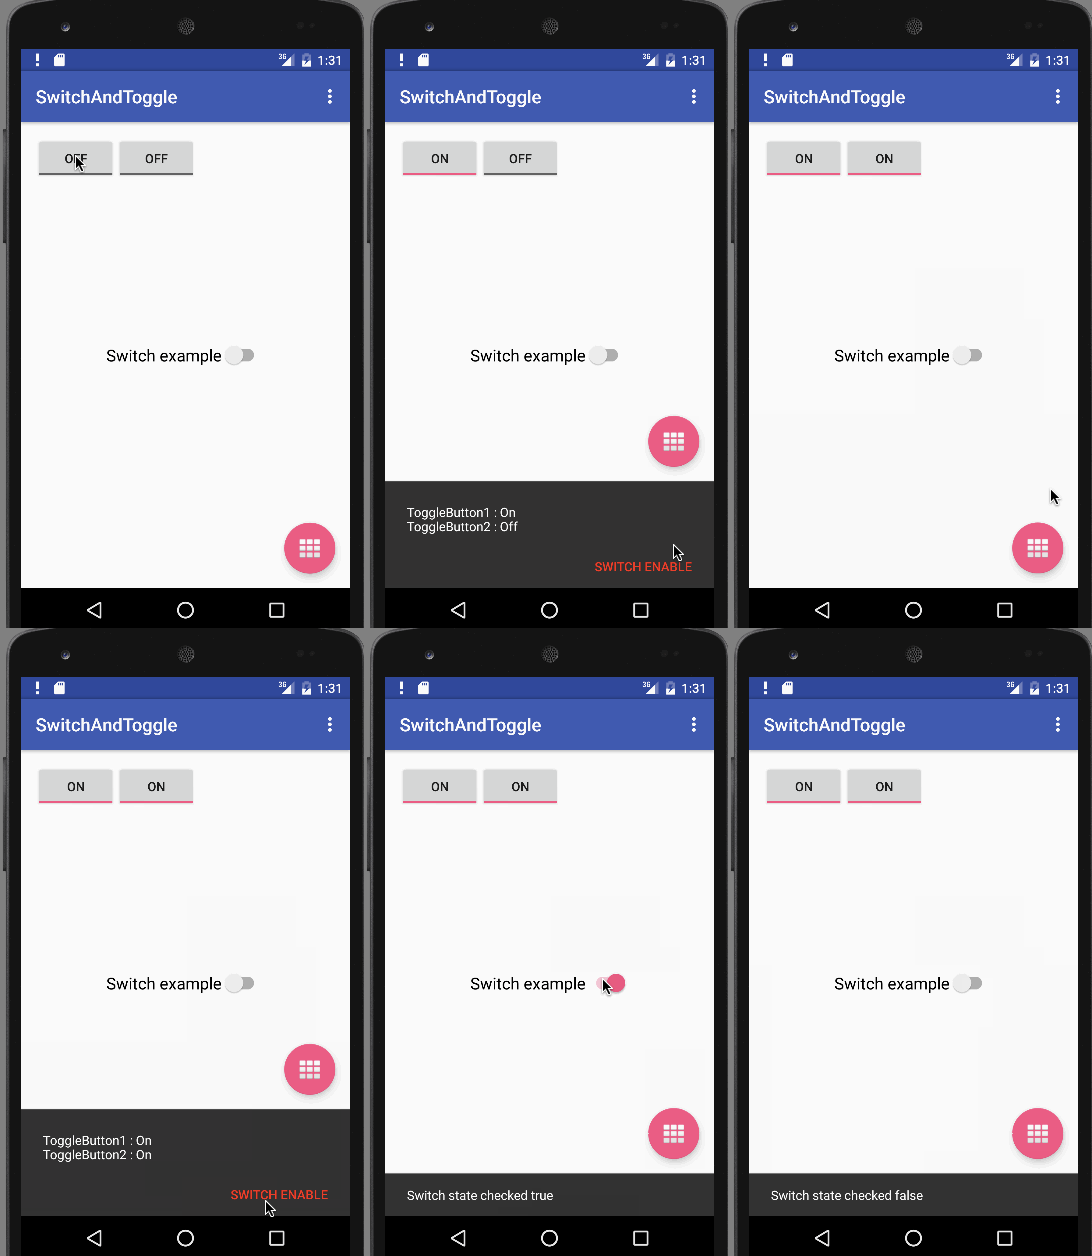
このアプリケーションでは、2つのトグルボタンと1つのスイッチボタンを表示します。トグルボタンの状態は、FloatingActionButtonが押されたときにSnackBarに表示されます。スイッチボタンの状態は、スナックバーのアクションボタンをクリックするとtrueに変更されます。または、スイッチをスライドしてスナックバーに状態が表示されます。
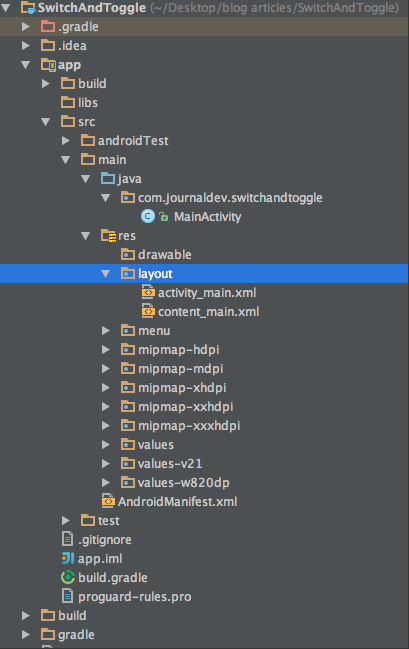
Androidのトグルボタンとスイッチのプロジェクト構造
Androidのトグルボタンのコード
activity_main.xmlは変わりません。 content_main.xmlには、デフォルトでfalseに設定された2つのトグルボタンとスイッチが含まれています。以下のコードスニペットを参照してください:
<?xml version="1.0" encoding="utf-8"?>
<RelativeLayout xmlns:android="https://schemas.android.com/apk/res/android"
    xmlns:app="https://schemas.android.com/apk/res-auto"
    xmlns:tools="https://schemas.android.com/tools"
    android:layout_width="match_parent"
    android:layout_height="match_parent"
    android:paddingBottom="@dimen/activity_vertical_margin"
    android:paddingLeft="@dimen/activity_horizontal_margin"
    android:paddingRight="@dimen/activity_horizontal_margin"
    android:paddingTop="@dimen/activity_vertical_margin"
    app:layout_behavior="@string/appbar_scrolling_view_behavior"
    tools:context="com.journaldev.switchandtoggle.MainActivity"
    tools:showIn="@layout/activity_main">

    <ToggleButton
        android:id="@+id/tb1"
        android:layout_width="wrap_content"
        android:layout_height="wrap_content"
        android:layout_alignParentLeft="true"
        android:layout_alignParentTop="true"
        android:text="ToggleButton 1"
        android:textOff="Off"
        android:textOn="On" />

    <ToggleButton
        android:id="@+id/tb2"
        android:layout_width="wrap_content"
        android:layout_height="wrap_content"
        android:layout_alignBaseline="@+id/tb1"
        android:layout_alignBottom="@+id/tb1"
        android:layout_toRightOf="@+id/tb1"
        android:text="ToggleButton 2"
        android:textOff="Off"
        android:textOn="On" />

    <android.support.v7.widget.SwitchCompat
        android:id="@+id/switchButton"
        android:layout_width="wrap_content"
        android:layout_centerInParent="true"
        android:checked="false"
        android:layout_height="wrap_content"
        android:textAppearance="?android:attr/textAppearanceMedium"
        android:text="Switch example"
        />


</RelativeLayout>
MainActivity.javaは以下のようになります:
package com.journaldev.switchandtoggle;

import android.graphics.Color;
import android.os.Bundle;
import android.support.design.widget.FloatingActionButton;
import android.support.design.widget.Snackbar;
import android.support.v7.app.AppCompatActivity;
import android.support.v7.widget.SwitchCompat;
import android.support.v7.widget.Toolbar;
import android.view.View;
import android.view.Menu;
import android.view.MenuItem;
import android.widget.CompoundButton;
import android.widget.ToggleButton;

public class MainActivity extends AppCompatActivity {

    ToggleButton tb1, tb2;
    SwitchCompat switchCompat;

    @Override
    protected void onCreate(Bundle savedInstanceState) {
        super.onCreate(savedInstanceState);
        setContentView(R.layout.activity_main);
        Toolbar toolbar = (Toolbar) findViewById(R.id.toolbar);
        setSupportActionBar(toolbar);

        FloatingActionButton fab = (FloatingActionButton) findViewById(R.id.fab);
        fab.setOnClickListener(new View.OnClickListener() {
            @Override
            public void onClick(View view) {

                StringBuilder result = new StringBuilder();
                result.append("ToggleButton1 : ").append(tb1.getText());
                result.append("\nToggleButton2 : ").append(tb2.getText());

               Snackbar snackbar= Snackbar.make(view, result.toString(), Snackbar.LENGTH_LONG)
                        .setAction("SWITCH ENABLE", new View.OnClickListener() {
                            @Override
                            public void onClick(View v) {
                                switchCompat.setChecked(true);
                            }
                        });

                snackbar.setActionTextColor(Color.RED);
                snackbar.show();
            }
        });

        tb1= (ToggleButton)findViewById(R.id.tb1);
        tb2=(ToggleButton)findViewById(R.id.tb2);
        switchCompat=(SwitchCompat)findViewById(R.id.switchButton);

        switchCompat.setOnCheckedChangeListener(new CompoundButton.OnCheckedChangeListener() {
            @Override
            public void onCheckedChanged(CompoundButton buttonView, boolean isChecked) {

                Snackbar.make(buttonView, "Switch state checked "+isChecked, Snackbar.LENGTH_LONG)
                        .setAction("ACTION",null).show();
            }
        });


    }

    @Override
    public boolean onCreateOptionsMenu(Menu menu) {
        // メニューをインフレートする。これにより、アクションバーにアイテムが追加される。
        getMenuInflater().inflate(R.menu.menu_main, menu);
        return true;
    }

    @Override
    public boolean onOptionsItemSelected(MenuItem item) {
        // アクションバーのアイテムクリックを処理する。アクションバーは自動的に
        // ホーム/アップボタンのクリックを処理しますので、
        // AndroidManifest.xmlで親アクティビティを指定する限り。
        int id = item.getItemId();

        //noinspection SimplifiableIfStatement
        if (id == R.id.action_settings) {
            return true;
        }

        return super.onOptionsItemSelected(item);
    }
}
A String builder is used to get the current state of the toggle buttons and append them to display in the snackbar. Switch button being a subclass of Compound Button, an OnCheckChangeListener is implemented as shown in the code above. The output below is the app in action.  This brings an end to android toggle button and switch in android tutorial. You can download the final Android SwitchAndToggle Project from the link below.
Source:
https://www.digitalocean.com/community/tutorials/android-toggle-button-switch-example


