지금까지 우리는 RecyclerView 내에서 동일한 유형의 뷰를 표시해 왔습니다. 이번 튜토리얼에서는 RecyclerView 내에서 이질적인 레이아웃을 구현할 것입니다.
RecyclerView
이질적인 레이아웃을 가진 RecyclerView는 섹션 헤더 및 세부 정보를 표시하는 데 일반적으로 사용됩니다(둘 다 다른 레이아웃이 필요하기 때문에 다른 뷰 유형이 필요합니다). 또한 텍스트, 이미지, GIF, 비디오 등과 같이 다른 유형에 대해 별도의 뷰를 표시하는 뉴스 피드 응용 프로그램(예: Facebook, Instagram)에서 사용됩니다. 이러한 각각은 RecyclerView 내에서 다른 레이아웃 유형이 필요합니다. 또한 NavigationDrawer에서 헤더를 나머지 섹션과 분리하는 데 사용됩니다. 시간을 낭비하지 않고 우리의 애플리케이션에 구현해 봅시다.
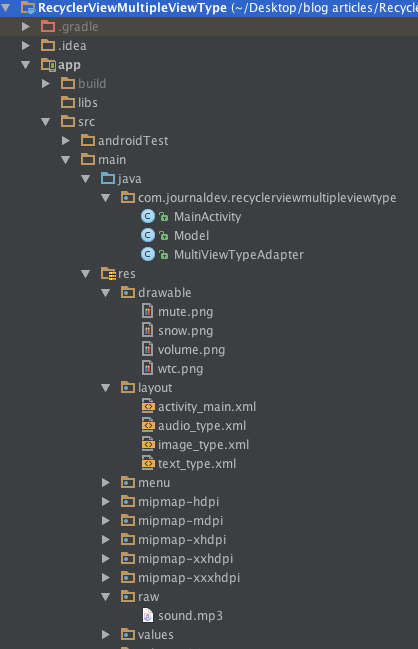
Android RecyclerView 다중 뷰 유형 프로젝트 구조
우리는 텍스트, 이미지, 오디오의 세 가지 보기 유형을 구현할 것입니다. 각각은 세 가지 다른 레이아웃에서 확장됩니다. 각각은 어댑터 클래스에서 지정된 자체 구현을 갖습니다. 
코드
우리의 activity_main.xml에는 CoordinatorLayout이 루트로 포함되어 있으며 RecyclerView가 하위 뷰로 작동합니다.
<?xml version="1.0" encoding="utf-8"?>
<android.support.design.widget.CoordinatorLayout xmlns:android="https://schemas.android.com/apk/res/android"
    xmlns:app="https://schemas.android.com/apk/res-auto"
    xmlns:tools="https://schemas.android.com/tools"
    android:layout_width="match_parent"
    android:layout_height="match_parent"
    android:fitsSystemWindows="true"
    tools:context="com.journaldev.recyclerviewmultipleviewtype.MainActivity">

    <android.support.design.widget.AppBarLayout
        android:layout_width="match_parent"
        android:layout_height="wrap_content"
        android:theme="@style/AppTheme.AppBarOverlay">

        <android.support.v7.widget.Toolbar
            android:id="@+id/toolbar"
            android:layout_width="match_parent"
            android:layout_height="?attr/actionBarSize"
            android:background="?attr/colorPrimary"
            app:popupTheme="@style/AppTheme.PopupOverlay" />

    </android.support.design.widget.AppBarLayout>

    <android.support.v7.widget.RecyclerView
        android:id="@+id/recyclerView"
        android:layout_width="match_parent"
        app:layout_behavior="@string/appbar_scrolling_view_behavior"
        android:layout_height="match_parent" />


</android.support.design.widget.CoordinatorLayout>
RecyclerView 내부의 app:layout_behavior="@string/appbar_scrolling_view_behavior" 라인에 유의하십시오. 이를 제거하면 RecyclerView가 전체 화면을 스크롤하여 AppBarLayout과 겹치게 됩니다. 어댑터에서 데이터를 채우는 Model.java 클래스는 아래에 제공됩니다
public class Model {

    public static final int TEXT_TYPE=0;
    public static final int IMAGE_TYPE=1;
    public static final int AUDIO_TYPE=2;

    public int type;
    public int data;
    public String text;

    public Model(int type, String text, int data)
    {
        this.type=type;
        this.data=data;
        this.text=text;
    }
}
세 가지 데이터 유형으로 구성되어 있습니다.
int type은 보기 유형 상수를 보유합니다.String text에는 TextView에 표시될 문자열이 포함됩니다.int data변수는 채우게 될 해당 데이터를 저장하는 데 사용됩니다. 이상적으로는 drawable 또는 raw 타입 리소스가 포함됩니다.
MainActivity.java 클래스는 아래에 제공됩니다
package com.journaldev.recyclerviewmultipleviewtype;

import android.os.Bundle;
import android.support.v7.app.AppCompatActivity;
import android.support.v7.widget.DefaultItemAnimator;
import android.support.v7.widget.LinearLayoutManager;
import android.support.v7.widget.OrientationHelper;
import android.support.v7.widget.RecyclerView;
import android.support.v7.widget.Toolbar;
import java.util.ArrayList;

public class MainActivity extends AppCompatActivity {

    @Override
    protected void onCreate(Bundle savedInstanceState) {
        super.onCreate(savedInstanceState);
        setContentView(R.layout.activity_main);
        Toolbar toolbar = (Toolbar) findViewById(R.id.toolbar);
        setSupportActionBar(toolbar);

        ArrayList<Model> list= new ArrayList();
        list.add(new Model(Model.TEXT_TYPE,"Hello. This is the Text-only View Type. Nice to meet you",0));
        list.add(new Model(Model.IMAGE_TYPE,"Hi. I display a cool image too besides the omnipresent TextView.",R.drawable.wtc));
        list.add(new Model(Model.AUDIO_TYPE,"Hey. Pressing the FAB button will playback an audio file on loop.",R.raw.sound));
        list.add(new Model(Model.IMAGE_TYPE,"Hi again. Another cool image here. Which one is better?",R.drawable.snow));

        MultiViewTypeAdapter adapter = new MultiViewTypeAdapter(list,this);
        LinearLayoutManager linearLayoutManager = new LinearLayoutManager(this, OrientationHelper.VERTICAL, false);

        RecyclerView mRecyclerView = (RecyclerView) findViewById(R.id.recyclerView);
        mRecyclerView.setLayoutManager(linearLayoutManager);
        mRecyclerView.setItemAnimator(new DefaultItemAnimator());
        mRecyclerView.setAdapter(adapter);
    }
}
R.raw.sound는 Audio View Type에서 재생될 sound.mp3 파일입니다. RecyclerView의 어댑터 클래스에는 재정의해야 할 세 가지 주요 메서드가 포함되어 있습니다.
getItemViewType()onCreateViewHolder()onBindViewHolder()
switch 문을 사용하여 getItemViewType() 메서드에서 각각의 viewType를 반환합니다. 이 viewType 변수는 Adapter 클래스 내에서 사용됩니다. onCreateViewHolder() 및 onBindViewHolder에서 매핑된 레이아웃을 인플레이트하고 채우는 데 사용됩니다. Adapter 클래스의 구현으로 이동하기 전에 각 view 타입에 대해 정의된 레이아웃 유형을 살펴보겠습니다. text_type.xml
<android.support.v7.widget.CardView xmlns:card_view="https://schemas.android.com/apk/res-auto"
    xmlns:android="https://schemas.android.com/apk/res/android"
    android:id="@+id/card_view"
    android:layout_width="match_parent"
    android:layout_height="wrap_content"
    android:layout_marginTop="@dimen/activity_horizontal_margin"
    card_view:cardElevation="10dp">
    <TextView
        android:id="@+id/type"
        android:layout_width="match_parent"
        android:layout_height="wrap_content"
        android:padding="10dp"
        />


</android.support.v7.widget.CardView>
image_type.xml
<android.support.v7.widget.CardView xmlns:card_view="https://schemas.android.com/apk/res-auto"
    xmlns:android="https://schemas.android.com/apk/res/android"
    android:id="@+id/card_view"
    android:layout_width="match_parent"
    android:layout_height="wrap_content"
    android:layout_margin="@dimen/activity_horizontal_margin"
    card_view:cardElevation="10dp">

    <LinearLayout
        android:layout_width="match_parent"
        android:orientation="vertical"
        android:layout_height="wrap_content">

        <TextView
            android:id="@+id/type"
            android:layout_width="match_parent"
            android:layout_height="wrap_content"
            android:padding="10dp"
            />

        <ImageView
            android:id="@+id/background"
            android:layout_width="match_parent"
            android:layout_height="150dp"
            android:scaleType="centerCrop"
            android:src="@drawable/snow"
            />

    </LinearLayout>

    </android.support.v7.widget.CardView>
audio_type.xml
<android.support.v7.widget.CardView xmlns:card_view="https://schemas.android.com/apk/res-auto"
    xmlns:android="https://schemas.android.com/apk/res/android"
    android:id="@+id/card_view"
    android:layout_width="match_parent"
    android:layout_height="wrap_content"
    android:layout_margin="@dimen/activity_horizontal_margin"
    card_view:cardElevation="10dp">

        <RelativeLayout
            android:layout_width="match_parent"
            android:layout_height="wrap_content">

        <TextView
            android:id="@+id/type"
            android:layout_width="match_parent"
            android:layout_height="wrap_content"
            android:padding="10dp"
            />

        <android.support.design.widget.FloatingActionButton
            android:layout_width="wrap_content"
            android:layout_height="wrap_content"
            android:layout_centerHorizontal="true"
            android:tint="#FFFFFF"
            android:id="@+id/fab"
            android:layout_below="@+id/type"
            android:layout_margin="@dimen/activity_horizontal_margin"
            android:src="@drawable/volume"/>

        </RelativeLayout>

    </android.support.v7.widget.CardView>
참고: build.gradle 파일에서 CardView의 다음 종속성을 추가하십시오.
compile 'com.android.support:cardview-v7:24.2.0'
앱컴팻 종속성의 버전 번호가 cardview와 일치하는지 확인하십시오. (현재 제 버전은 24.2.0입니다. 여러분의 경우 다를 수 있습니다.) 각 레이아웃 유형에 대해 MultiViewTypeAdapter.java 클래스에 아래와 같이 세 개의 별도 ViewHolder 클래스를 생성할 것입니다.
package com.journaldev.recyclerviewmultipleviewtype;

import android.content.Context;
import android.media.MediaPlayer;
import android.support.design.widget.FloatingActionButton;
import android.support.v7.widget.CardView;
import android.support.v7.widget.RecyclerView;
import android.view.LayoutInflater;
import android.view.View;
import android.view.ViewGroup;
import android.widget.ImageView;
import android.widget.TextView;

import java.util.ArrayList;

/**
 * Created by anupamchugh on 09/02/16.
 */
public class MultiViewTypeAdapter extends RecyclerView.Adapter {

    private ArrayList<Model>dataSet;
    Context mContext;
    int total_types;
    MediaPlayer mPlayer;
    private boolean fabStateVolume = false;

    public static class TextTypeViewHolder extends RecyclerView.ViewHolder {

        TextView txtType;
        CardView cardView;

        public TextTypeViewHolder(View itemView) {
            super(itemView);

            this.txtType = (TextView) itemView.findViewById(R.id.type);
            this.cardView = (CardView) itemView.findViewById(R.id.card_view);
        }
    }

    public static class ImageTypeViewHolder extends RecyclerView.ViewHolder {

        TextView txtType;
        ImageView image;

        public ImageTypeViewHolder(View itemView) {
            super(itemView);

            this.txtType = (TextView) itemView.findViewById(R.id.type);
            this.image = (ImageView) itemView.findViewById(R.id.background);
        }
    }

    public static class AudioTypeViewHolder extends RecyclerView.ViewHolder {

        TextView txtType;
        FloatingActionButton fab;

        public AudioTypeViewHolder(View itemView) {
            super(itemView);

            this.txtType = (TextView) itemView.findViewById(R.id.type);
            this.fab = (FloatingActionButton) itemView.findViewById(R.id.fab);
        }
    }

    public MultiViewTypeAdapter(ArrayList<Model>data, Context context) {
        this.dataSet = data;
        this.mContext = context;
        total_types = dataSet.size();
    }

    @Override
    public RecyclerView.ViewHolder onCreateViewHolder(ViewGroup parent, int viewType) {

        View view;
        switch (viewType) {
            case Model.TEXT_TYPE:
                view = LayoutInflater.from(parent.getContext()).inflate(R.layout.text_type, parent, false);
                return new TextTypeViewHolder(view);
            case Model.IMAGE_TYPE:
                view = LayoutInflater.from(parent.getContext()).inflate(R.layout.image_type, parent, false);
                return new ImageTypeViewHolder(view);
            case Model.AUDIO_TYPE:
                view = LayoutInflater.from(parent.getContext()).inflate(R.layout.audio_type, parent, false);
                return new AudioTypeViewHolder(view);
        }
        return null;
    }

    @Override
    public int getItemViewType(int position) {

        switch (dataSet.get(position).type) {
            case 0:
                return Model.TEXT_TYPE;
            case 1:
                return Model.IMAGE_TYPE;
            case 2:
                return Model.AUDIO_TYPE;
            default:
                return -1;
        }
    }

    @Override
    public void onBindViewHolder(final RecyclerView.ViewHolder holder, final int listPosition) {

        Model object = dataSet.get(listPosition);
        if (object != null) {
            switch (object.type) {
                case Model.TEXT_TYPE:
                    ((TextTypeViewHolder) holder).txtType.setText(object.text);

                    break;
                case Model.IMAGE_TYPE:
                    ((ImageTypeViewHolder) holder).txtType.setText(object.text);
                    ((ImageTypeViewHolder) holder).image.setImageResource(object.data);
                    break;
                case Model.AUDIO_TYPE:

                    ((AudioTypeViewHolder) holder).txtType.setText(object.text);

                    ((AudioTypeViewHolder) holder).fab.setOnClickListener(new View.OnClickListener() {
                        @Override
                        public void onClick(View view) {

                            if (fabStateVolume) {
                                if (mPlayer.isPlaying()) {
                                    mPlayer.stop();

                                }
                                ((AudioTypeViewHolder) holder).fab.setImageResource(R.drawable.volume);
                                fabStateVolume = false;

                            } else {
                                mPlayer = MediaPlayer.create(mContext, R.raw.sound);
                                mPlayer.setLooping(true);
                                mPlayer.start();
                                ((AudioTypeViewHolder) holder).fab.setImageResource(R.drawable.mute);
                                fabStateVolume = true;

                            }
                        }
                    });
                    break;
            }
        }
    }

    @Override
    public int getItemCount() {
        return dataSet.size();
    }
}
위의 코드에서는 각 클릭마다 토글된 전역 불리언 변수를 유지하여 볼륨 버튼 상태를 저장합니다(FloatingActionButton의 이미지 리소스 변경과 함께). 위 응용 프로그램의 출력은 아래에 제공됩니다.  이로써 이 튜토리얼을 마칩니다. 최종 Android RecyclerViewMultipleViewType 프로젝트는 아래 링크에서 다운로드할 수 있습니다.
Source:
https://www.digitalocean.com/community/tutorials/android-recyclerview-example


