עד כה הצגנו את אותו סוג של תצוגות בתוך RecyclerView. במדריך זה, נממש פריסות מגוונות בתוך RecyclerView.
RecyclerView
RecyclerView עם פריסות מגוונות נהוג לשימוש רב בתצוגת כותרות סקציות ופרטים (שדורשים פריסה שונה, ולכן סוג תצוגה שונה). זה נעשה גם באפליקציית Newsfeed (כמו Facebook, Instagram) שמציגה תצוגות שונות לכל סוג – לדוג', טקסט, תמונה, GIF, וידאו וכו'. לכל אחת מהן דרוש סוג פריסה שונה בתוך RecyclerView. זה נעשה גם ב-NavigationDrawer כדי להפריד את הכותרת משאר הסקציה. בלעדי כל השקפה, בואו נממש את זה באפליקציה שלנו.
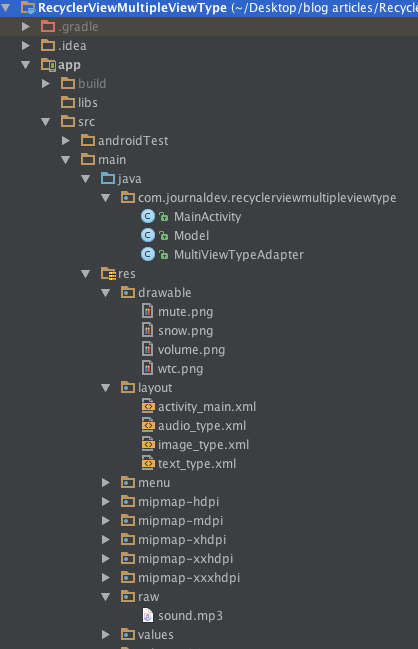
מבנה הפרויקט עם סוגי תצוגה מרובים ב-RecyclerView של Android
נטפל להטמעת שלושה סוגי תצוגה (טקסט, תמונה, שמע) שיתנפחו על ידי שלושה פריסות שונות. לכל סוג תצוגה יש יישום משלו המוגדר באופן ספציפי במחלקת המתאימה. 
קוד
ה- activity_main.xml שלנו מכיל את CoordinatorLayout כשורש ו-RecyclerView משמש כתצוגת ילד שלו.
<?xml version="1.0" encoding="utf-8"?>
<android.support.design.widget.CoordinatorLayout xmlns:android="https://schemas.android.com/apk/res/android"
    xmlns:app="https://schemas.android.com/apk/res-auto"
    xmlns:tools="https://schemas.android.com/tools"
    android:layout_width="match_parent"
    android:layout_height="match_parent"
    android:fitsSystemWindows="true"
    tools:context="com.journaldev.recyclerviewmultipleviewtype.MainActivity">

    <android.support.design.widget.AppBarLayout
        android:layout_width="match_parent"
        android:layout_height="wrap_content"
        android:theme="@style/AppTheme.AppBarOverlay">

        <android.support.v7.widget.Toolbar
            android:id="@+id/toolbar"
            android:layout_width="match_parent"
            android:layout_height="?attr/actionBarSize"
            android:background="?attr/colorPrimary"
            app:popupTheme="@style/AppTheme.PopupOverlay" />

    </android.support.design.widget.AppBarLayout>

    <android.support.v7.widget.RecyclerView
        android:id="@+id/recyclerView"
        android:layout_width="match_parent"
        app:layout_behavior="@string/appbar_scrolling_view_behavior"
        android:layout_height="match_parent" />


</android.support.design.widget.CoordinatorLayout>
שים לב לשורה app:layout_behavior="@string/appbar_scrolling_view_behavior" בתוך RecyclerView. הסרת זה תגרום לגלילת RecyclerView על פני המסך כולו, על ידי חפיפה עם AppBarLayout. מחלקת Model.java המשמשת להכנסת הנתונים למתאם ניתנת להלן.
public class Model {

    public static final int TEXT_TYPE=0;
    public static final int IMAGE_TYPE=1;
    public static final int AUDIO_TYPE=2;

    public int type;
    public int data;
    public String text;

    public Model(int type, String text, int data)
    {
        this.type=type;
        this.data=data;
        this.text=text;
    }
}
היא מורכבת משלושה סוגי נתונים.
- ה-
int typeמחזיק את הקבוע סוג התצוגה. - ה-
String textמכיל את המחרוזת שתוצג ב-TextView. - המשתנה
int dataמשמש לאחסון הנתונים המתאימים שיתבצע עליהם. באידיאל, הוא יכיל גרפיקה או משאב טבעי מסוג נתון.
מחלקת MainActivity.java מתוארת להלן.
package com.journaldev.recyclerviewmultipleviewtype;

import android.os.Bundle;
import android.support.v7.app.AppCompatActivity;
import android.support.v7.widget.DefaultItemAnimator;
import android.support.v7.widget.LinearLayoutManager;
import android.support.v7.widget.OrientationHelper;
import android.support.v7.widget.RecyclerView;
import android.support.v7.widget.Toolbar;
import java.util.ArrayList;

public class MainActivity extends AppCompatActivity {

    @Override
    protected void onCreate(Bundle savedInstanceState) {
        super.onCreate(savedInstanceState);
        setContentView(R.layout.activity_main);
        Toolbar toolbar = (Toolbar) findViewById(R.id.toolbar);
        setSupportActionBar(toolbar);

        ArrayList<Model> list= new ArrayList();
        list.add(new Model(Model.TEXT_TYPE,"Hello. This is the Text-only View Type. Nice to meet you",0));
        list.add(new Model(Model.IMAGE_TYPE,"Hi. I display a cool image too besides the omnipresent TextView.",R.drawable.wtc));
        list.add(new Model(Model.AUDIO_TYPE,"Hey. Pressing the FAB button will playback an audio file on loop.",R.raw.sound));
        list.add(new Model(Model.IMAGE_TYPE,"Hi again. Another cool image here. Which one is better?",R.drawable.snow));

        MultiViewTypeAdapter adapter = new MultiViewTypeAdapter(list,this);
        LinearLayoutManager linearLayoutManager = new LinearLayoutManager(this, OrientationHelper.VERTICAL, false);

        RecyclerView mRecyclerView = (RecyclerView) findViewById(R.id.recyclerView);
        mRecyclerView.setLayoutManager(linearLayoutManager);
        mRecyclerView.setItemAnimator(new DefaultItemAnimator());
        mRecyclerView.setAdapter(adapter);
    }
}
ה- R.raw.sound הוא קובץ sound.mp3 שישמע בסוג התצוגה שמע. מחלקת המתאם עבור RecyclerView מכילה שלושה שיטות עיקריות שיש לדרוס אותן.
getItemViewType()onCreateViewHolder()onBindViewHolder()
נשתמש בהצהרות switch בשיטת getItemViewType() כדי להחזיר את viewType הרצוי. משתנה זה מוגדר בתוך מחלקת המתאם ומשמש ב־onCreateViewHolder() ו־onBindViewHolder() כדי להפיח ולמלא את הפריטים בהתאם לתבניות המפורטות. לפני שנתקע ביישום של מחלקת המתאם, בואו נביט בסוגי התבניות שמוגדרות עבור כל סוג תצוגה. text_type.xml
<android.support.v7.widget.CardView xmlns:card_view="https://schemas.android.com/apk/res-auto"
    xmlns:android="https://schemas.android.com/apk/res/android"
    android:id="@+id/card_view"
    android:layout_width="match_parent"
    android:layout_height="wrap_content"
    android:layout_marginTop="@dimen/activity_horizontal_margin"
    card_view:cardElevation="10dp">
    <TextView
        android:id="@+id/type"
        android:layout_width="match_parent"
        android:layout_height="wrap_content"
        android:padding="10dp"
        />


</android.support.v7.widget.CardView>
image_type.xml
<android.support.v7.widget.CardView xmlns:card_view="https://schemas.android.com/apk/res-auto"
    xmlns:android="https://schemas.android.com/apk/res/android"
    android:id="@+id/card_view"
    android:layout_width="match_parent"
    android:layout_height="wrap_content"
    android:layout_margin="@dimen/activity_horizontal_margin"
    card_view:cardElevation="10dp">

    <LinearLayout
        android:layout_width="match_parent"
        android:orientation="vertical"
        android:layout_height="wrap_content">

        <TextView
            android:id="@+id/type"
            android:layout_width="match_parent"
            android:layout_height="wrap_content"
            android:padding="10dp"
            />

        <ImageView
            android:id="@+id/background"
            android:layout_width="match_parent"
            android:layout_height="150dp"
            android:scaleType="centerCrop"
            android:src="@drawable/snow"
            />

    </LinearLayout>

    </android.support.v7.widget.CardView>
audio_type.xml
<android.support.v7.widget.CardView xmlns:card_view="https://schemas.android.com/apk/res-auto"
    xmlns:android="https://schemas.android.com/apk/res/android"
    android:id="@+id/card_view"
    android:layout_width="match_parent"
    android:layout_height="wrap_content"
    android:layout_margin="@dimen/activity_horizontal_margin"
    card_view:cardElevation="10dp">

        <RelativeLayout
            android:layout_width="match_parent"
            android:layout_height="wrap_content">

        <TextView
            android:id="@+id/type"
            android:layout_width="match_parent"
            android:layout_height="wrap_content"
            android:padding="10dp"
            />

        <android.support.design.widget.FloatingActionButton
            android:layout_width="wrap_content"
            android:layout_height="wrap_content"
            android:layout_centerHorizontal="true"
            android:tint="#FFFFFF"
            android:id="@+id/fab"
            android:layout_below="@+id/type"
            android:layout_margin="@dimen/activity_horizontal_margin"
            android:src="@drawable/volume"/>

        </RelativeLayout>

    </android.support.v7.widget.CardView>
הערה: הוסיפו את התלות הבאה עבור CardView בקובץ build.gradle
compile 'com.android.support:cardview-v7:24.2.0'
ודאו שמספר הגרסה של התלות appcompat תואם לגרסת cardview. (זו 24.2.0 עבורי כעת. יכול להיות שונה אצלך.) ניצור שלוש מחלקות ViewHolder נפרדות עבור כל אחת מהתבניות הנ"ל כפי שמוצג במחלקת MultiViewTypeAdapter.java למטה.
package com.journaldev.recyclerviewmultipleviewtype;

import android.content.Context;
import android.media.MediaPlayer;
import android.support.design.widget.FloatingActionButton;
import android.support.v7.widget.CardView;
import android.support.v7.widget.RecyclerView;
import android.view.LayoutInflater;
import android.view.View;
import android.view.ViewGroup;
import android.widget.ImageView;
import android.widget.TextView;

import java.util.ArrayList;

/**
 * Created by anupamchugh on 09/02/16.
 */
public class MultiViewTypeAdapter extends RecyclerView.Adapter {

    private ArrayList<Model>dataSet;
    Context mContext;
    int total_types;
    MediaPlayer mPlayer;
    private boolean fabStateVolume = false;

    public static class TextTypeViewHolder extends RecyclerView.ViewHolder {

        TextView txtType;
        CardView cardView;

        public TextTypeViewHolder(View itemView) {
            super(itemView);

            this.txtType = (TextView) itemView.findViewById(R.id.type);
            this.cardView = (CardView) itemView.findViewById(R.id.card_view);
        }
    }

    public static class ImageTypeViewHolder extends RecyclerView.ViewHolder {

        TextView txtType;
        ImageView image;

        public ImageTypeViewHolder(View itemView) {
            super(itemView);

            this.txtType = (TextView) itemView.findViewById(R.id.type);
            this.image = (ImageView) itemView.findViewById(R.id.background);
        }
    }

    public static class AudioTypeViewHolder extends RecyclerView.ViewHolder {

        TextView txtType;
        FloatingActionButton fab;

        public AudioTypeViewHolder(View itemView) {
            super(itemView);

            this.txtType = (TextView) itemView.findViewById(R.id.type);
            this.fab = (FloatingActionButton) itemView.findViewById(R.id.fab);
        }
    }

    public MultiViewTypeAdapter(ArrayList<Model>data, Context context) {
        this.dataSet = data;
        this.mContext = context;
        total_types = dataSet.size();
    }

    @Override
    public RecyclerView.ViewHolder onCreateViewHolder(ViewGroup parent, int viewType) {

        View view;
        switch (viewType) {
            case Model.TEXT_TYPE:
                view = LayoutInflater.from(parent.getContext()).inflate(R.layout.text_type, parent, false);
                return new TextTypeViewHolder(view);
            case Model.IMAGE_TYPE:
                view = LayoutInflater.from(parent.getContext()).inflate(R.layout.image_type, parent, false);
                return new ImageTypeViewHolder(view);
            case Model.AUDIO_TYPE:
                view = LayoutInflater.from(parent.getContext()).inflate(R.layout.audio_type, parent, false);
                return new AudioTypeViewHolder(view);
        }
        return null;
    }

    @Override
    public int getItemViewType(int position) {

        switch (dataSet.get(position).type) {
            case 0:
                return Model.TEXT_TYPE;
            case 1:
                return Model.IMAGE_TYPE;
            case 2:
                return Model.AUDIO_TYPE;
            default:
                return -1;
        }
    }

    @Override
    public void onBindViewHolder(final RecyclerView.ViewHolder holder, final int listPosition) {

        Model object = dataSet.get(listPosition);
        if (object != null) {
            switch (object.type) {
                case Model.TEXT_TYPE:
                    ((TextTypeViewHolder) holder).txtType.setText(object.text);

                    break;
                case Model.IMAGE_TYPE:
                    ((ImageTypeViewHolder) holder).txtType.setText(object.text);
                    ((ImageTypeViewHolder) holder).image.setImageResource(object.data);
                    break;
                case Model.AUDIO_TYPE:

                    ((AudioTypeViewHolder) holder).txtType.setText(object.text);

                    ((AudioTypeViewHolder) holder).fab.setOnClickListener(new View.OnClickListener() {
                        @Override
                        public void onClick(View view) {

                            if (fabStateVolume) {
                                if (mPlayer.isPlaying()) {
                                    mPlayer.stop();

                                }
                                ((AudioTypeViewHolder) holder).fab.setImageResource(R.drawable.volume);
                                fabStateVolume = false;

                            } else {
                                mPlayer = MediaPlayer.create(mContext, R.raw.sound);
                                mPlayer.setLooping(true);
                                mPlayer.start();
                                ((AudioTypeViewHolder) holder).fab.setImageResource(R.drawable.mute);
                                fabStateVolume = true;

                            }
                        }
                    });
                    break;
            }
        }
    }

    @Override
    public int getItemCount() {
        return dataSet.size();
    }
}
בקוד שמופיע לעיל, אנחנו שומרים משתנה בוליאני גלובלי לאחסון מצב כפתור העוצמה שמופעל בכל לחיצה (יחד עם שינוי מקור התמונה עבור FloatingActionButton). פלט היישום לעיל מוצג להלן.  זה סיום המדריך. ניתן להוריד את פרויקט Android הסופי של RecyclerViewMultipleViewType מהקישור למטה.
Source:
https://www.digitalocean.com/community/tutorials/android-recyclerview-example


