


Git에서 브랜치를 병합하는 것은 때로는 어려운 작업일 수 있지만, git merge 명령어는 이 과정을 상당히 간단하게 만듭니다. 이 튜토리얼에서는 git merge를 사용하여 브랜치를 결합하는 기본 사항과 GitHub, 주요 프로젝트 관리 도구를 함께 배우게 됩니다.
Git과 GitHub 세계로의 여정을 시작해봅시다. 강력한 git merge 명령어에 중점을 두겠습니다.
Git Merge 마스터링을 위한 준비물
git merge의 복잡성에 대해 깊이 파헤치기 전에 다음 설정이 완료되었는지 확인하세요:
- 이 튜토리얼에서는 Git(버전 2.25.1 사용) – Git 공식 사이트에서 다운로드하세요.
- A GitHub account – Sign up at GitHub.
- Ubuntu 기기 (여기에서는 Ubuntu 20.04를 사용하지만, Git이 설치된 모든 운영 체제를 사용할 수 있습니다).
Git Merge를 위한 프로젝트 초기화
git merge를 효과적으로 사용하려면 먼저 Git 프로젝트가 필요합니다. 연습용 데모 프로젝트를 설정해보겠습니다.
1. 새 디렉토리를 만들고 ~/git-demo로 이동하세요:
2. 다음 내용으로 index.html 파일을 ~/git-demo 디렉토리에 만드세요. 이 기본 HTML 파일은 git merge로 시작하는 메시지를 표시합니다.
3. 프로젝트 디렉토리에서 새 Git 저장소를 초기화하세요:
git init명령은 기존에 버전 관리되지 않은 프로젝트를 Git 저장소로 변환하거나 Git으로 새 프로젝트를 시작하는 데 사용됩니다.

4. 프로젝트 디렉토리에 .git 폴더가 생성되었는지 확인하세요. 이 폴더는 Git이 변경 사항을 추적하는 곳입니다:

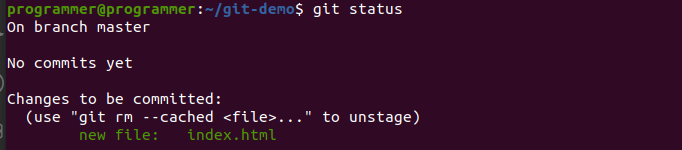
5. 프로젝트에서 변경 사항을 스테이징하기 위해 git add 명령을 실행하세요. index.html 파일을 스테이징하면 Git 워크플로우에서 다음 커밋을 준비하게 됩니다.
6. 파일이 올바르게 스테이징되었는지 확인하려면 git status를 사용하세요. 이 명령은 현재 작업 디렉토리의 상태를 스냅샷으로 제공합니다.
7. 다음으로, 변경 사항을 커밋하세요. 이 명령은 스테이징된 변경 사항을 로컬 저장소에 저장하며, 버전 이력에서 중요한 단계를 표시합니다.

Git을 처음 사용하는 경우
git config --global user.email "[email protected]"및git config --global user.name "Your Name"으로 Git 식별 정보를 설정하세요.
8. git log로 커밋 이력을 검토하세요. 이 명령은 변경 사항을 추적하는 데 도움이 되며, git merge를 준비할 때 필수적입니다.

9. 저장소에 브랜치가 있는지 확인하려면 git branch를 사용하세요. 이 단계는 git merge를 수행하기 전에 중요합니다.
참고: 최신 Git 버전에서 기본 브랜치는 ‘master’를 대체하여 ‘main’으로 지정됩니다.

Git 병합을 위한 브랜치 생성
초기 Git 설정이 완료되고 첫 번째 커밋이 완료되었으므로 이제 새 브랜치를 만들어야 합니다. 이 브랜치는 git merge 프로세스를 효과적으로 보여주기 위해 사용될 것입니다.
1. 새 내용으로 index.html 파일을 업데이트하여 브랜치의 변경 사항을 보여줍니다. 이 버전에는 사용자 입력 필드가 포함되어 있으며 git merge의 시연을 위해 준비됩니다.
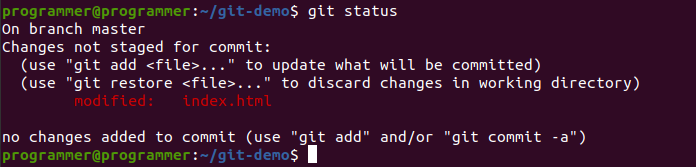
2. git status로 저장소의 상태를 확인하여 index.html의 변경 사항을 확인합니다. 파일이 수정되어 스테이지에 올라가지 않은 상태여야 하며, git merge 프로세스의 다음 단계를 위해 준비가 되어 있어야 합니다.
3. git checkout -b form으로 “form”이라는 새 브랜치를 만듭니다. 이 명령은 새 브랜치를 만드는 것뿐만 아니라 현재 작업 중인 브랜치를 “form”으로 전환하는데 필수적입니다. 이것은 git merge를 실행하는 데 필요합니다.

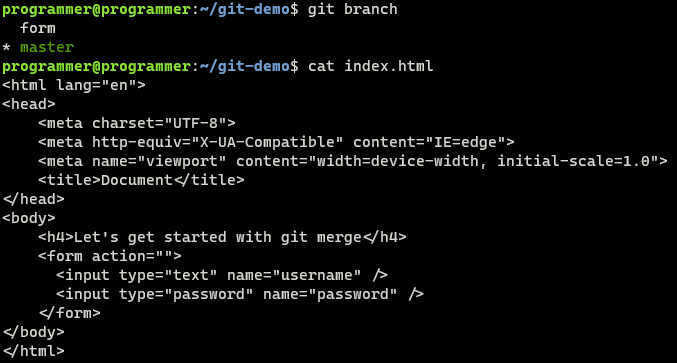
4. git branch를 실행하여 새 브랜치가 성공적으로 만들어졌는지 확인합니다. 이제 “form”과 “master” 두 개의 브랜치가 표시되어야 하며, 활성 브랜치는 별표 (*)로 표시됩니다.

5. 변경 사항을 form 브랜치에 스테이징하고 커밋합니다. 이 작업은 form 브랜치가 index.html 파일에 최근 업데이트를 반영하도록 하여 효과적인 git merge를 준비합니다.

로컬 브랜치 Git 병합
GitHub 저장소에 구분된 브랜치가 있으면 다음 단계는 이들을 병합하는 것입니다. 이 섹션에서는 git merge 명령을 사용하여 로컬에서 브랜치를 병합하는 것에 중점을 둡니다. 이는 Git의 기본 동작 중 하나입니다.
1. 병합을 시작하려면 master 브랜치로 전환하십시오. 이 브랜치는 form 브랜치에서 업데이트를 받게 됩니다:
2. master 브랜치에 있는 상태에서 git merge form을 실행하여 form 브랜치의 변경 사항을 master에 통합합니다. 이는 git merge 프로세스에서 중요한 단계입니다.
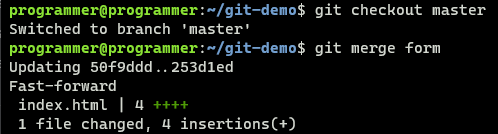
git merge.3. 병합을 확인하려면 master 브랜치에 있는지 확인하고 index.html의 내용이 업데이트되었는지 확인하십시오.
git merge.Git Squash로 간소화
Git에서 Squashing은 커밋 기록을 정리하는 데 사용되는 기술입니다. 여러 개별적으로 필요하지 않은 커밋 메시지가 있는 경우, Squashing을 사용하면 이를 단일하고 포괄적인 커밋으로 결합할 수 있습니다. 이 실천법은 특히 git merge를 준비할 때 유용합니다.
더 나아가 form 브랜치에서 index.html 파일에 추가 변경을 가하고 이러한 변경 사항을 Squashing하는 과정을 탐색해 봅시다.
1. 추가 변경 사항을 위해 form 브랜치로 전환하십시오:
2. index.html을 수정하여 양식 헤더를 추가하십시오. 이 단계는 후에 병합 중에 스쿼시할 변경 사항을 만듭니다:
3. 변경 사항을 명확히 설명하는 명확한 메시지와 함께 스테이징 및 커밋하십시오:

git merge.
4. form 브랜치의 index.html을 개선하여 새 입력 필드를 추가하십시오. 이 수정은 효율적인 git merge를 위한 준비의 일환입니다.
5. 이러한 변경 사항을 각각의 단계가 명확히 문서화되어 있는 독특한 메시지와 함께 스테이징 및 커밋하십시오. 다가오는 git merge를 위해 각 작업 단계가 명확하게 문서화되어야 합니다.

git merge.
6. 다음으로, index.html의 양식 아래에 문단 요소를 삽입하여 git merge를 위한 파일 수정을 더합니다.
7. 다시 한 번, 이 변경 사항을 스테이징하고 커밋하십시오. 이 업데이트의 본질을 포착하는 메시지를 사용하여, git merge 프로세스에 중요합니다.

git merge.
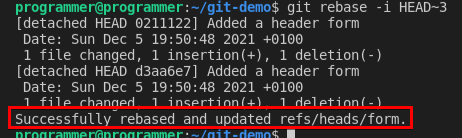
8. 인터랙티브 모드에서 git rebase를 사용하여 최근 커밋을 보고 편집하십시오. 이 단계는 깔끔한 git merge를 위해 커밋을 스쿼시하는 과정에서 중요합니다.
9. 인터랙티브 모드에서 첫 번째 커밋을 reword하고 그 다음 커밋을 squash로 선택하십시오. 이 작업은 커밋 히스토리를 통합하여 git merge를 더 깨끗하고 조직적으로 만듭니다.

git merge.
10. 메시지를 다시 편집하고 누적 변경 사항을 반영하도록 통합된 커밋 메시지를 업데이트하십시오. 이 단계는 스쿼싱 프로세스를 완료하여 깔끔한 git merge를 위한 준비를 마무리합니다.

git merge.다수의 커밋 메시지를 처리할 때 git merge 프로세스의 필수 부분인 스쿼싱 작업이 성공적으로 완료되었는지 확인하세요.
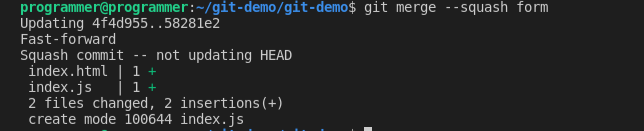
git squash operation.동시에 스쿼싱과 머지를 하려면 git merge --squash를 사용하세요. 이 기술은 커밋을 효율적으로 결합하여 form 브랜치를 master 브랜치에 병합합니다.
git merge --squash 명령을 실행하면 form 브랜치의 변경 사항을 master에 병합하면서 모든 커밋을 하나로 압축합니다. 이 접근 방식은 효과적인 git merge 전략의 일부입니다.
git merge with squash option.Git 머지에서 Fast-Forward 구현하기
간결한 커밋 히스토리를 위해 Fast-Forward는 특히 작은 업데이트나 버그 수정에 이상적인 방법입니다. 이를 통해 병합 커밋 없이 브랜치를 병합하여 깔끔하고 선형적인 히스토리를 유지할 수 있으며, 효율적인 git merge 프로세스에 중요합니다.
Fast-Forward는 기본 브랜치(일반적으로 master)에서 발생하는 기점 분기가 없을 때 발생하며, 히스토리와 포인터 업데이트를 원활하게 통합할 수 있습니다.
1. Fast-Forward 프로세스를 시작하기 위해 form 브랜치로 변경하세요:
2. form 브랜치에서 index.js와 같은 JavaScript 파일을 생성하고 업데이트하며 변경 사항을 스테이징(staging)하고 커밋하세요:
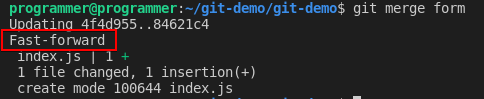
3. 마지막으로, Fast-Forward 접근 방식을 사용하여 form 브랜치를 master에 병합하세요. 이 단계에서 최신 변경 사항을 반영하여 master 브랜치와 부드러운 선형적인 git merge 경로를 만듭니다.
결론
이 튜토리얼은 git merge를 사용하여 브랜치를 결합하는 다양한 기술을 안내했습니다. 커밋을 스쿼싱하는 것부터 빠른 전진까지, 이러한 방법들은 Git에서 프로젝트를 협업적으로 관리하는 능력을 향상시킵니다.
이제 이러한 기술을 갖추고 나면 실제 시나리오에서 git merge의 지식을 적용하여 GitHub에서 협업 프로젝트에 기여하는 것을 고려해보세요.