이 튜토리얼에서는 안드로이드 ConstraintLayout의 복잡성에 대해 논의하겠습니다. 구글은 2016년 Google I/O 컨퍼런스에서 안드로이드 constraint layout 편집기를 소개했습니다. 새로운 레이아웃 편집기에는 개발자가 복잡한 레이아웃을 위한 평면 UI 계층을 생성할 수 있는 강력한 도구 세트가 있습니다.
안드로이드 ConstraintLayout
안드로이드 ConstraintLayout을 사용하려면 최신 Android Studio 버전을 사용하는지 확인하십시오. 이상적으로는 Android Studio 2.2 이상이어야 합니다. ConstraintLayout을 위한 필요한 SDK 도구를 SDK 관리자에서 다운로드해야 합니다. 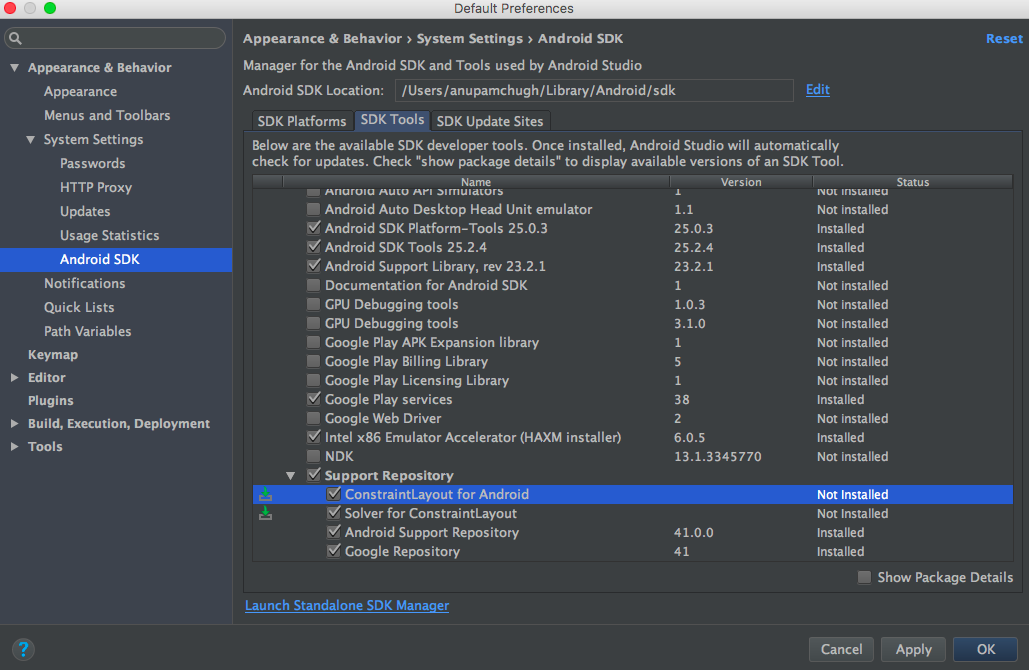 새로운 빈 액티비티 프로젝트를 생성하고 다음 종속성을 build.gradle 파일에 추가하십시오.
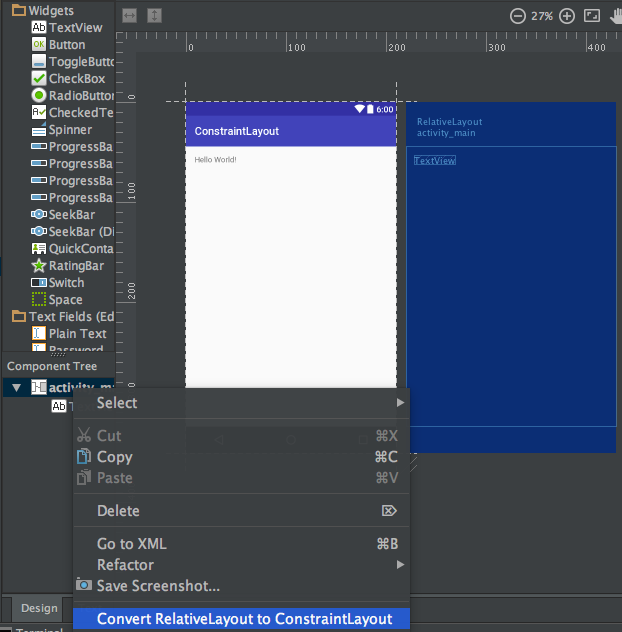
 compile 'com.android.support.constraint:constraint-layout:1.0.0-beta4' 다음 이미지와 같이 루트 클래스가 ConstraintLayout으로 설정된 새로운 레이아웃을 생성하십시오.  이전 레이아웃을 ConstraintLayout으로 변환하려면 해당 레이아웃의 디자인 패널을 열고 루트 구성 요소를 마우스 오른쪽 단추로 클릭하여 이미지에 표시된 관련 옵션을 선택하십시오.
안드로이드 Constraint Layout 개요
Android ConstraintLayout은 각 자식 뷰/위젯에 대해 다른 뷰와의 상대적인 제약 조건을 할당하여 레이아웃을 정의하는 데 사용됩니다. ConstraintLayout은 RelativeLayout과 유사하지만 더 강력한 기능을 가지고 있습니다. ConstraintLayout의 목표는 중첩된 뷰를 제거하여 평면적이고 유연한 디자인으로 애플리케이션의 성능을 향상시키는 것입니다. ConstraintLayout 내부의 뷰에는 각 측면에 핸들(또는 앵커 포인트)이 있으며 이를 사용하여 제약 조건을 할당합니다. 레이아웃에 TextView를 끌어다 놓고 제약 조건을 할당해 보겠습니다. TextView는 다음과 같은 세 가지 유형의 핸들이 있습니다: 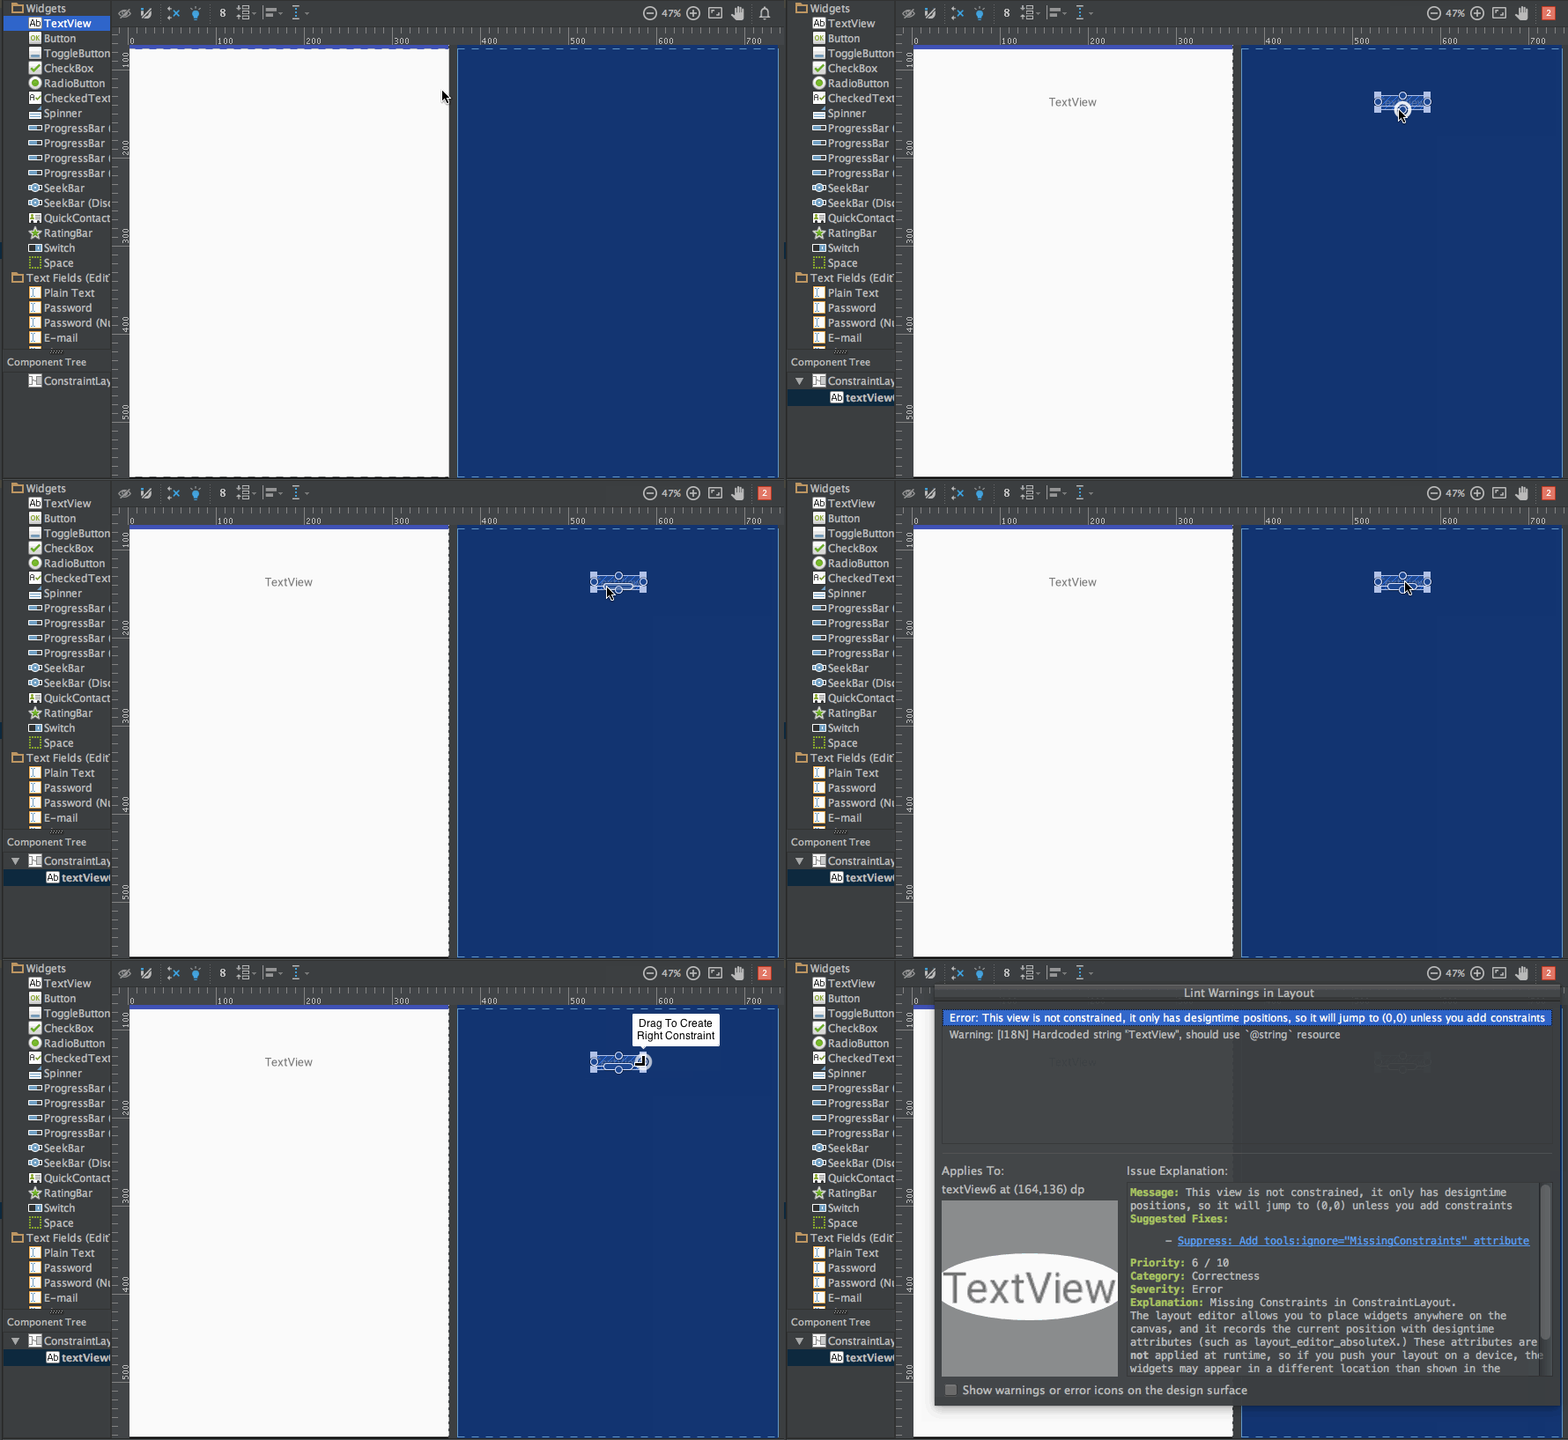 위의 TextView에는 세 가지 유형의 핸들이 있습니다:
크기 조절 핸들 – 네 귀퉁이에 있으며 뷰의 크기를 조정하지만 제약 조건은 유지합니다. 측면 핸들 – 각 측면의 중앙에 있는 원형 핸들입니다. 뷰의 상단, 왼쪽, 하단 및 오른쪽 제약 조건을 설정하는 데 사용됩니다. 기준선 핸들 – 레이아웃 내 다른 텍스트뷰와 기준선을 맞추는 데 사용됩니다.
TextView에 제약 조건을 할당하고 해당 xml 코드를 살펴보겠습니다. 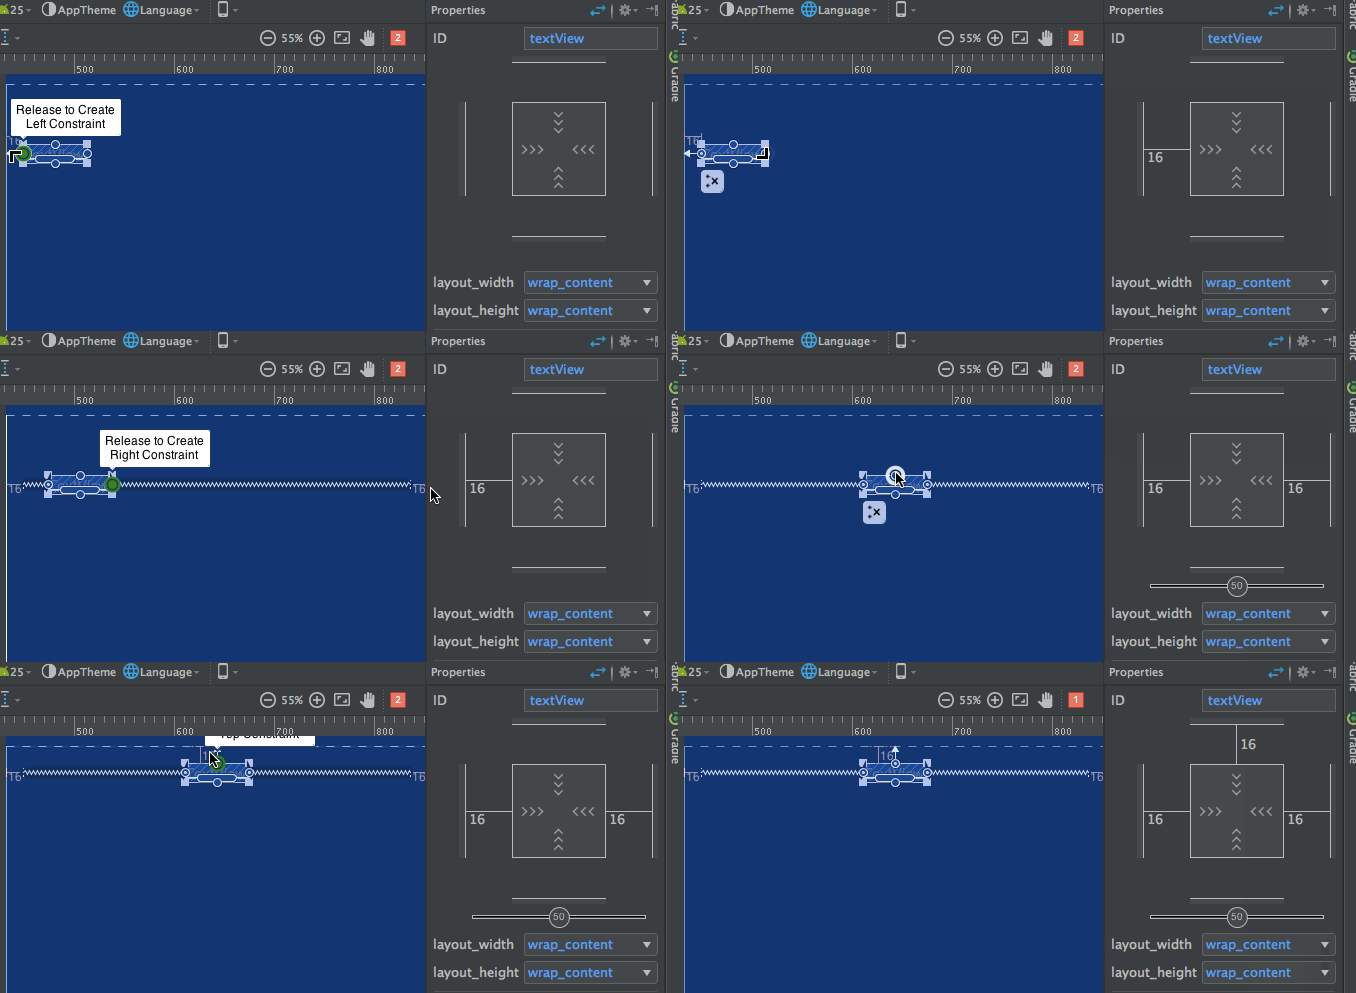 우측에 있는 속성 검사기 창에 주목하십시오.
 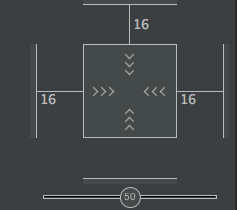 이 창은 뷰의 각 면에 설정된 여백을 보여줍니다. 또한 다음 모드로 전환하여 뷰의 크기를 변경할 수 있습니다:
- 내용에 맞추기 – 이 모드는 뷰를 내용에 맞게 감싸줍니다.

- 임의의 크기 – 이 모드는 match parent와 유사합니다.

- 고정 크기 – 이 모드는 상수 너비와 높이를 설정할 수 있게 합니다.

위의 레이아웃에 대한 xml 코드는 다음과 같습니다: sample.xml
<?xml version="1.0" encoding="utf-8"?>
<android.support.constraint.ConstraintLayout
    xmlns:android="https://schemas.android.com/apk/res/android"
    xmlns:app="https://schemas.android.com/apk/res-auto"
    android:layout_width="match_parent"
    android:layout_height="match_parent">

    <TextView
        android:text="TextView"
        android:layout_width="wrap_content"
        android:layout_height="wrap_content"
        android:id="@+id/textView"
        android:layout_marginStart="16dp"
        android:layout_marginTop="16dp"
        app:layout_constraintLeft_toLeftOf="parent"
        app:layout_constraintTop_toTopOf="parent"
        android:layout_marginLeft="16dp"
        android:layout_marginEnd="16dp"
        app:layout_constraintRight_toRightOf="parent"
        android:layout_marginRight="16dp" />
</android.support.constraint.ConstraintLayout>
app:layout_constraintLeft_toLeftOf="parent"– constraintLeft는 뷰의 왼쪽에 대한 앵커 포인트입니다. toLeftOf는 뷰를 “parent”로 지정된 뷰의 왼쪽에 정렬하는 것을 의미합니다.
뷰에 절대 위치가 설정되면 사용되는 xml 속성은 다음과 같습니다. –
tools:layout_editor_absoluteY="48dp"
tools:layout_editor_absoluteX="40dp"
다른 TextView를 추가하고 기준선을 정렬해 봅시다.  위 레이아웃의 xml 코드는 다음과 같습니다. :
<?xml version="1.0" encoding="utf-8"?>
<android.support.constraint.ConstraintLayout
    xmlns:android="https://schemas.android.com/apk/res/android"
    xmlns:app="https://schemas.android.com/apk/res-auto"
    xmlns:tools="https://schemas.android.com/tools"
    android:layout_width="match_parent"
    android:layout_height="match_parent">

    <TextView
        android:text="TextView"
        android:layout_width="wrap_content"
        android:layout_height="wrap_content"
        android:id="@+id/textView"
        android:layout_marginStart="16dp"
        app:layout_constraintLeft_toLeftOf="parent"
        android:layout_marginLeft="16dp"
        android:layout_marginEnd="16dp"
        app:layout_constraintRight_toRightOf="parent"
        android:layout_marginRight="16dp"
        android:layout_marginTop="16dp"
        app:layout_constraintTop_toTopOf="parent" />

    <TextView
        android:text="TextView"
        android:layout_width="wrap_content"
        android:layout_height="wrap_content"
        android:id="@+id/textView2"
        app:layout_constraintBaseline_toBaselineOf="@+id/textView"
        android:layout_marginStart="16dp"
        app:layout_constraintLeft_toLeftOf="parent"
        android:layout_marginLeft="16dp"
        app:layout_constraintRight_toLeftOf="@+id/textView"
        android:layout_marginEnd="8dp"
        android:layout_marginRight="8dp" />

</android.support.constraint.ConstraintLayout>
Auto-connect와 Inference라는 두 가지 다른 도구가 자동으로 제약 조건을 생성하는 데 사용됩니다.
- Auto-Connect – 이 기능은 다음을 클릭하여 활성화할 수 있습니다. :
 이름에서 알 수 있듯이, Auto-connect는 두 개의 이웃하는 뷰 사이에 자동으로 제약 조건을 생성합니다.
 - Inference – 이 기능은 다음을 클릭하여 활성화할 수 있습니다. :
 Inference 엔진은 레이아웃 내의 모든 요소 사이에 제약 조건을 생성합니다. Inference 엔진은 위젯의 위치와 크기와 같은 다양한 요소를 기반으로 최적의 연결을 찾아내고 생성하려고 시도합니다.
A demo of Auto-Connect layout is given below: 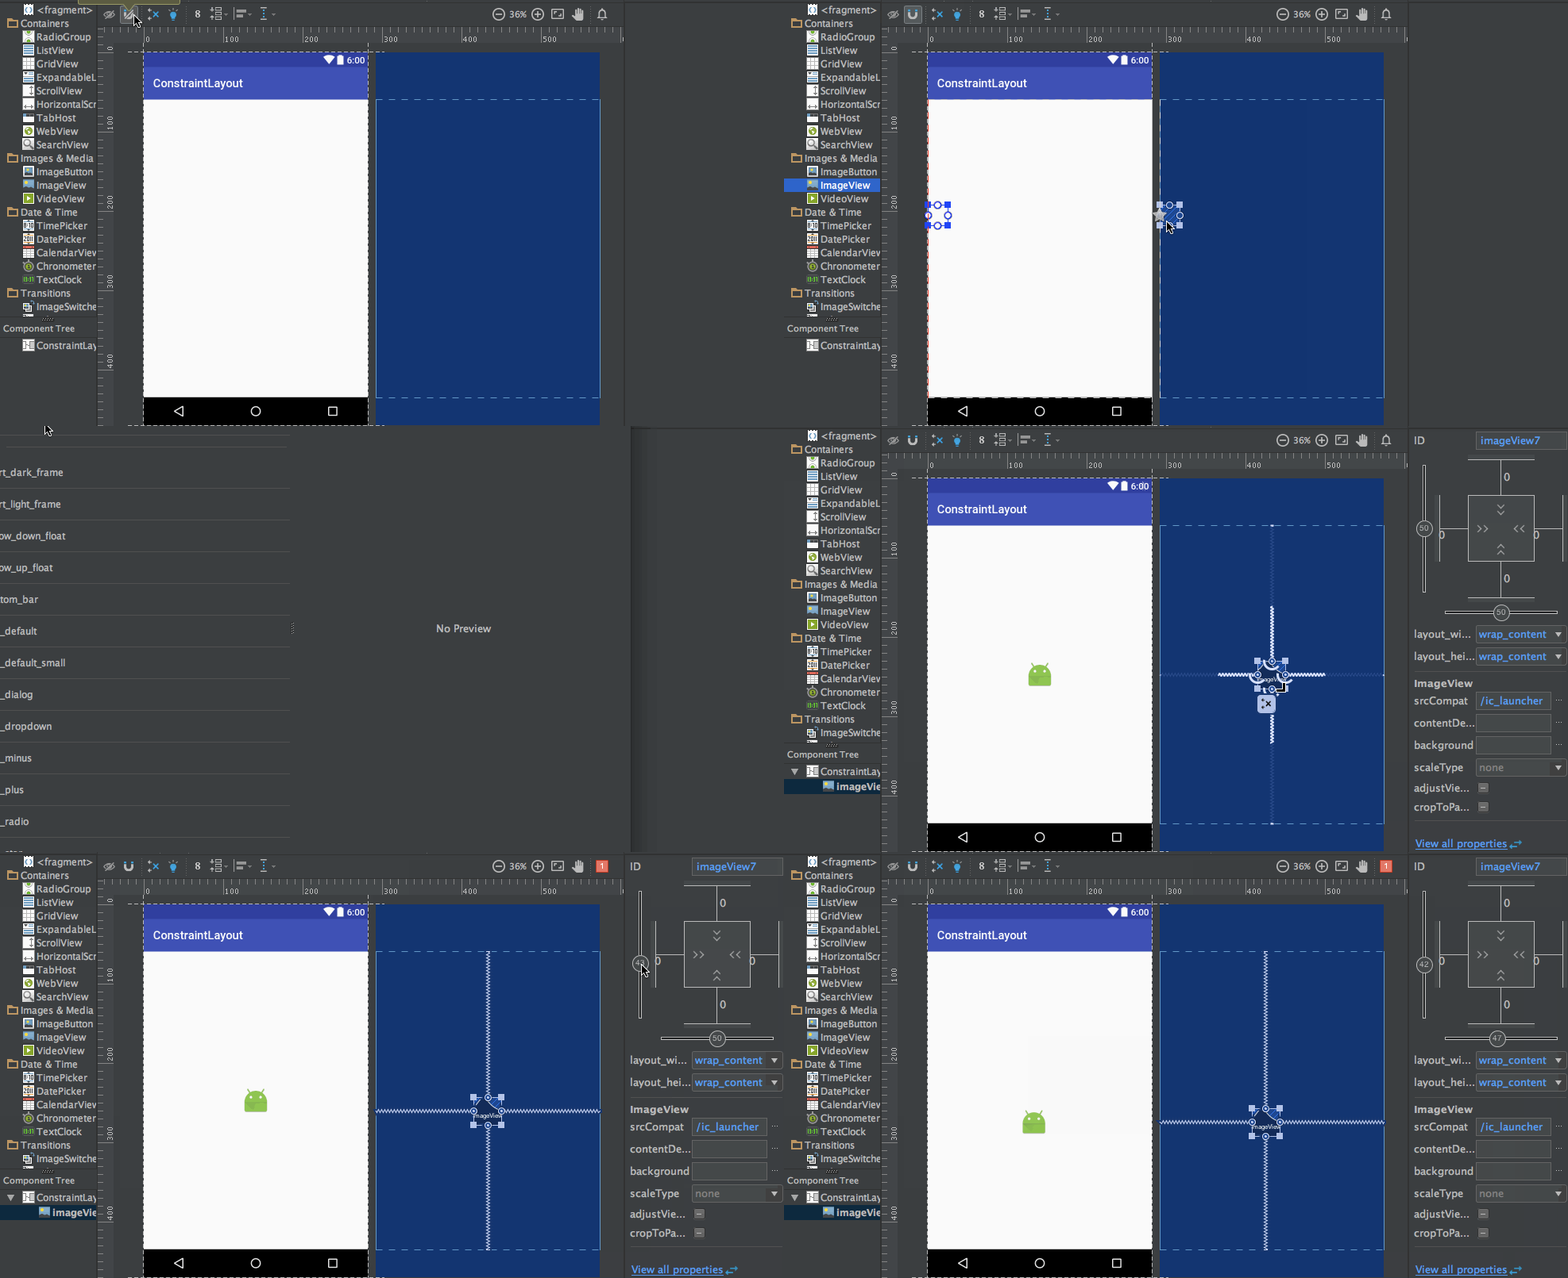 As you can see in the above gif, The constraints are animated automatically. Notice the horizontal and vertical sliders in the properties pane. They are called horizontal and vertical bias respectively. They allow us to position a view along the horizontal or vertical axis using a bias value, this will be relative to it’s constrained position. The xml code for the above demo is given below:
<?xml version="1.0" encoding="utf-8"?>
<android.support.constraint.ConstraintLayout
    xmlns:android="https://schemas.android.com/apk/res/android"
    xmlns:app="https://schemas.android.com/apk/res-auto"
    xmlns:tools="https://schemas.android.com/tools"
    android:layout_width="match_parent"
    android:layout_height="match_parent">

    <ImageView
        android:layout_width="wrap_content"
        android:layout_height="wrap_content"
        app:srcCompat="@mipmap/ic_launcher"
        android:id="@+id/imageView7"
        app:layout_constraintBottom_toBottomOf="parent"
        app:layout_constraintRight_toRightOf="parent"
        app:layout_constraintLeft_toLeftOf="parent"
        app:layout_constraintTop_toTopOf="parent"
        app:layout_constraintVertical_bias="0.58000004"
        app:layout_constraintHorizontal_bias="0.47" />
</android.support.constraint.ConstraintLayout>
아래에는 추론이 가능한 레이아웃의 데모가 제공됩니다: 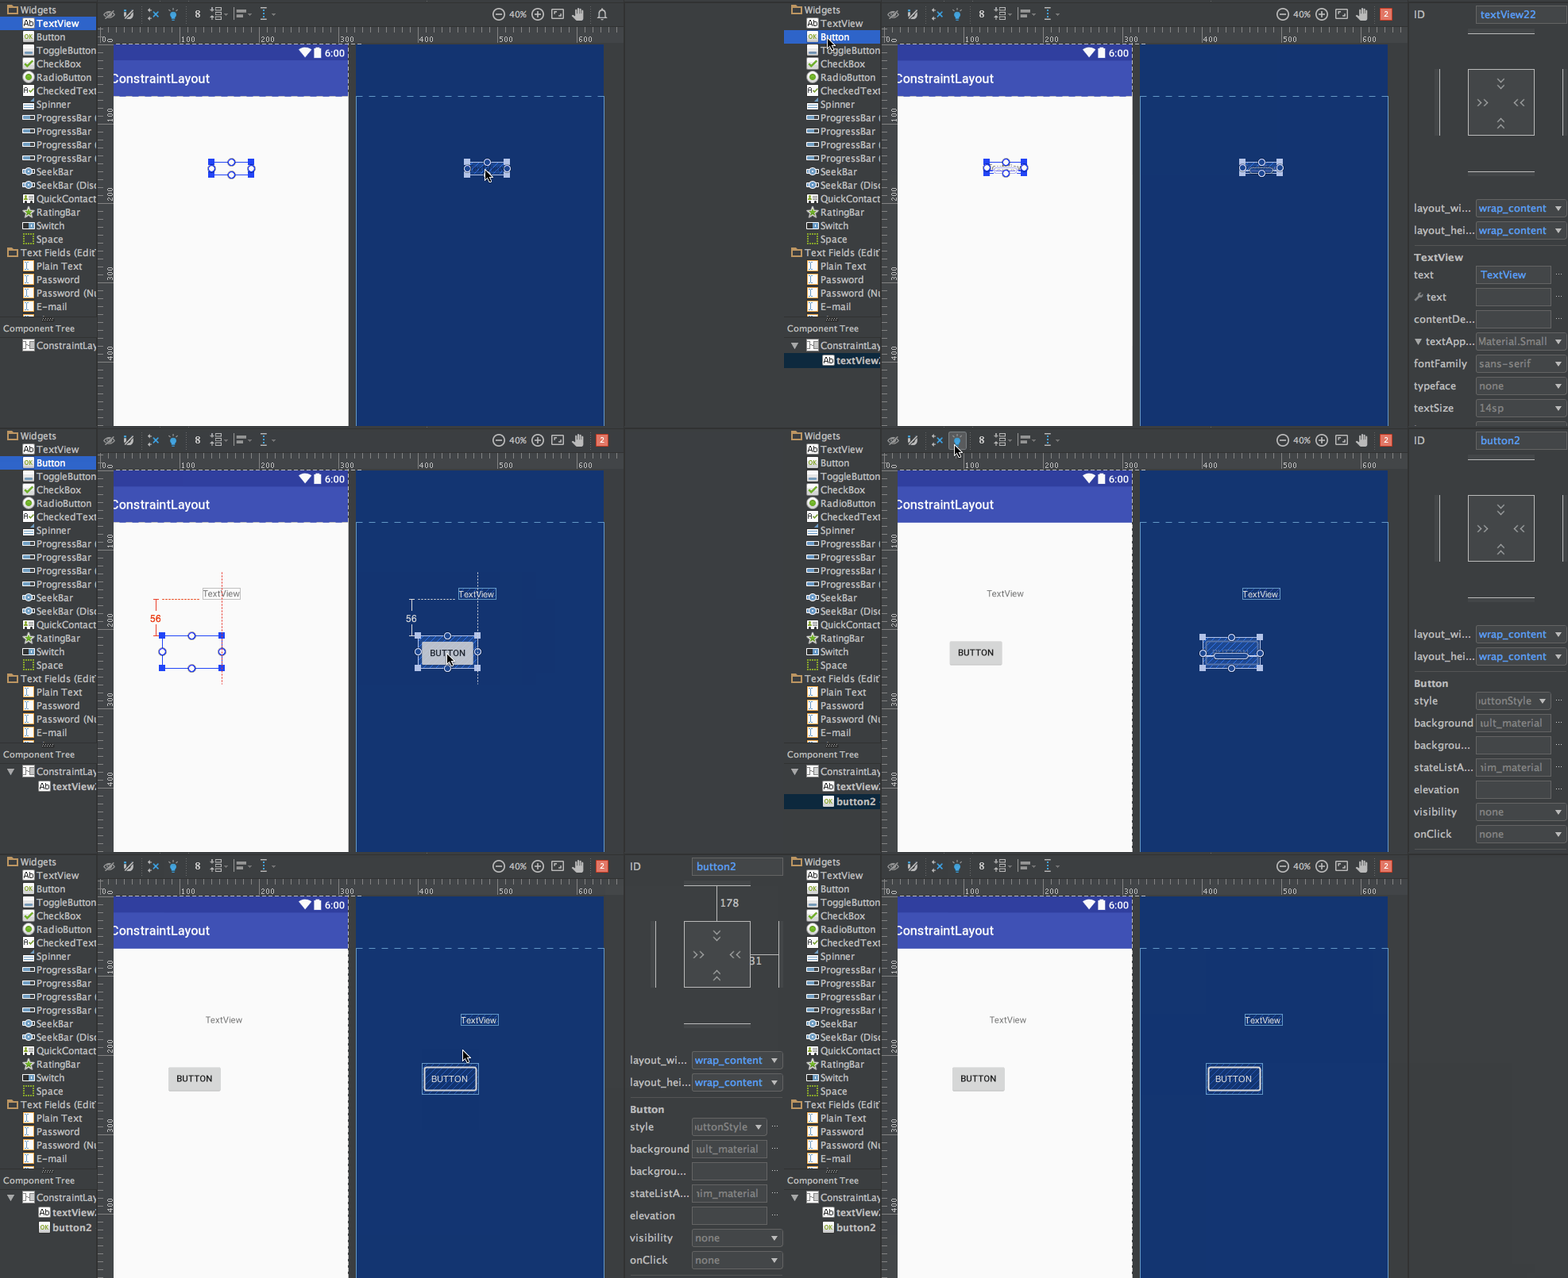 위 gif에 대한 xml 코드는 다음과 같습니다:
<?xml version="1.0" encoding="utf-8"?>
<android.support.constraint.ConstraintLayout
    xmlns:android="https://schemas.android.com/apk/res/android"
    xmlns:app="https://schemas.android.com/apk/res-auto"
    xmlns:tools="https://schemas.android.com/tools"
    android:layout_width="match_parent"
    android:layout_height="match_parent">

    <TextView
        android:text="TextView"
        android:layout_width="wrap_content"
        android:layout_height="wrap_content"
        android:id="@+id/textView22"
        tools:layout_constraintRight_creator="1"
        tools:layout_constraintBottom_creator="1"
        app:layout_constraintBottom_toTopOf="@+id/button2"
        app:layout_constraintRight_toRightOf="parent"
        tools:layout_constraintLeft_creator="1"
        android:layout_marginBottom="59dp"
        app:layout_constraintLeft_toLeftOf="parent" />

    <Button
        android:text="Button"
        android:layout_width="wrap_content"
        android:layout_height="wrap_content"
        android:id="@+id/button2"
        tools:layout_constraintTop_creator="1"
        tools:layout_constraintRight_creator="1"
        android:layout_marginEnd="31dp"
        app:layout_constraintRight_toRightOf="@+id/textView22"
        android:layout_marginTop="178dp"
        app:layout_constraintTop_toTopOf="parent"
        android:layout_marginRight="31dp" />
</android.support.constraint.ConstraintLayout>
tools:layout_constraintTop_creator="1": 생성자 속성은 제약 조건을 만든 사람을 추적하는 데 사용됩니다. 특히 추론 엔진에 의해 생성되는 경우 1로 할당됩니다.
제약 조건 삭제
개별 제약 조건을 삭제하려면 원형 핸들 위로 마우스를 올리고 빨간색으로 변할 때 클릭하십시오. 뷰의 모든 제약 조건을 삭제하려면 그 아래에 있는 다음과 같이 보이는 기호를 클릭하십시오:  샘플 데모 gif가 아래에 제공됩니다:
 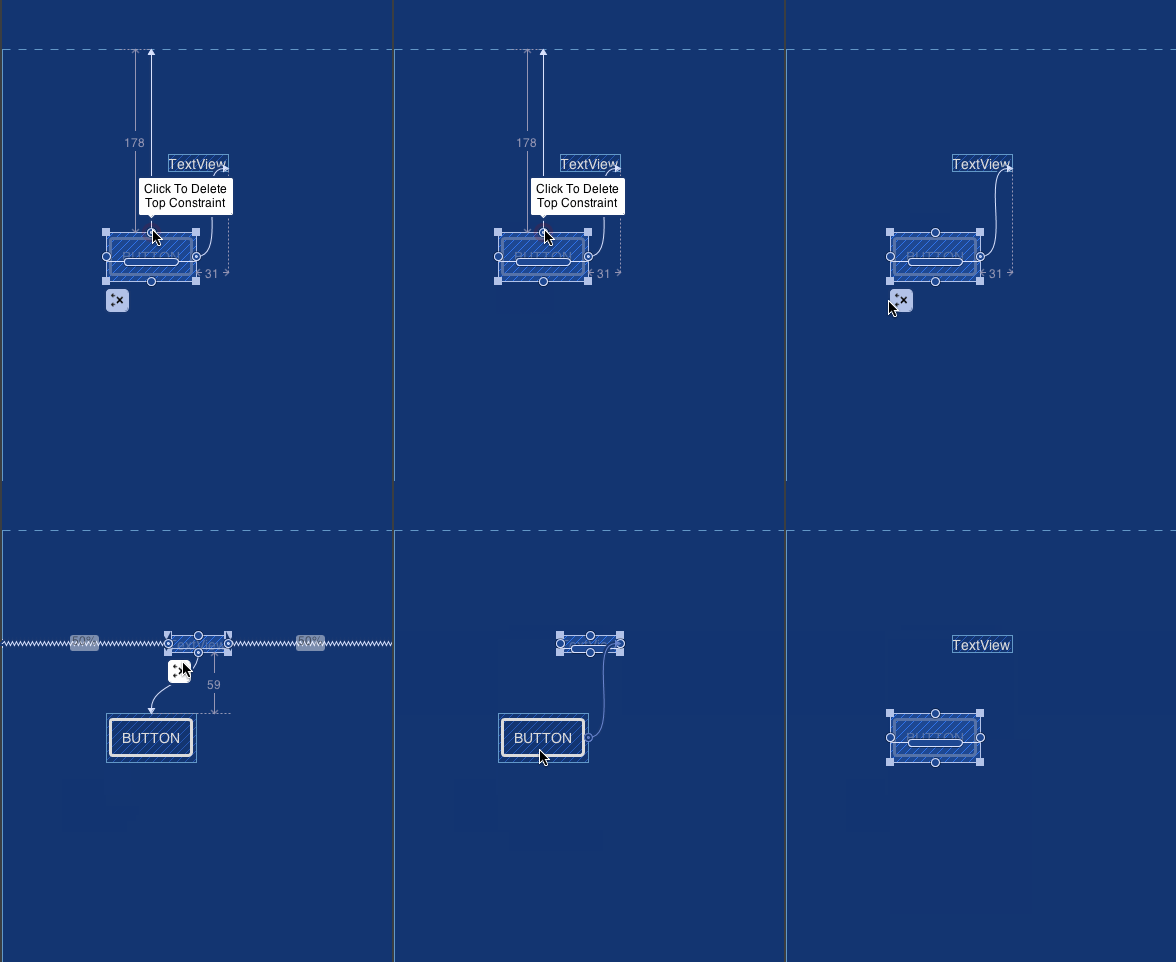 이로써 이 튜토리얼을 마칩니다. 직접 몇 개의 레이아웃을 제약 레이아웃으로 대체해 보세요.
Source:
https://www.digitalocean.com/community/tutorials/android-constraintlayout


