במדריך זה, נדבר על פרטי הַעֲקוֹב לְ סדרת הרגישויות של Android. גוגל הכריזה על עורך סדרת ההגבלות של Android בכנס Google I/O 2016. בעורך החדש יש סט של כלים חזקים שמאפשרים למפתחים ליצור היררכיות של עיצוב flat-ui עבור הפרישה המורכבת שלהם.
סדרת ההגבלות של Android
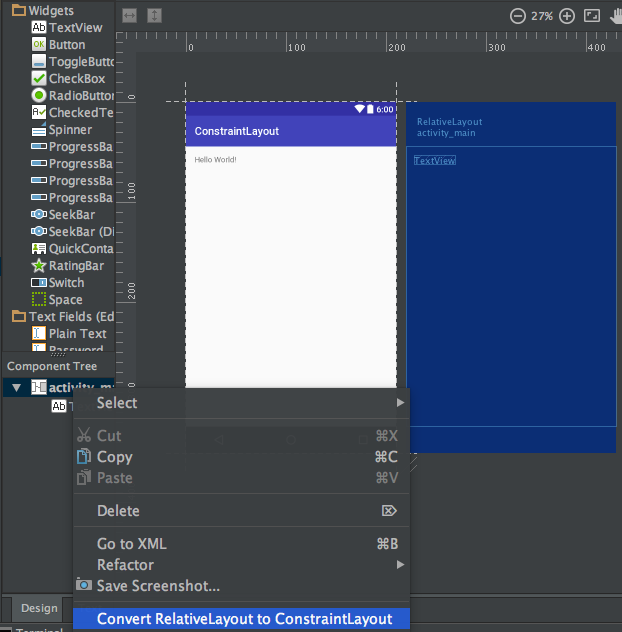
להשתמש ב-ConstraintLayout של אנדרואיד, ודאו שאתה משתמש בגרסה האחרונה של אנדרואיד סטודיו. באידיאל, אנדרואיד סטודיו 2.2 ומעלה. אנו צריכים להוריד את כלי ה-SDK המתאימים עבור ConstraintLayout ממנהל ה-SDK. ליצור פרויקט פעילות ריק חדש ולהוסיף את התלות הבאה בתוך קובץ ה-build.gradle. compile 'com.android.support.constraint:constraint-layout:1.0.0-beta4' ליצור פריסה חדשה עם הקלאס הראשי שמוגדר ל-ConstraintLayout כפי שמוצג בתמונה למטה.  כדי להמיר פריסה ישנה ל-ConstraintLayout, פתח את חלון העיצוב של הפריסה הרלוונטית, ללחוץ על הרכיב הראשי ולבחור את האפשרות הרלוונטית כפי שמוצג בתמונה למטה.
סקירת Constraint Layout של אנדרואיד
ה-ConstraintLayout של Android משמש להגדיר פריסת מסך על ידי הקצאת אילוצים לכל תצוגה/ווידג'ט ילד ביחס לתצוגות אחרות הנוכחיות. פריסת ה-ConstraintLayout דומה ל-RelativeLayout, אך בעוצמה נוספת. המטרה של ConstraintLayout היא לשפר את ביצועי היישומים על ידי הסרת התצוגות המקוננות עם עיצוב שטוח וגמיש. תצוגה בתוך ה-ConstraintLayout מכילה ידיות (או נקודות עיגון) בכל צד שמשמשות להקצאת האילוצים. בואו נגרור ונשים TextView על הפריסה ונקצה לו את האילוצים. 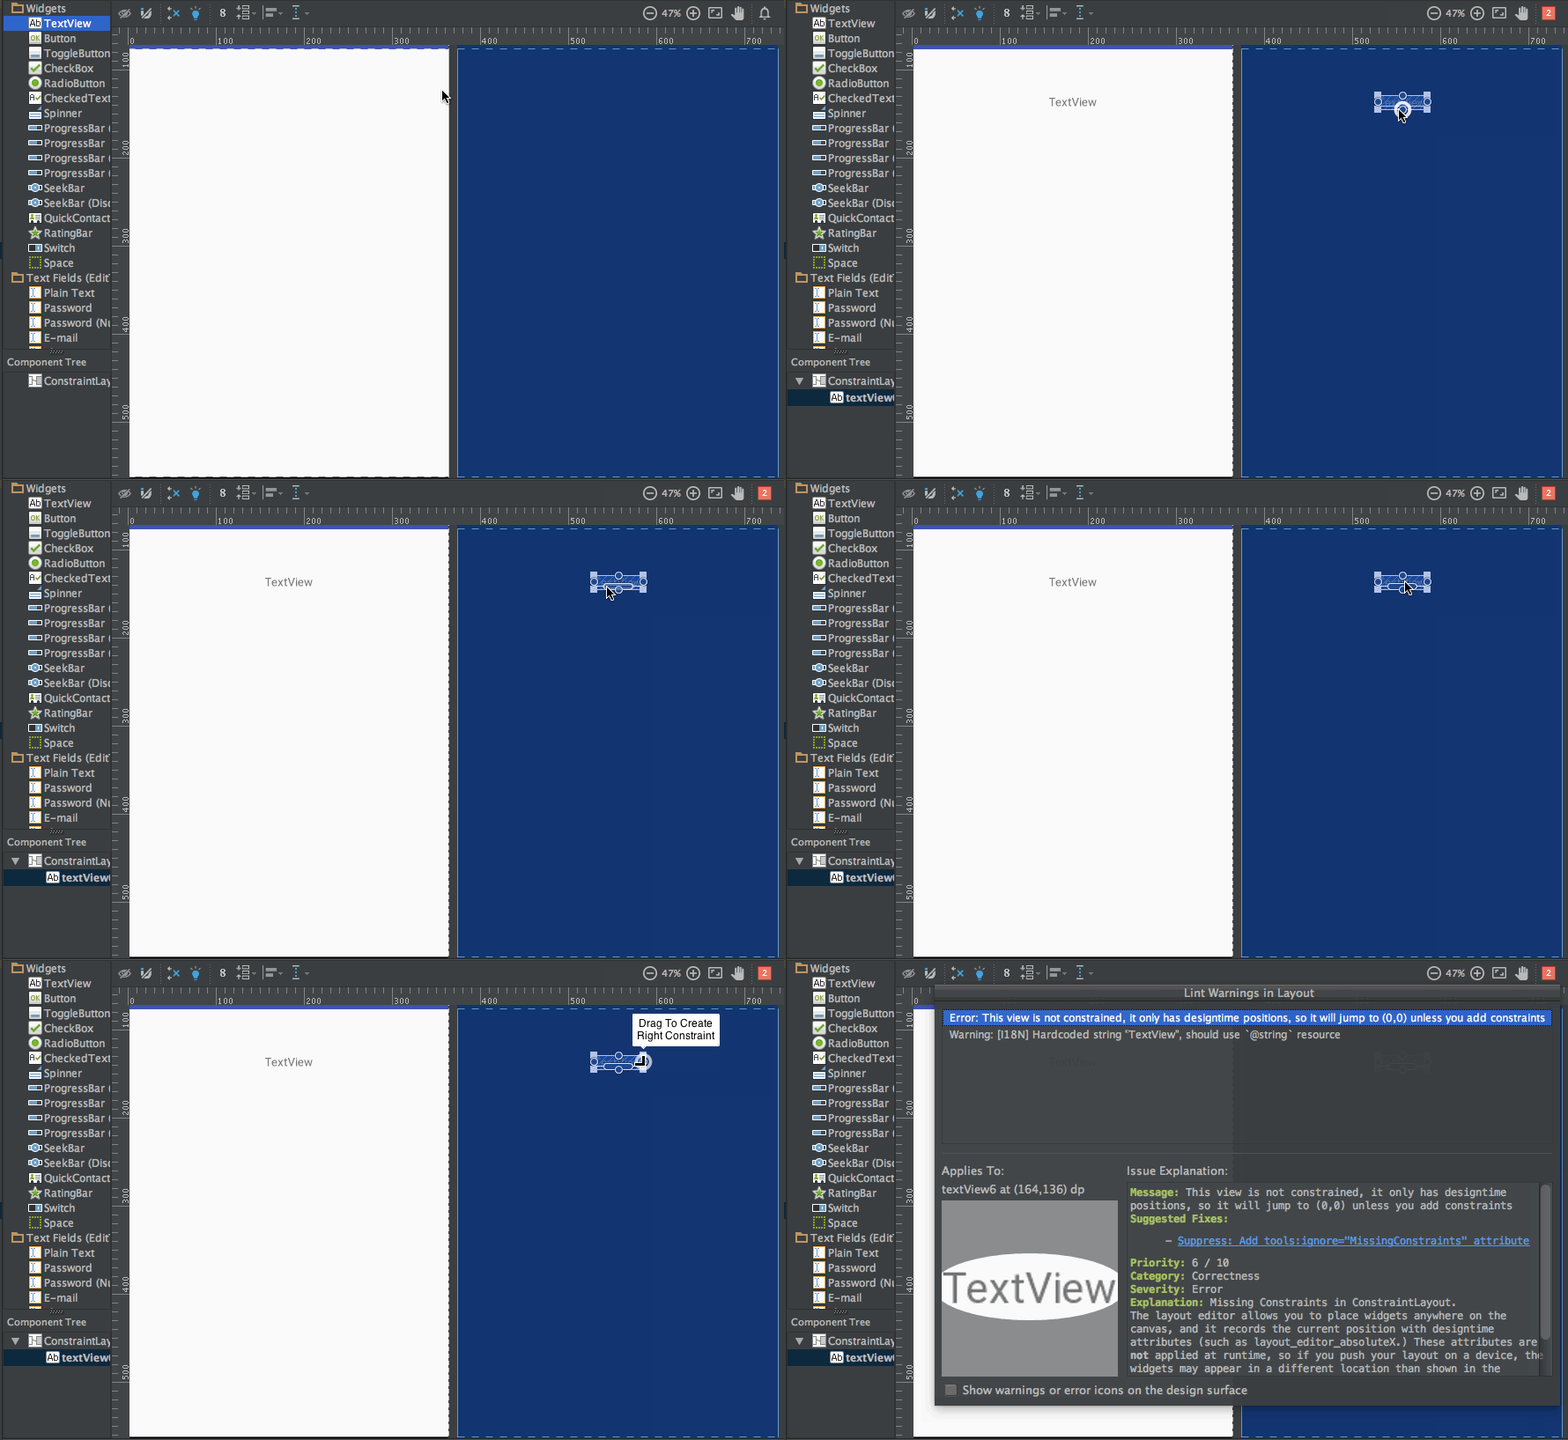 ה-TextView למעלה מכיל שלושה סוגים של ידיות:
ידית שינוי גודל – היא נמצאת בארבעת הפינות ומשמשת לשינוי גודל התצוגה, אך לשמירה על האילוצים שלה. ידית צד – זו הידית המעגלית שנמצאת במרכז כל צד. היא משמשת להגדרת האילוצים למעלה, לשמאל, למטה ולימין של התצוגה. ידית בסיס – משמשת ליישור הבסיס עם TextView אחר בפריסה.
העמית: נקבע את האילוצים על תיבת הטקסט ונבדוק את קוד ה-XML שלה. 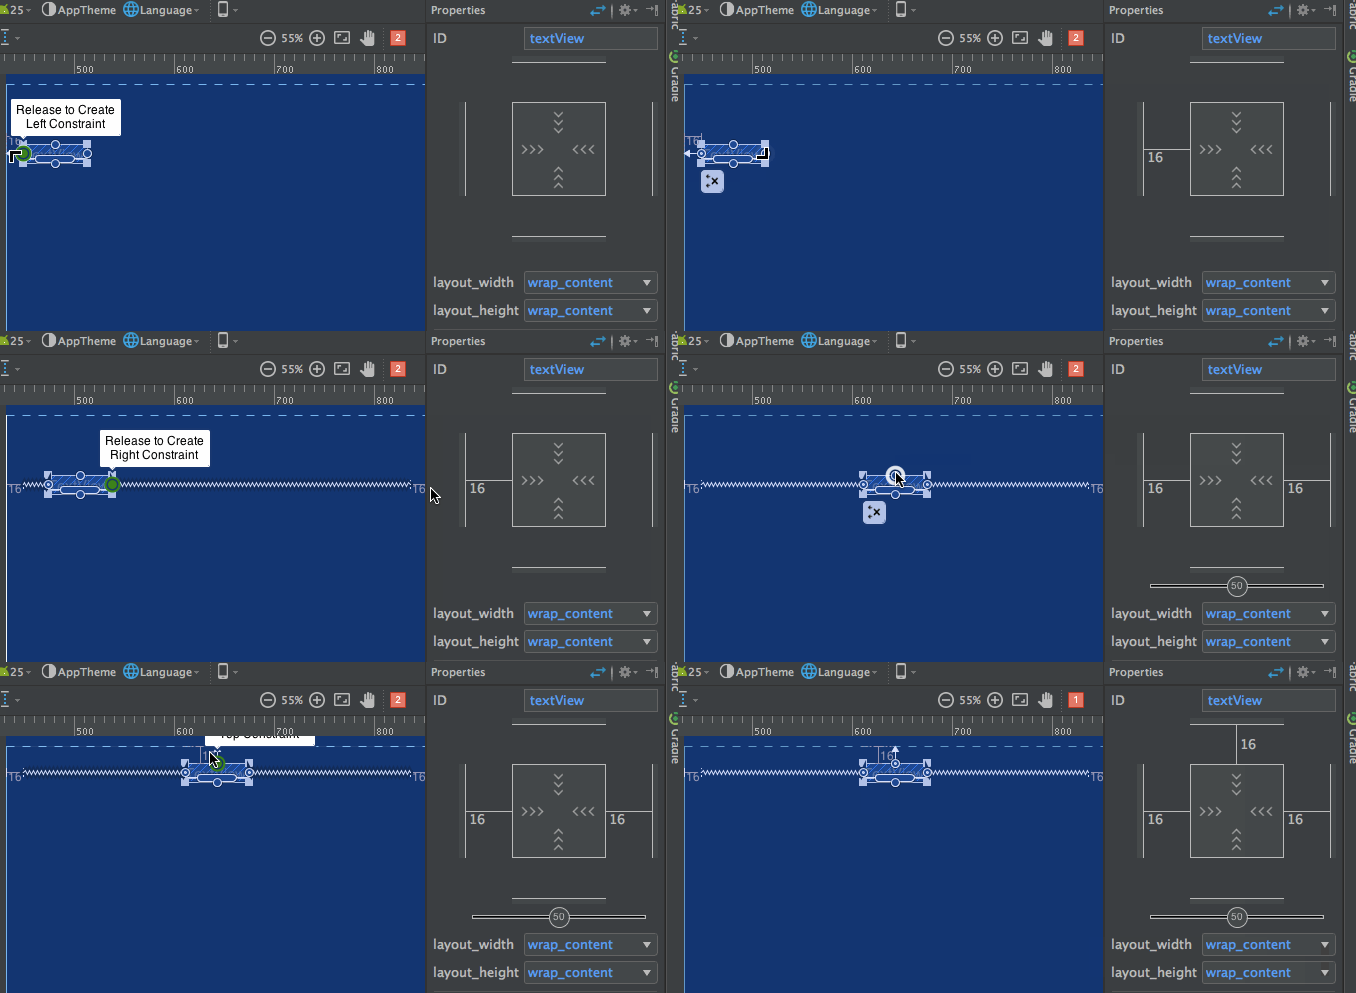 שים לב לחלונית המאפיינים בצד ימין:
 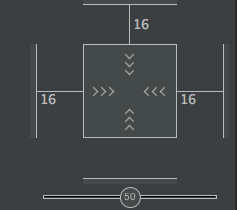 היא מציגה את המרווחים המוגדרים לכל צד של התצוגה. היא מאפשרת גם לשנות את גודל התצוגה על ידי החלפה בין המצבים הבאים:
- Wrap Content – מעטיף את התצוגה כדי למלא את התוכן שלה.

- Any Size – דומה ל-match parent.

- Fixed Size – מאפשר לנו לקבוע רוחב וגובה קבועים.

קוד ה-XML לפריסה הנ"ל נראה כך: sample.xml
<?xml version="1.0" encoding="utf-8"?>
<android.support.constraint.ConstraintLayout
    xmlns:android="https://schemas.android.com/apk/res/android"
    xmlns:app="https://schemas.android.com/apk/res-auto"
    android:layout_width="match_parent"
    android:layout_height="match_parent">

    <TextView
        android:text="TextView"
        android:layout_width="wrap_content"
        android:layout_height="wrap_content"
        android:id="@+id/textView"
        android:layout_marginStart="16dp"
        android:layout_marginTop="16dp"
        app:layout_constraintLeft_toLeftOf="parent"
        app:layout_constraintTop_toTopOf="parent"
        android:layout_marginLeft="16dp"
        android:layout_marginEnd="16dp"
        app:layout_constraintRight_toRightOf="parent"
        android:layout_marginRight="16dp" />
</android.support.constraint.ConstraintLayout>
app:layout_constraintLeft_toLeftOf="parent"– האפשרות constraintLeft היא נקודת העיגול משמאל של התצוגה. toLeftOf מציינת מיצוי של התצוגה לשמאל של התצוגה שהוקצתה, שהיא "parent" במקרה זה.
כאשר המיקומים המוחלטים מוגדרים על התצוגה, המאפיינים XML שמשמשים הם –
tools:layout_editor_absoluteY="48dp"
tools:layout_editor_absoluteX="40dp"
בואו נוסיף טקסט נוסף וניישב את הבסיסים שלהם.  קוד ה-XML לפריסה למעלה הוא:
<?xml version="1.0" encoding="utf-8"?>
<android.support.constraint.ConstraintLayout
    xmlns:android="https://schemas.android.com/apk/res/android"
    xmlns:app="https://schemas.android.com/apk/res-auto"
    xmlns:tools="https://schemas.android.com/tools"
    android:layout_width="match_parent"
    android:layout_height="match_parent">

    <TextView
        android:text="TextView"
        android:layout_width="wrap_content"
        android:layout_height="wrap_content"
        android:id="@+id/textView"
        android:layout_marginStart="16dp"
        app:layout_constraintLeft_toLeftOf="parent"
        android:layout_marginLeft="16dp"
        android:layout_marginEnd="16dp"
        app:layout_constraintRight_toRightOf="parent"
        android:layout_marginRight="16dp"
        android:layout_marginTop="16dp"
        app:layout_constraintTop_toTopOf="parent" />

    <TextView
        android:text="TextView"
        android:layout_width="wrap_content"
        android:layout_height="wrap_content"
        android:id="@+id/textView2"
        app:layout_constraintBaseline_toBaselineOf="@+id/textView"
        android:layout_marginStart="16dp"
        app:layout_constraintLeft_toLeftOf="parent"
        android:layout_marginLeft="16dp"
        app:layout_constraintRight_toLeftOf="@+id/textView"
        android:layout_marginEnd="8dp"
        android:layout_marginRight="8dp" />

</android.support.constraint.ConstraintLayout>
ישנם שני כלים נוספים, Auto-connect ו-Inferences, המשמשים ליצירת אילוצים באופן אוטומטי.
- Auto-Connect – ניתן להפעיל את התכונה הזו על ידי לחיצה:
 כפי שהשם מרמז, Auto-connect יוצר אילוצים אוטומטית בין שני תצוגים שסמוכים
 - Inference – ניתן להפעיל את התכונה הזו על ידי לחיצה:
 מנוע ההסק יוצר אילוצים בין כל הרכיבים בפריסה. מנוע ההסק מנסה למצוא וליצור חיבורים אופטימליים בהתבסס על פקטורים שונים כגון המיקומים של הווידג'טים וגודלם.
A demo of Auto-Connect layout is given below: 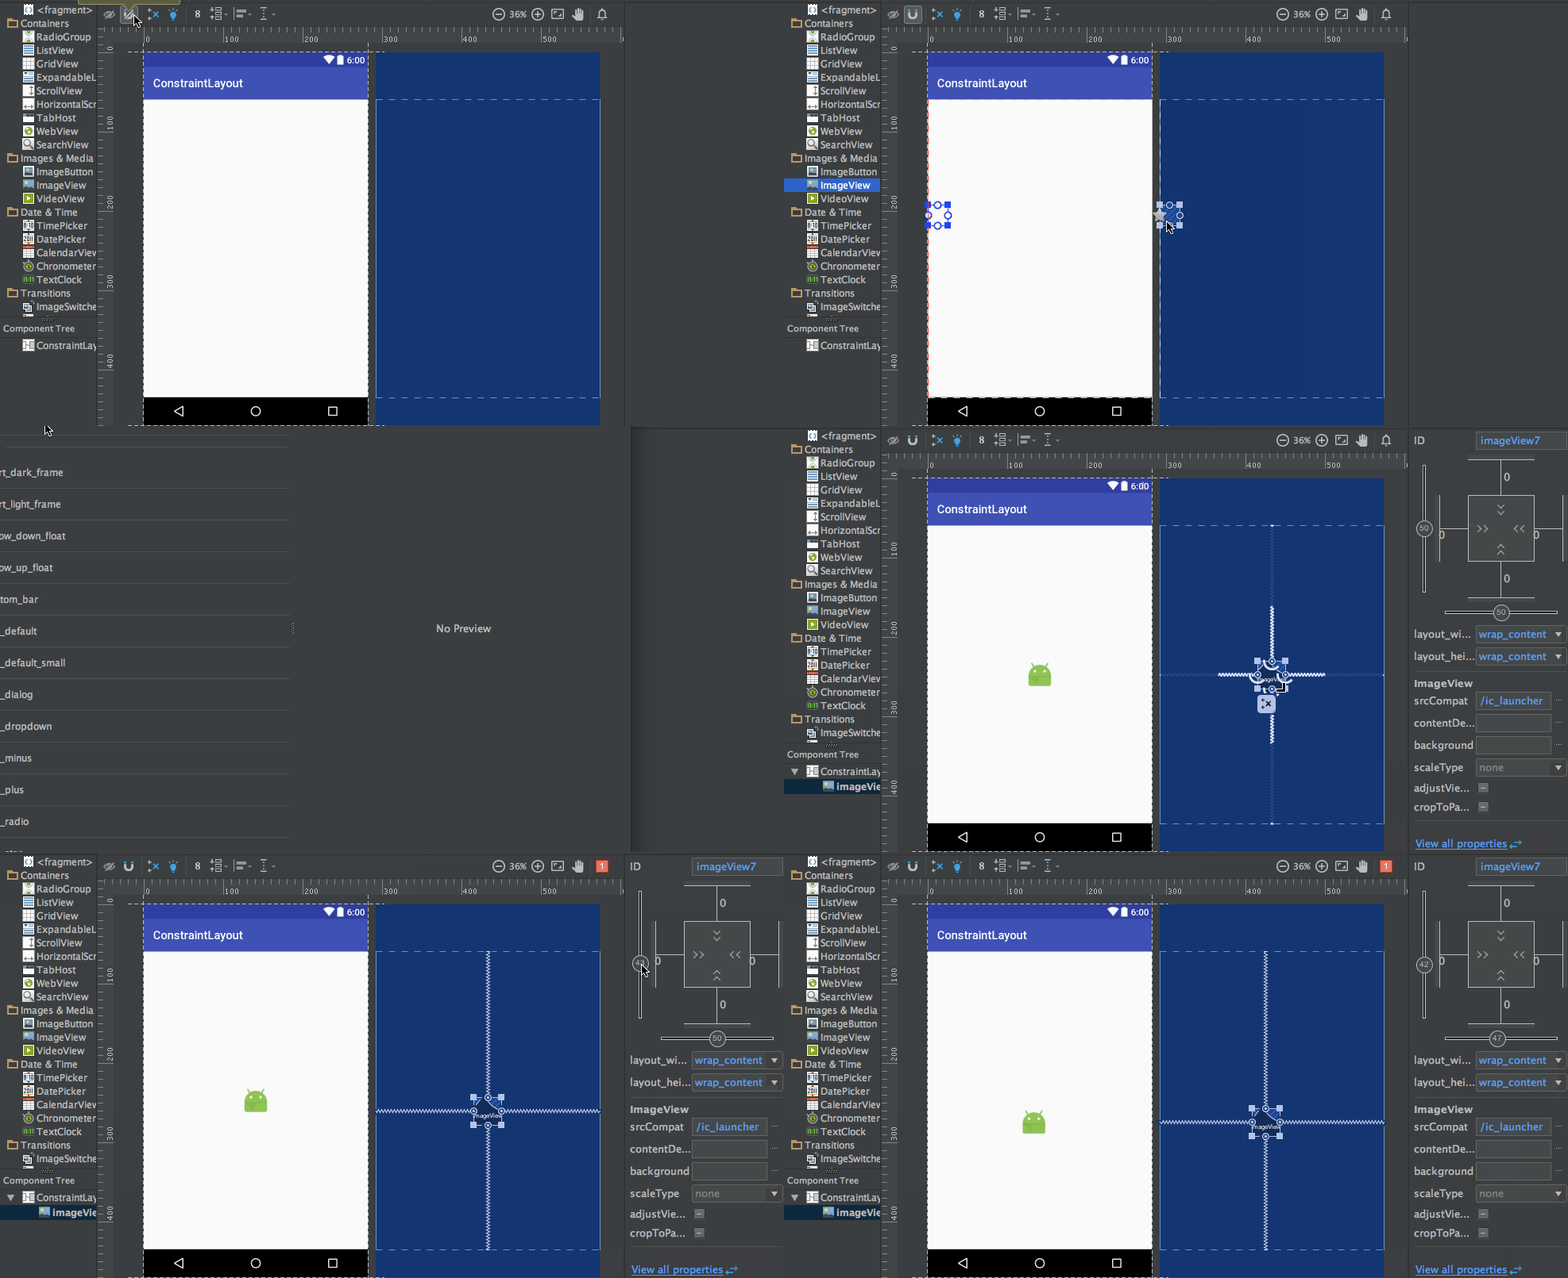 As you can see in the above gif, The constraints are animated automatically. Notice the horizontal and vertical sliders in the properties pane. They are called horizontal and vertical bias respectively. They allow us to position a view along the horizontal or vertical axis using a bias value, this will be relative to it’s constrained position. The xml code for the above demo is given below:
<?xml version="1.0" encoding="utf-8"?>
<android.support.constraint.ConstraintLayout
    xmlns:android="https://schemas.android.com/apk/res/android"
    xmlns:app="https://schemas.android.com/apk/res-auto"
    xmlns:tools="https://schemas.android.com/tools"
    android:layout_width="match_parent"
    android:layout_height="match_parent">

    <ImageView
        android:layout_width="wrap_content"
        android:layout_height="wrap_content"
        app:srcCompat="@mipmap/ic_launcher"
        android:id="@+id/imageView7"
        app:layout_constraintBottom_toBottomOf="parent"
        app:layout_constraintRight_toRightOf="parent"
        app:layout_constraintLeft_toLeftOf="parent"
        app:layout_constraintTop_toTopOf="parent"
        app:layout_constraintVertical_bias="0.58000004"
        app:layout_constraintHorizontal_bias="0.47" />
</android.support.constraint.ConstraintLayout>
הנה הדגמה של פריסה עם ההפעלה מאופשרת: 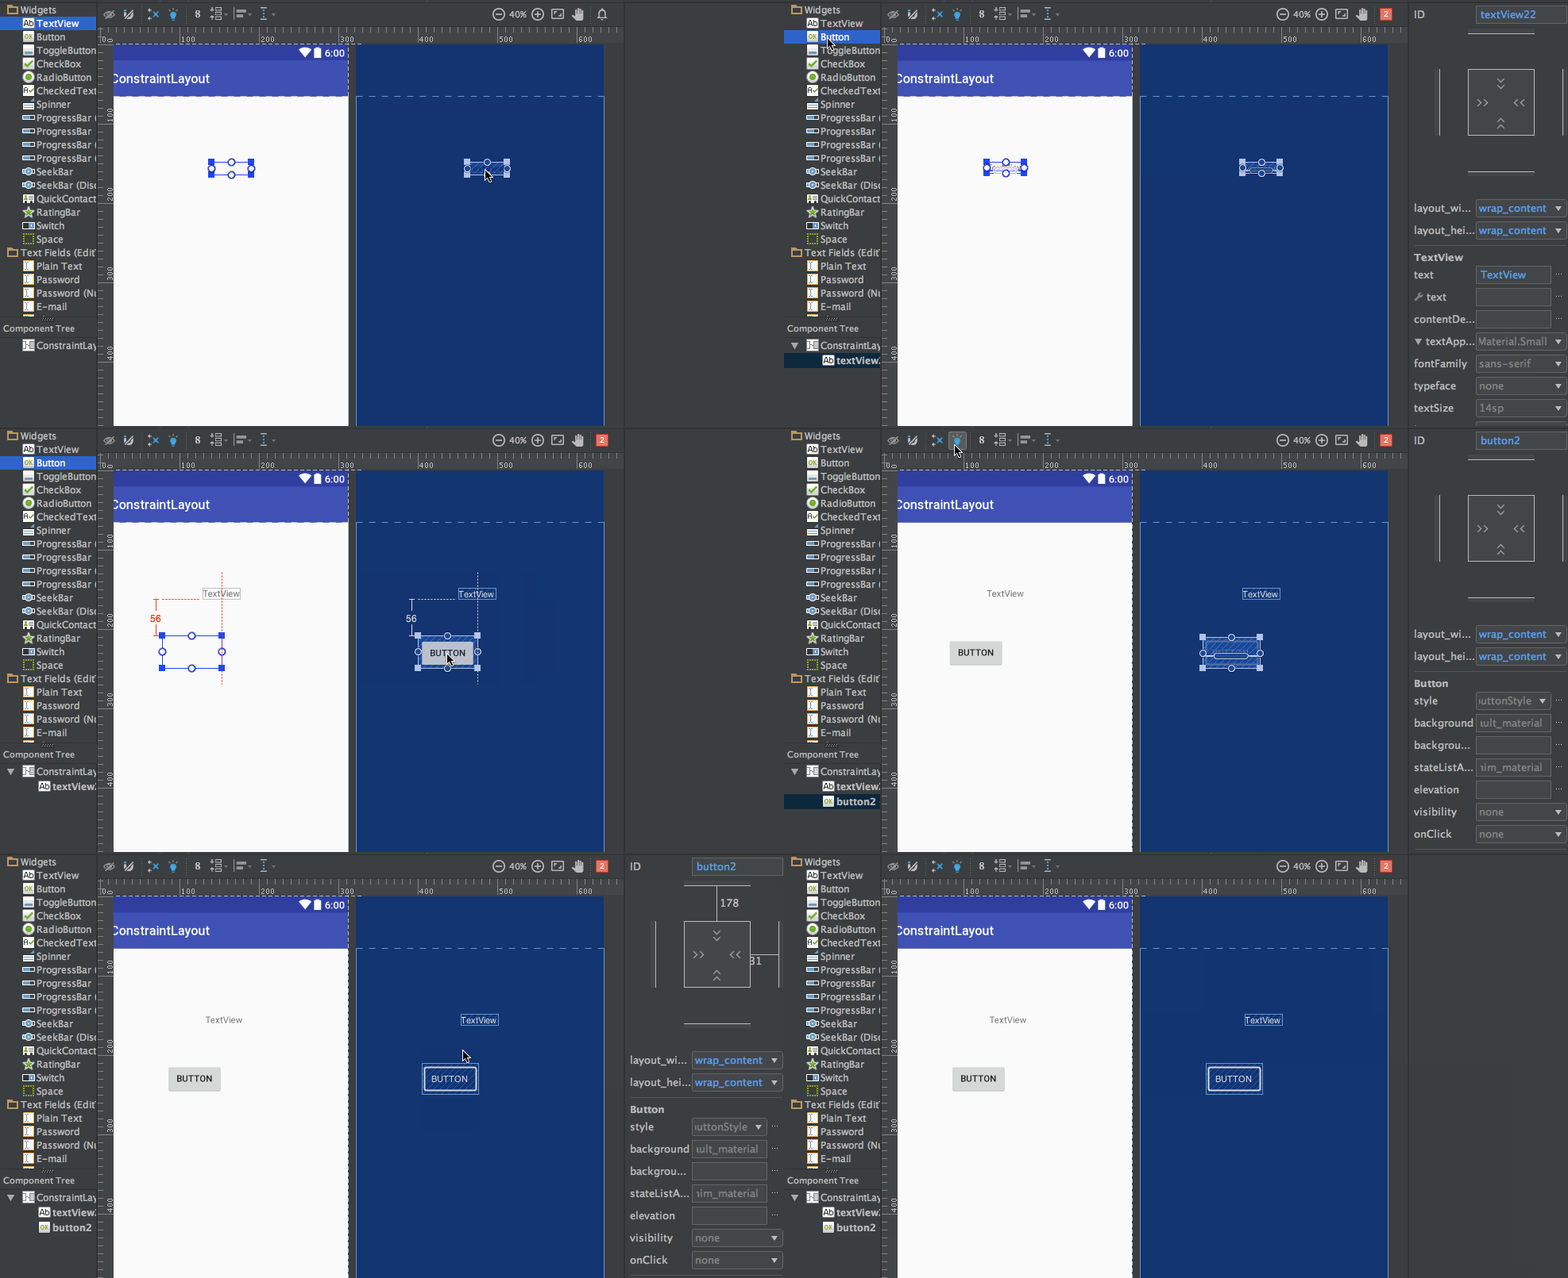 הקוד XML עבור ה-GIF לעיל הוא:
<?xml version="1.0" encoding="utf-8"?>
<android.support.constraint.ConstraintLayout
    xmlns:android="https://schemas.android.com/apk/res/android"
    xmlns:app="https://schemas.android.com/apk/res-auto"
    xmlns:tools="https://schemas.android.com/tools"
    android:layout_width="match_parent"
    android:layout_height="match_parent">

    <TextView
        android:text="TextView"
        android:layout_width="wrap_content"
        android:layout_height="wrap_content"
        android:id="@+id/textView22"
        tools:layout_constraintRight_creator="1"
        tools:layout_constraintBottom_creator="1"
        app:layout_constraintBottom_toTopOf="@+id/button2"
        app:layout_constraintRight_toRightOf="parent"
        tools:layout_constraintLeft_creator="1"
        android:layout_marginBottom="59dp"
        app:layout_constraintLeft_toLeftOf="parent" />

    <Button
        android:text="Button"
        android:layout_width="wrap_content"
        android:layout_height="wrap_content"
        android:id="@+id/button2"
        tools:layout_constraintTop_creator="1"
        tools:layout_constraintRight_creator="1"
        android:layout_marginEnd="31dp"
        app:layout_constraintRight_toRightOf="@+id/textView22"
        android:layout_marginTop="178dp"
        app:layout_constraintTop_toTopOf="parent"
        android:layout_marginRight="31dp" />
</android.support.constraint.ConstraintLayout>
tools:layout_constraintTop_creator="1": המאפיינים של היוצר לעקוב אחר מי יצר את האילוצים, במיוחד אם הם נוצרו על ידי מנוע ההסקה הם מוקצים כ-1.
מחיקת אילוצים
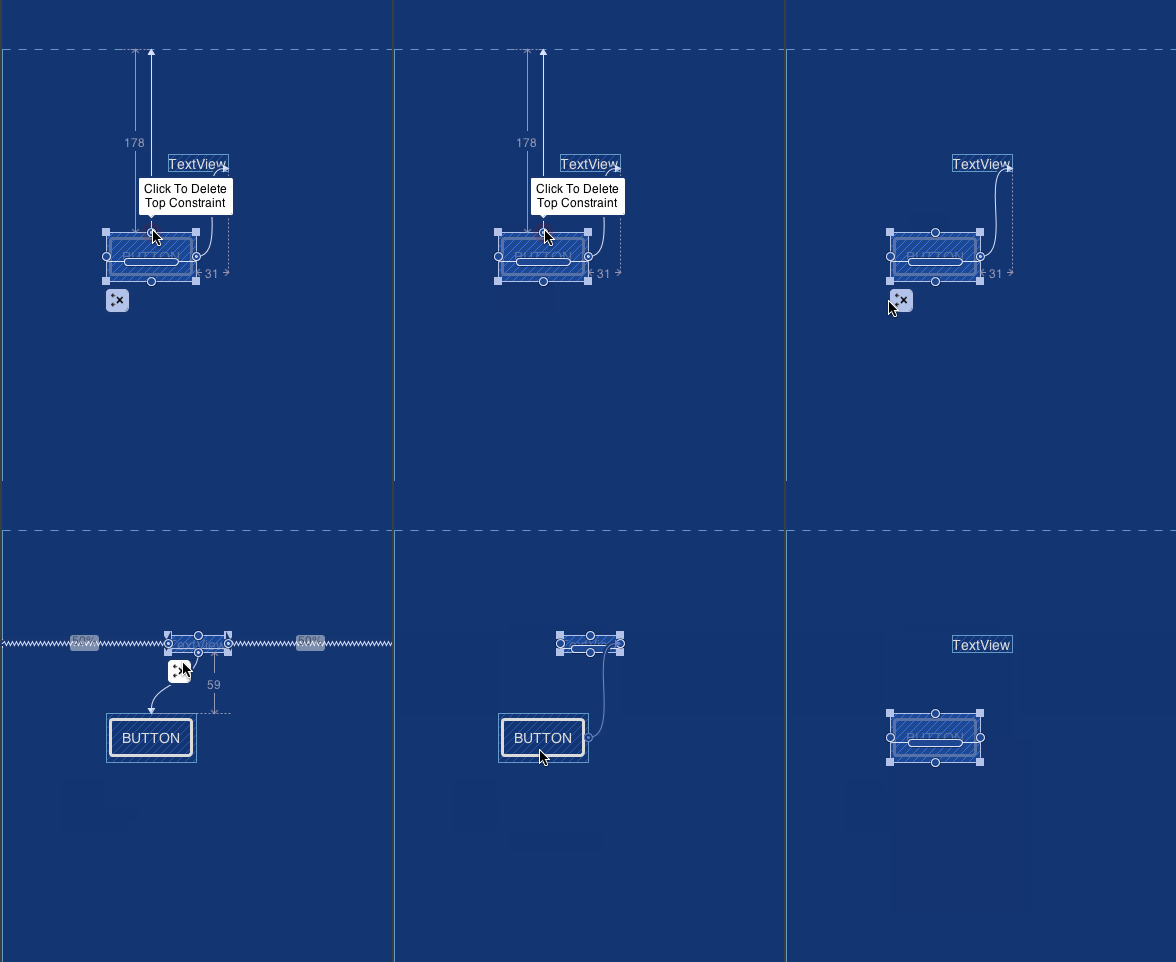
כדי למחוק אילוצים יחידים, נחית מעל לידית המעגלית ולחץ עליה כשהיא משתנה לאדום. כדי למחוק את כל האילוצים של תצוגה, לחץ על הסמל שתחתיו נראה כמו:  דמו דוגמתי מוצג למטה:
  זה מסיים את המדריך הזה. אתה יכול להמשיך ולנסות להחליף חלק מהפריסות שלך עם פריסת אילוצים.
Source:
https://www.digitalocean.com/community/tutorials/android-constraintlayout


