在這個教程中,我們將討論 android ConstraintLayout 的細節。Google 在 2016 年的 Google I/O Conference 上推出了 Android 約束布局編輯器。新的佈局編輯器具有一組強大的工具,讓開發人員為其複雜的佈局創建扁平化 UI 階層結構。
Android ConstraintLayout
使用Android ConstraintLayout時,請確保您使用最新版本的Android Studio。理想情況下,Android Studio應該是2.2或更高版本。我們需要從SDK Manager下載ConstraintLayout所需的SDK工具。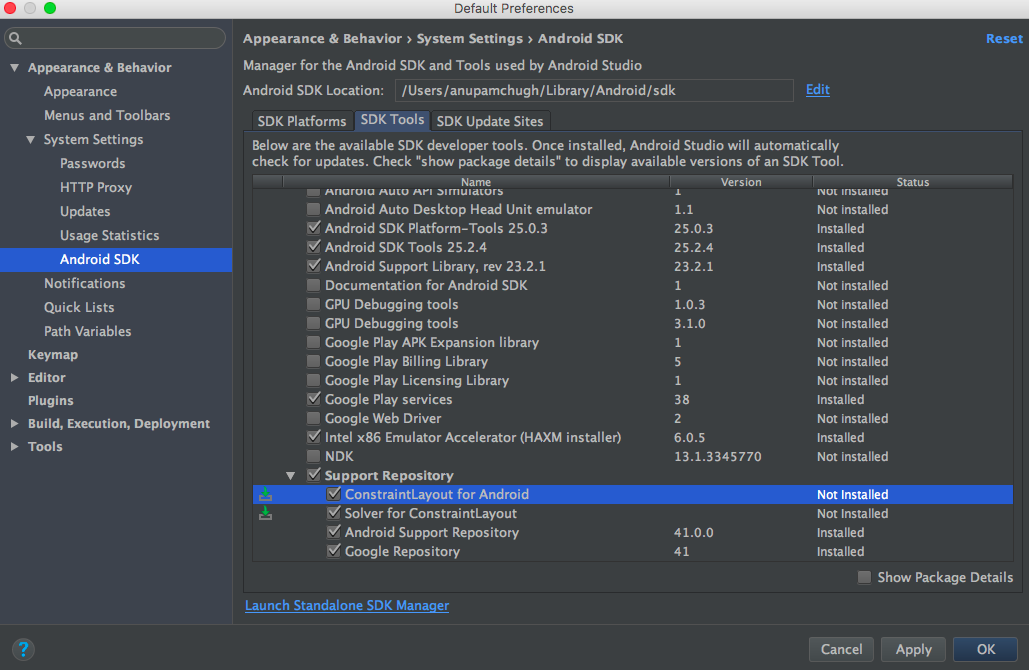 創建一個新的空活動項目,並在build.gradle文件中添加以下依賴。
 compile 'com.android.support.constraint:constraint-layout:1.0.0-beta4'創建一個新的佈局,將根類設置為ConstraintLayout,如下圖所示。 將舊的佈局轉換為ConstraintLayout。打開相應佈局的設計窗格,右鍵單擊根組件,並選擇相應的選項,如下圖所示。
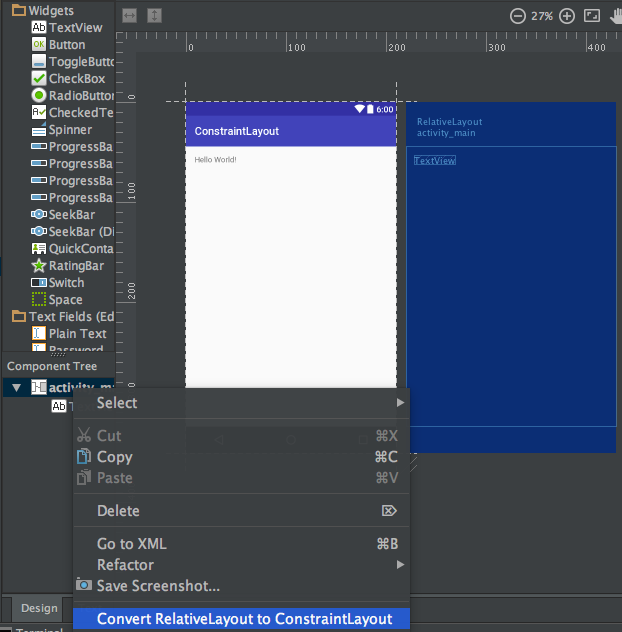
Android Constraint Layout 概述
Android ConstraintLayout 用於通過為每個子視圖/小部件分配與其他視圖相對應的約束來定義佈局。ConstraintLayout 類似於 RelativeLayout,但具有更強大的功能。ConstraintLayout 的目的是通過使用平坦且靈活的設計來提高應用程序的性能,從而消除了嵌套視圖。ConstraintLayout 中的視圖的每一側都有手柄(或錨點),用於分配約束。讓我們在佈局上拖放一個 TextView,並為其分配約束。 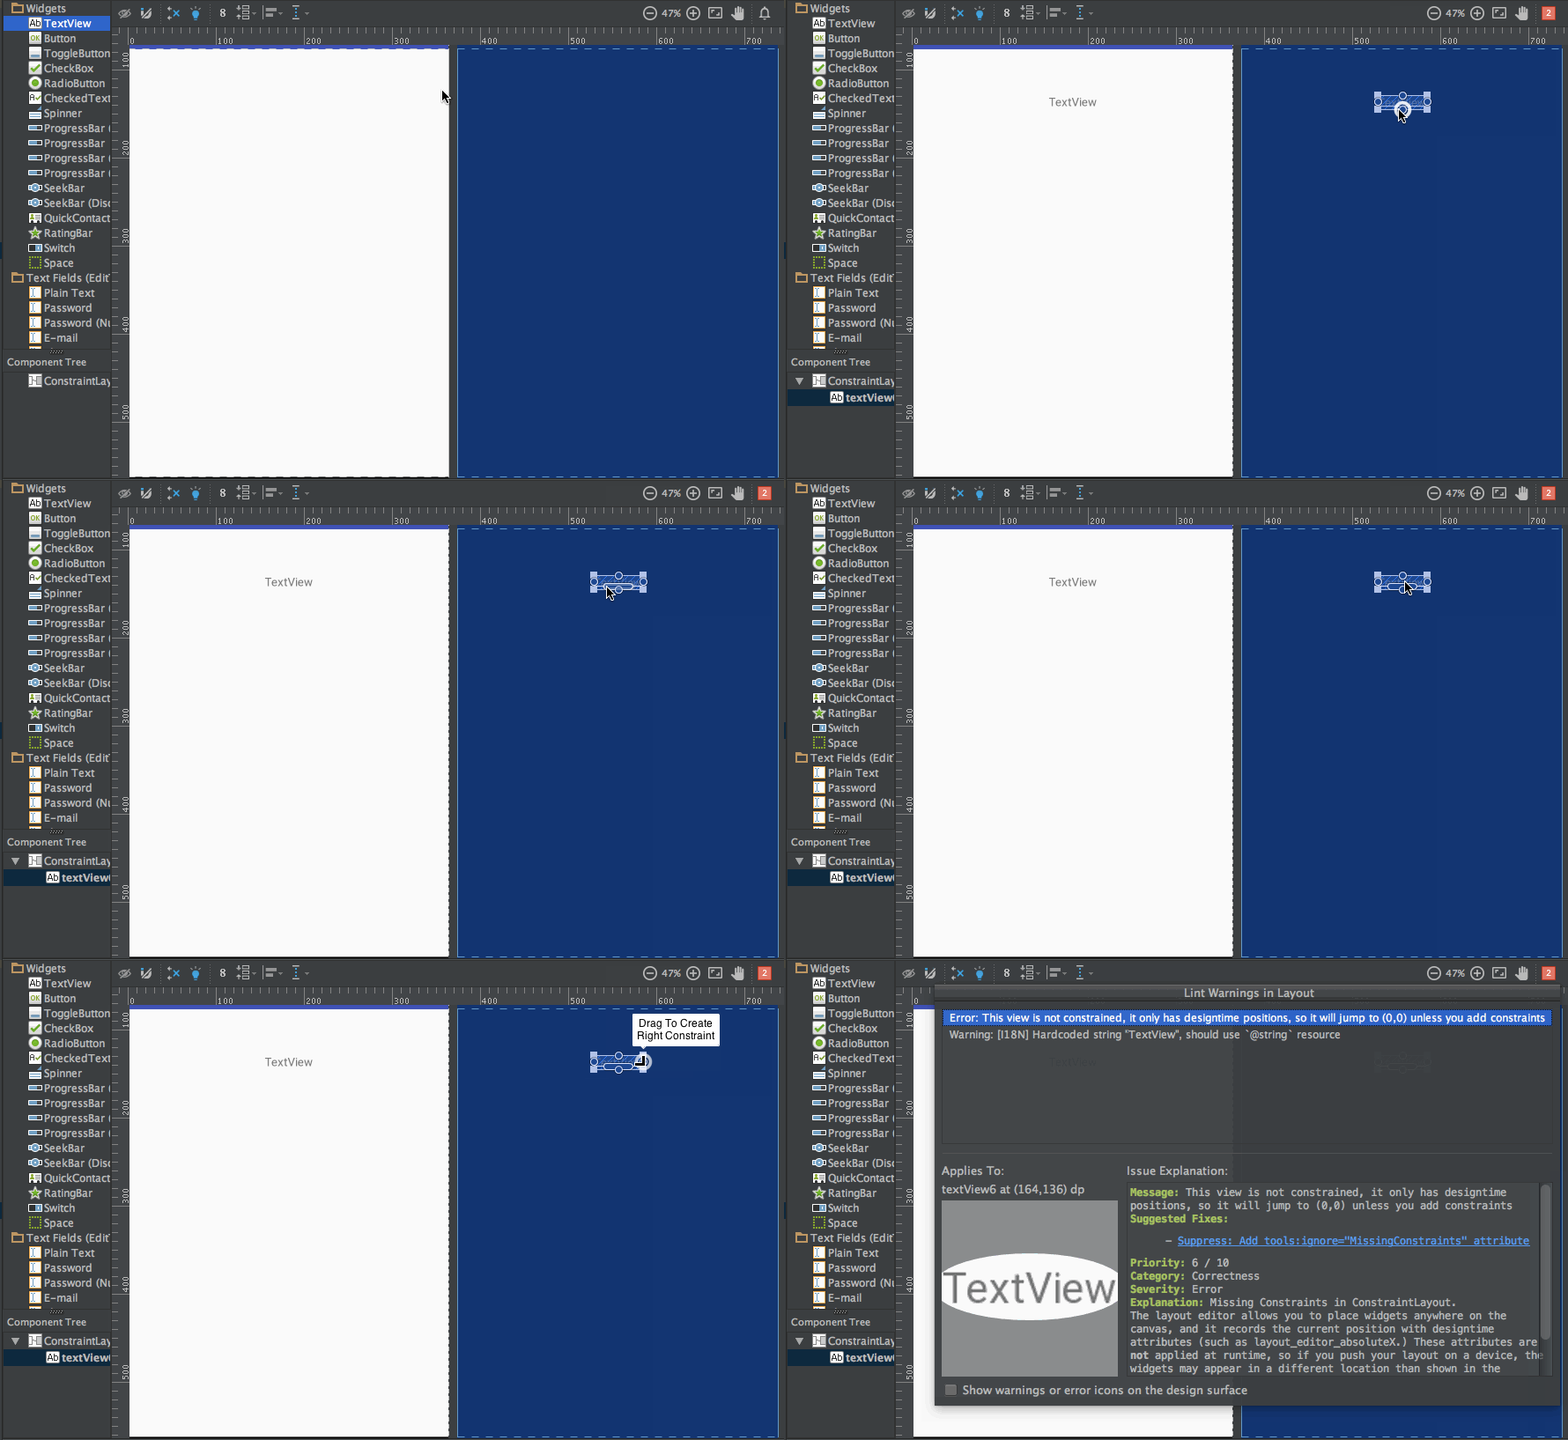 上面的 TextView 有三種類型的手柄:
調整大小的手柄 – 它位於四個角落,用於調整視圖的大小,但保持其約束不變。邊緣手柄 – 它是位於每個邊緣中心的圓形手柄。它用於設置視圖的頂部、左側、底部和右側的約束。基線手柄 – 它用於將基線與佈局中的另一個 TextView 對齊。
讓我們對 TextView 分配約束,並查看其 xml 代碼。請注意右側的屬性檢查器窗格: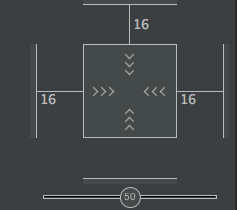 它顯示了視圖每一側設置的邊距。它還允許通過在以下模式之間切換來更改視圖的大小:
上述布局的 xml 代碼如下:sample.xml
<?xml version="1.0" encoding="utf-8"?>
<android.support.constraint.ConstraintLayout
    xmlns:android="https://schemas.android.com/apk/res/android"
    xmlns:app="https://schemas.android.com/apk/res-auto"
    android:layout_width="match_parent"
    android:layout_height="match_parent">

    <TextView
        android:text="TextView"
        android:layout_width="wrap_content"
        android:layout_height="wrap_content"
        android:id="@+id/textView"
        android:layout_marginStart="16dp"
        android:layout_marginTop="16dp"
        app:layout_constraintLeft_toLeftOf="parent"
        app:layout_constraintTop_toTopOf="parent"
        android:layout_marginLeft="16dp"
        android:layout_marginEnd="16dp"
        app:layout_constraintRight_toRightOf="parent"
        android:layout_marginRight="16dp" />
</android.support.constraint.ConstraintLayout>
app:layout_constraintLeft_toLeftOf="parent"– constraintLeft 是视图左侧的锚点。toLeftOf 表示将视图与指定的视图(在本例中为“parent”)左对齐。
当在视图上设置绝对位置时,使用的是以下 XML 属性 –
tools:layout_editor_absoluteY="48dp"
tools:layout_editor_absoluteX="40dp"
让我们添加另一个 TextView 并对齐它们的基线。 以上布局的 XML 代码为:
<?xml version="1.0" encoding="utf-8"?>
<android.support.constraint.ConstraintLayout
    xmlns:android="https://schemas.android.com/apk/res/android"
    xmlns:app="https://schemas.android.com/apk/res-auto"
    xmlns:tools="https://schemas.android.com/tools"
    android:layout_width="match_parent"
    android:layout_height="match_parent">

    <TextView
        android:text="TextView"
        android:layout_width="wrap_content"
        android:layout_height="wrap_content"
        android:id="@+id/textView"
        android:layout_marginStart="16dp"
        app:layout_constraintLeft_toLeftOf="parent"
        android:layout_marginLeft="16dp"
        android:layout_marginEnd="16dp"
        app:layout_constraintRight_toRightOf="parent"
        android:layout_marginRight="16dp"
        android:layout_marginTop="16dp"
        app:layout_constraintTop_toTopOf="parent" />

    <TextView
        android:text="TextView"
        android:layout_width="wrap_content"
        android:layout_height="wrap_content"
        android:id="@+id/textView2"
        app:layout_constraintBaseline_toBaselineOf="@+id/textView"
        android:layout_marginStart="16dp"
        app:layout_constraintLeft_toLeftOf="parent"
        android:layout_marginLeft="16dp"
        app:layout_constraintRight_toLeftOf="@+id/textView"
        android:layout_marginEnd="8dp"
        android:layout_marginRight="8dp" />

</android.support.constraint.ConstraintLayout>
还有另外两个工具 Auto-connect 和 Inferences 用于自动创建约束。
- Auto-Connect – 通过点击启用此功能:
 正如其名称所示,Auto-connect 会在两个相邻视图之间自动创建约束。
 - Inference – 通过点击启用此功能:
 推理引擎会在布局中的所有元素之间创建约束。推理引擎试图根据各种因素,如小部件的位置和大小,找到并创建最优连接。
A demo of Auto-Connect layout is given below: 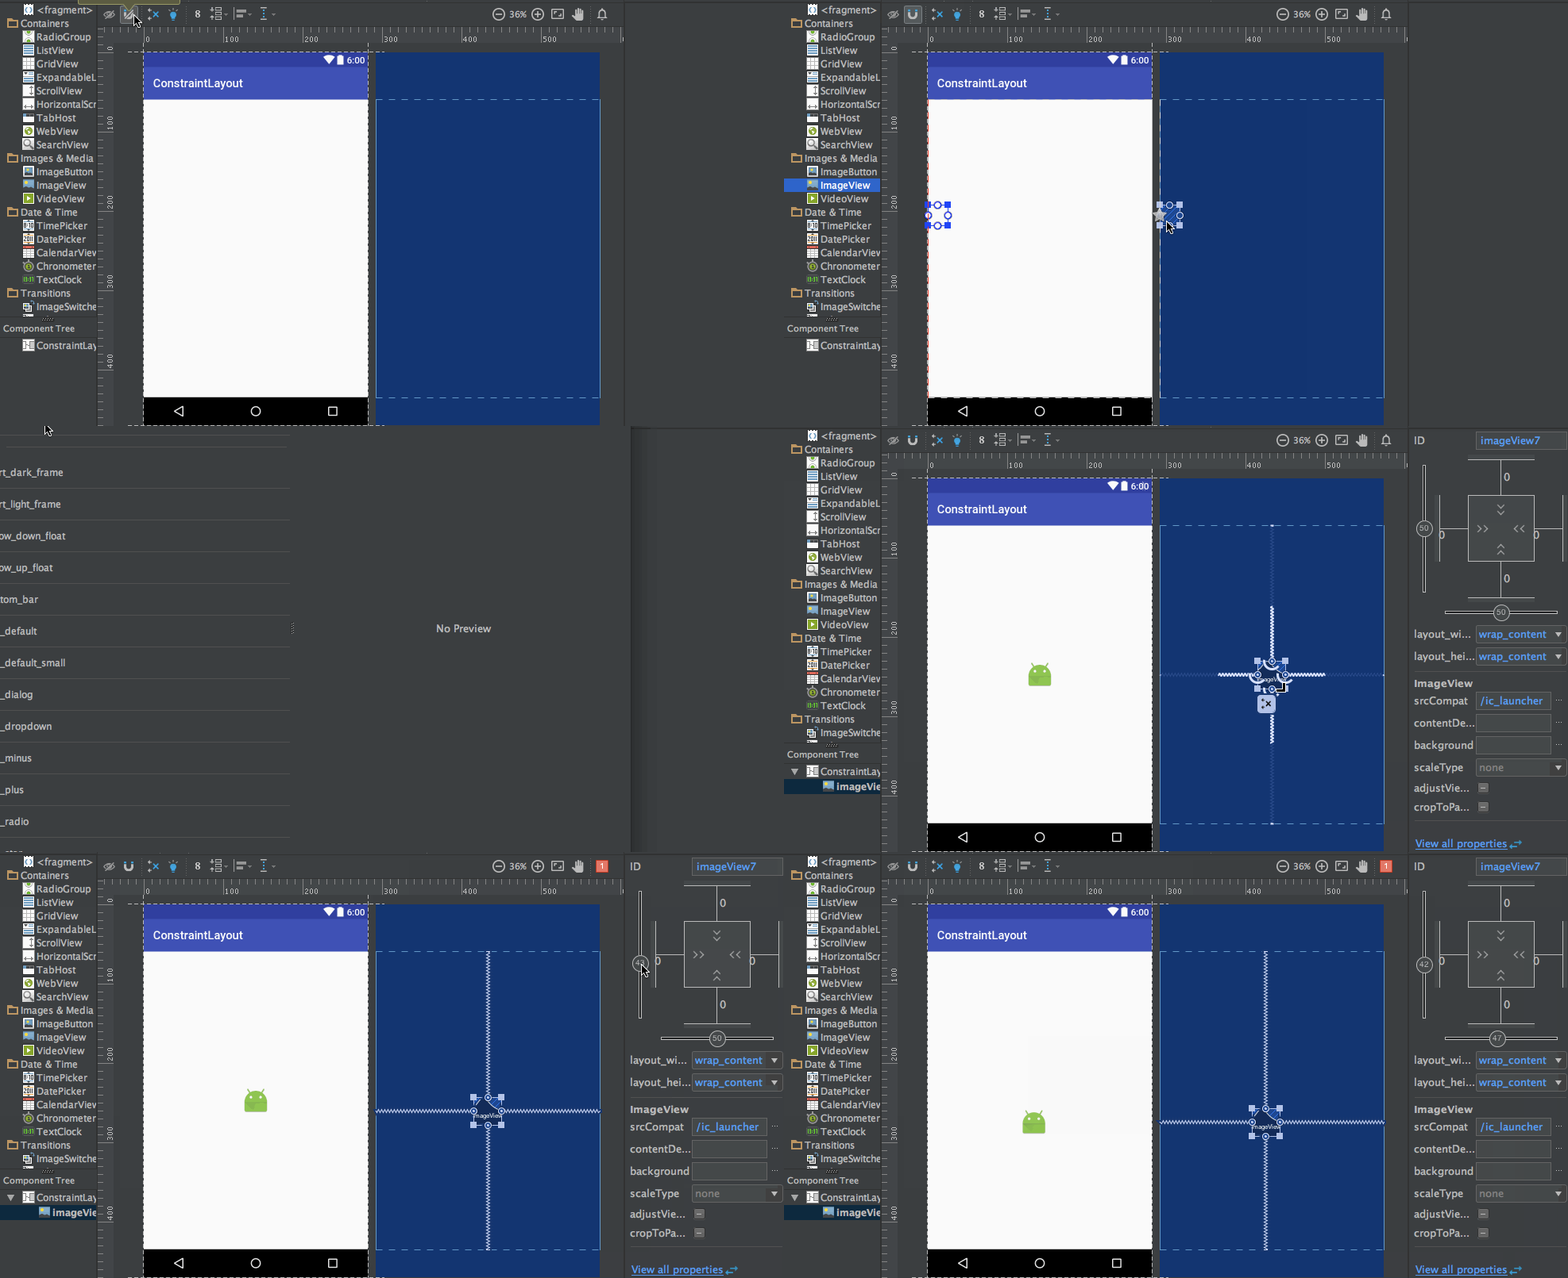 As you can see in the above gif, The constraints are animated automatically. Notice the horizontal and vertical sliders in the properties pane. They are called horizontal and vertical bias respectively. They allow us to position a view along the horizontal or vertical axis using a bias value, this will be relative to it’s constrained position. The xml code for the above demo is given below:
<?xml version="1.0" encoding="utf-8"?>
<android.support.constraint.ConstraintLayout
    xmlns:android="https://schemas.android.com/apk/res/android"
    xmlns:app="https://schemas.android.com/apk/res-auto"
    xmlns:tools="https://schemas.android.com/tools"
    android:layout_width="match_parent"
    android:layout_height="match_parent">

    <ImageView
        android:layout_width="wrap_content"
        android:layout_height="wrap_content"
        app:srcCompat="@mipmap/ic_launcher"
        android:id="@+id/imageView7"
        app:layout_constraintBottom_toBottomOf="parent"
        app:layout_constraintRight_toRightOf="parent"
        app:layout_constraintLeft_toLeftOf="parent"
        app:layout_constraintTop_toTopOf="parent"
        app:layout_constraintVertical_bias="0.58000004"
        app:layout_constraintHorizontal_bias="0.47" />
</android.support.constraint.ConstraintLayout>
以下是啟用推論功能的版面配置示範: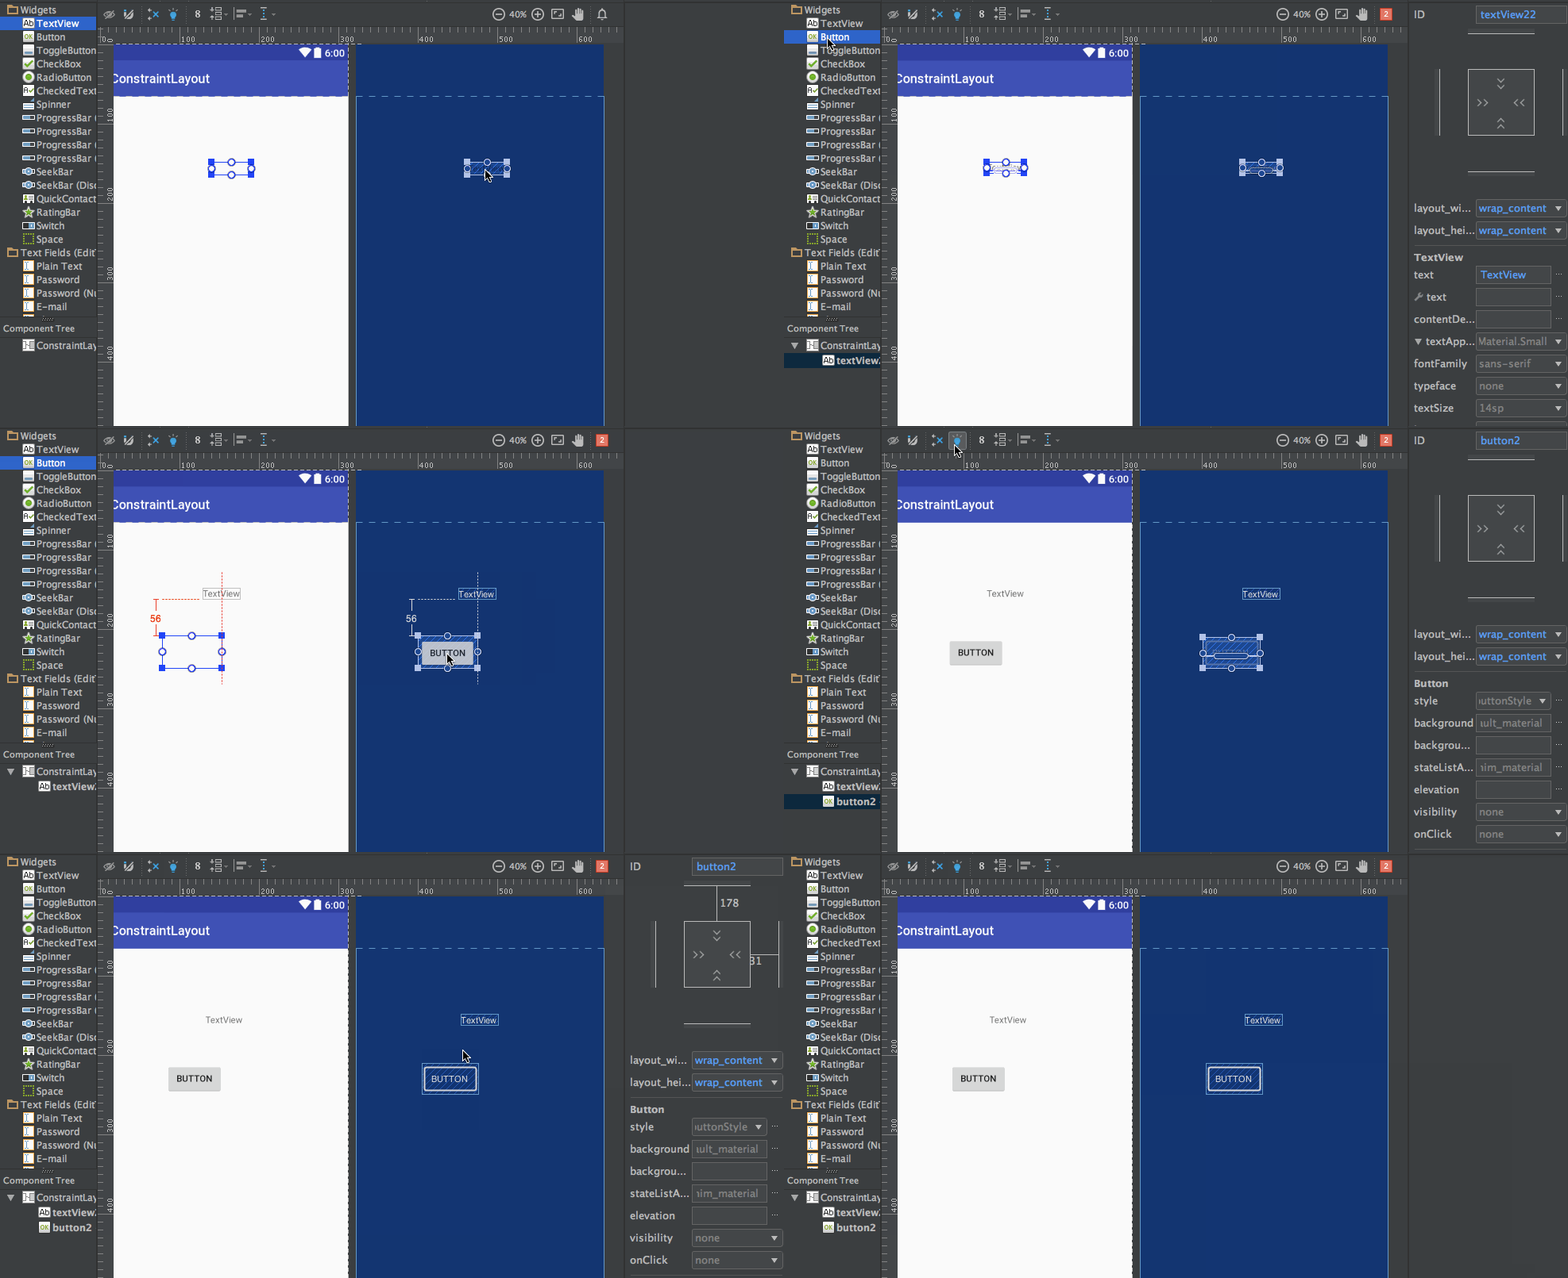 上述 GIF 的 XML 代碼如下:
<?xml version="1.0" encoding="utf-8"?>
<android.support.constraint.ConstraintLayout
    xmlns:android="https://schemas.android.com/apk/res/android"
    xmlns:app="https://schemas.android.com/apk/res-auto"
    xmlns:tools="https://schemas.android.com/tools"
    android:layout_width="match_parent"
    android:layout_height="match_parent">

    <TextView
        android:text="TextView"
        android:layout_width="wrap_content"
        android:layout_height="wrap_content"
        android:id="@+id/textView22"
        tools:layout_constraintRight_creator="1"
        tools:layout_constraintBottom_creator="1"
        app:layout_constraintBottom_toTopOf="@+id/button2"
        app:layout_constraintRight_toRightOf="parent"
        tools:layout_constraintLeft_creator="1"
        android:layout_marginBottom="59dp"
        app:layout_constraintLeft_toLeftOf="parent" />

    <Button
        android:text="Button"
        android:layout_width="wrap_content"
        android:layout_height="wrap_content"
        android:id="@+id/button2"
        tools:layout_constraintTop_creator="1"
        tools:layout_constraintRight_creator="1"
        android:layout_marginEnd="31dp"
        app:layout_constraintRight_toRightOf="@+id/textView22"
        android:layout_marginTop="178dp"
        app:layout_constraintTop_toTopOf="parent"
        android:layout_marginRight="31dp" />
</android.support.constraint.ConstraintLayout>
tools:layout_constraintTop_creator="1":creator 屬性用於跟蹤創建約束的人,特別是如果它們是由推論引擎創建的,它們會被賦為1。
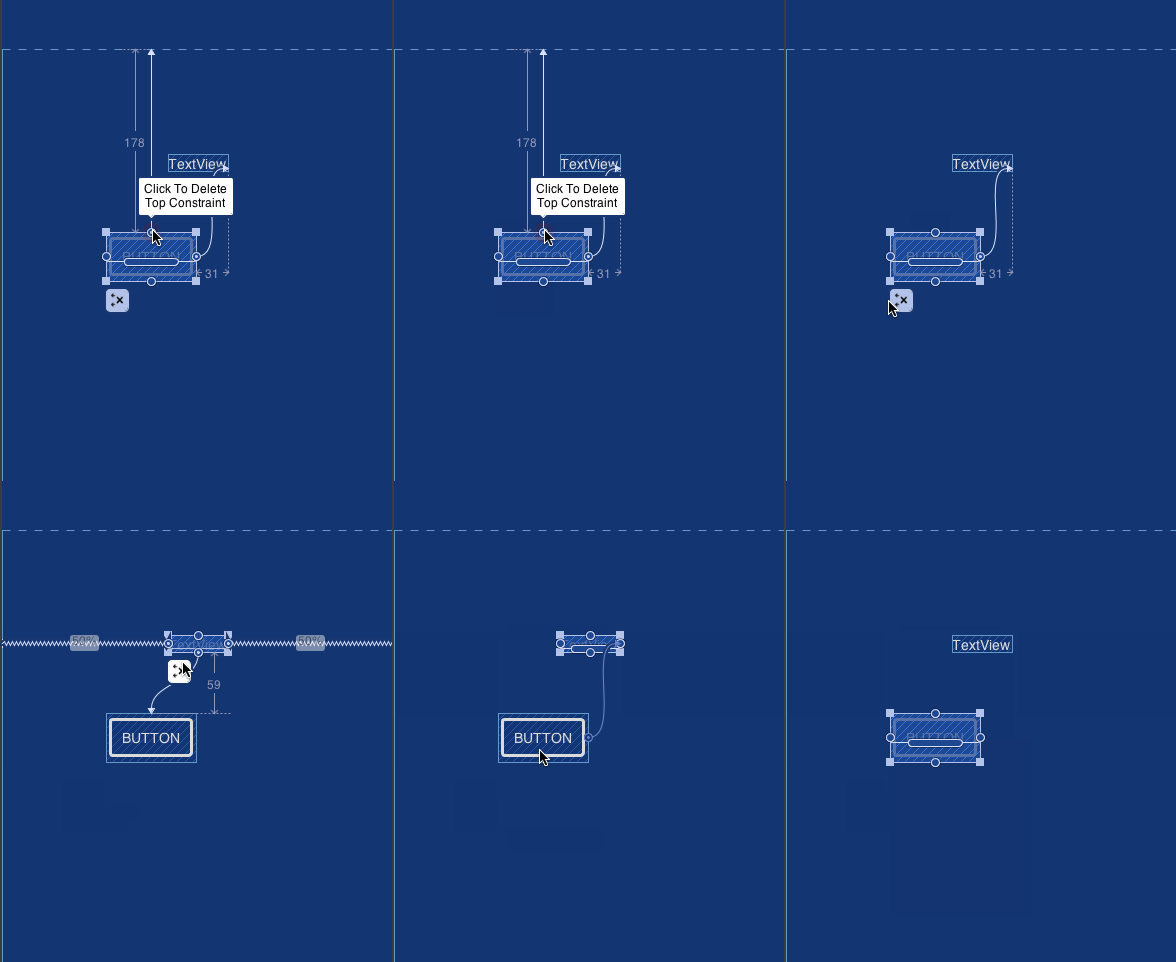
刪除約束
要刪除單個約束,將鼠標懸停在圓形手柄上並點擊,它將變成紅色。 要刪除視圖的所有約束,請單擊其下方的符號,看起來像這樣: 下面是一個示範 GIF:
 這就是本教程的全部內容。 您可以嘗試將一些自己的版面配置替換為約束布局。
Source:
https://www.digitalocean.com/community/tutorials/android-constraintlayout


