


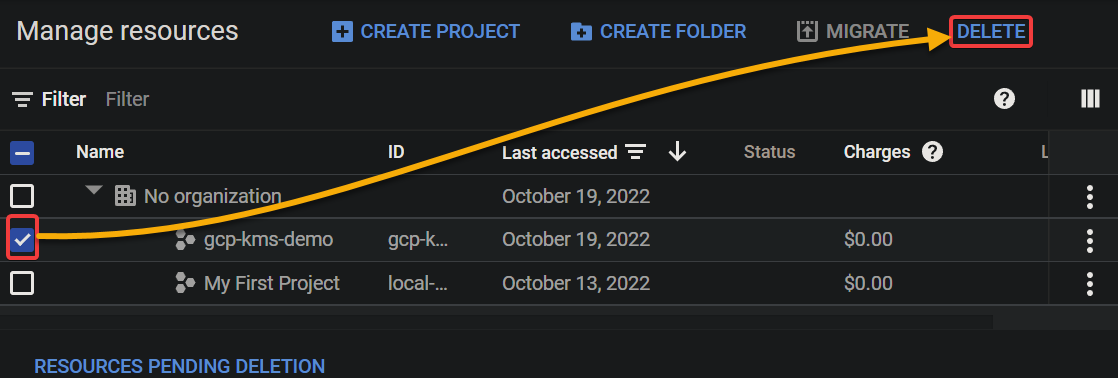
데이터 보안은 모든 조직의 최우선 과제이며, 암호화는 데이터를 보호하는 가장 효과적인 방법 중 하나입니다. 그렇다면 어떻게 해야 할까요? Google Cloud Platform (GCP)은 Google Key Management Service (KMS)라는 키 관리 서비스를 제공하여 암호화 키를 빠르게 생성하고 관리할 수 있도록 합니다.
이 튜토리얼에서는 GCP KMS에서 키를 생성하고 사용하는 방법을 배우게 됩니다. 또한 키, 키링, 키 버전과 관련된 몇 가지 중요한 개념에 대해 알아볼 것입니다.
준비되셨나요? 계속해서 읽어보고 데이터 보안을 한 단계 높여보세요!
전제 조건
이 튜토리얼은 실습으로 진행됩니다. 따라오기 위해 활성화된 결제가 있는 GCP 계정이 필요하지만, 무료 평가판으로도 충분합니다.
A Google Cloud Project is a collection of resources you create and manage in GCP. Note that you should create separate projects for each of your applications. Doing so lets you efficiently manage the resources for each application. In the end, you can delete all the resources associated with a project, which is helpful for clean-up.
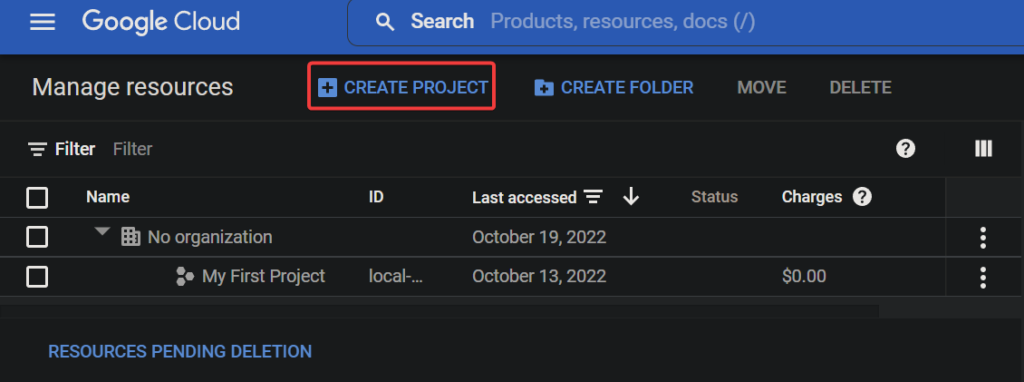
새로운 Google Cloud 프로젝트를 생성하려면:
1. 웹 브라우저를 열고, GCP 콘솔에 로그인합니다. GCP 콘솔은 AWS 콘솔과 마찬가지로 Google Cloud의 리소스를 관리하기 위한 웹 기반 인터페이스입니다.
2. GCP 콘솔에서 모든 기존 프로젝트를 볼 수 있고 관리할 수 있는 리소스 관리 페이지로 이동합니다.
3. 그 다음, 새 프로젝트를 생성하기 위해 CREATE PROJECT 버튼을 클릭합니다.
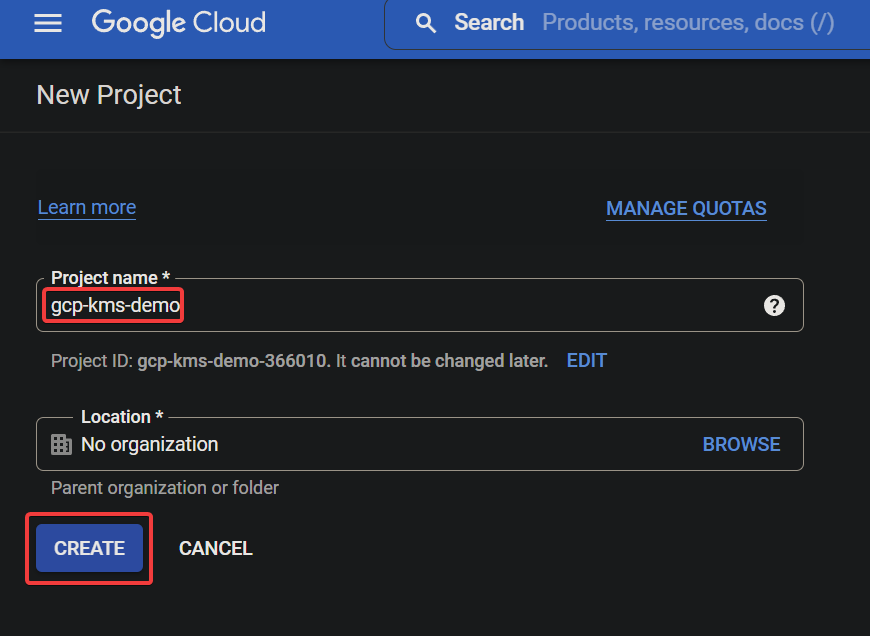
마지막으로, 새 프로젝트에 대한 다음 설정을 구성하고 CREATE를 클릭하여 프로젝트를 생성합니다.
- 프로젝트 이름 – 프로젝트 이름을 입력하십시오. 이 이름은 고유할 필요가 없으며 나중에 변경할 수 있습니다. 이 튜토리얼에서는 프로젝트 이름으로 gcp-kms-demo을 선택합니다.
- 위치 – 이 프로젝트를 생성하려는 상위 조직 또는 폴더를 선택하십시오. 새로 생성된 프로젝트는 최상위 부모가 됩니다. 그러나 조직이 없는 경우이 필드를 건너 뛸 수 있습니다.
시험 계정을 사용하는 경우 위치 필드가 표시되지 않을 수 있습니다.
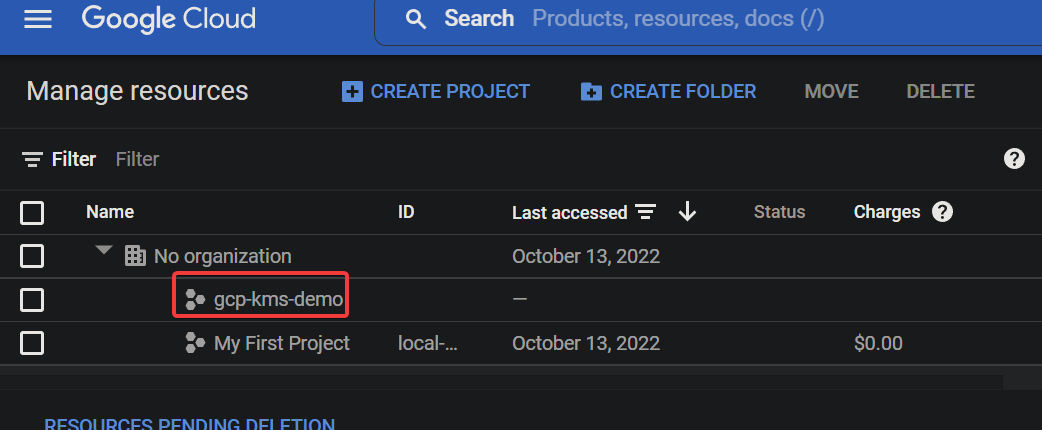
성공하면 아래에 표시된 것처럼 새로 생성된 Google Cloud 프로젝트가 나열됩니다.
Google Cloud 프로젝트에 Cloud KMS API 활성화하기
첫 번째 Google Cloud 프로젝트를 만들었으며 일반적으로 보호되지 않은 상태로 둘 수 없습니다. 걱정하지 마십시오! Cloud KMS API는 데이터를 보호하는 데 사용할 수있는 Google 제공의 암호화 API 집합입니다.
Cloud KMS API를 사용하려면 프로젝트에서 활성화해야합니다:
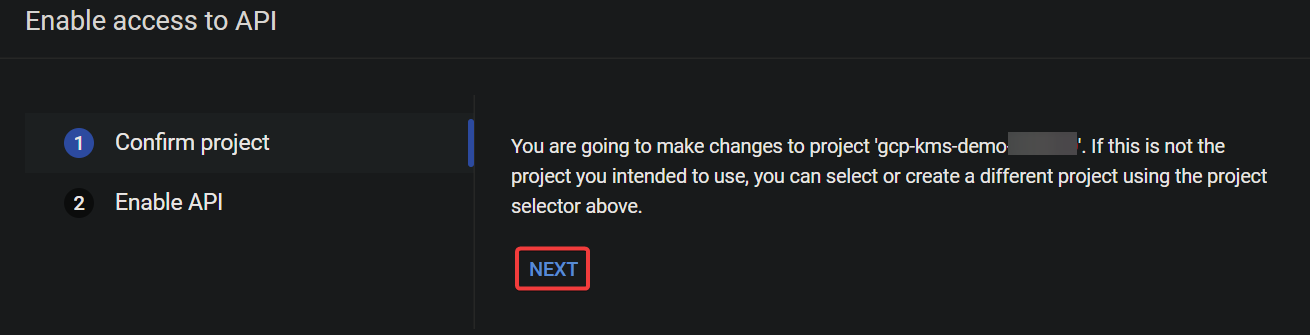
1. Google 프로젝트 선택기 페이지로 이동하여 Google Cloud 프로젝트 (gcp-kms-demo)를 선택하십시오.
2. 다음으로, API에 액세스 활성화 페이지로 이동하고 선택한 프로젝트에 대해 API 활성화를 확인하려면 NEXT를 클릭하십시오.
3. 이제 Cloud KMS API를 활성화하려면 ENABLE을 클릭하십시오.

이 시점에서 Cloud KMS API가 프로젝트에 활성화되었습니다. 이제 Cloud KMS API를 사용하여 암호화 키를 생성하고 관리할 수 있습니다.

키와 키링 생성을 위해 Cloud Shell을 시작합니다.
Cloud KMS API를 활성화하면 데이터를 암호화하고 복호화하기 위해 키와 키링을 생성할 준비가됩니다. 키와 키링은 Cloud KMS의 기본 개념입니다.
| Key | A key is an encryption key stored in a keyring that you can use to encrypt and decrypt your data. Each key has a name, and the name must be unique within the keyring. You can use IAM ( Identity and Access Management) policies to control who has access to keys. |
| Keyring | A keyring is a container in Cloud KMS that holds a set of keys. You can think of the keyring as a folder on your computer that contains many files. But in essence, a keyring holds a set of keys in a specific Cloud KMS location. |
그러나 키와 키링을 생성하기 전에 먼저 Cloud Shell을 시작해야합니다. Cloud Shell은 Google Cloud Platform에서 도구를 설치하지 않고 명령을 실행할 수있는 무료 대화 형 셸입니다.
1. GCP 콘솔에서 Cloud Shell 활성화 버튼 (오른쪽 상단)을 클릭하여 Cloud Shell을 시작합니다.

A Cloud Shell session initializes, as shown below (at the bottom of the page), where you can run commands.

2. 그다음 Cloud Shell에서 다음 gcloud 명령을 실행하여 글로벌 위치에서 새로운 키링 (keyrings)인 kms-demo-keyring을 생성하십시오.
–location “global”
인증이 요청되면 “인가”를 클릭하여 명령을 계속 실행하십시오.
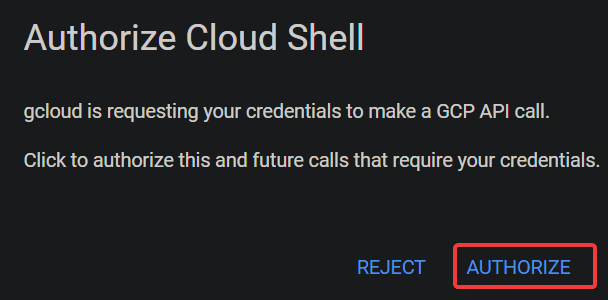
이 프롬프트는 Cloud Shell에서 gcloud 명령을 처음 실행할 때 나타나며, gcloud 도구가 KSM API에 액세스하도록 허용하도록 요청합니다.

아래에 표시된 것처럼, 키링이 성공적으로 생성되면 출력 메시지가 없습니다.
AWS Key Management를 사용하여 암호화 키를 전문적으로 사용하십시오
위치 (global)는 키링에 설정한 것과 동일해야 함에 유의하십시오.
–location “global” \
–keyring “kms-demo-keyring” \

–purpose “encryption”
키를 만들거나 회전할 때마다 Cloud KMS는 키의 새 버전을 생성합니다. 이 기능을 사용하면 필요할 경우 쉽게 이전 버전으로 롤백할 수 있습니다.
| PURPOSE | ENCRYPT_DECRYPT | Indicates the purpose of the key (encryption and decryption). |
| ALGORITHM | GOOGLE_SYMMETRIC_ENCRYPTION | Indicates the key uses Google Symmetric Encryption, the default algorithm for Cloud KMS keys. |
| PROTECTION_LEVEL | SOFTWARE | Indicates the key is software-protected. |
| LABELS | You can add labels to keys to categorize them or to add additional information. | |
| PRIMARY ID | 1 | Indicates the key is the primary key for the keyring, which is what Cloud KMS uses by default when you do not specify a key.
Note that you can have only one primary key per keyring. |
| PRIMARY STATE | ENABLED | Shows the current status of the key. The ENABLED state indicates the key can be used for its specified purpose. |

키링을 만드는 것처럼, 키가 성공적으로 생성되면 출력 메시지가 없습니다.
하지만 이 시점에서 데이터를 암호화하고 해독하는 데 사용할 수 있는 키링과 키가 있습니다.
4. 이제 다음 명령을 실행하여 –keyring (kms-demo-keyring)에 있는 키를 나열하십시오.
아래 스크린샷과 유사한 출력을 볼 수 있으며 다음과 같은 정보가 포함되어 있습니다:
GCP KMS를 사용하여 데이터 암호화 및 복호화

1. 아래 명령을 실행하여 출력을 제공하지 않지만 일부 텍스트를 포함하는 텍스트 파일(gcp-kms-demo.txt)을 생성합니다.
2. 그 다음, 아래 각 명령을 실행하여 텍스트 파일(gcp-kms-demo.txt)을 나열(ls)하고 그 내용을 보기(cat) 위해 데이터를 확인합니다.
# 텍스트 파일 나열
# 텍스트 파일 내용 보기
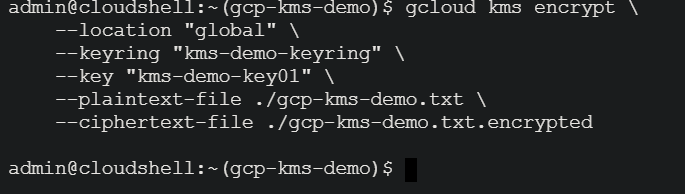
3. 확인한 후에는 아래 명령을 실행하여 파일(gcp-kms-demo.txt)의 데이터를 암호화 키(kms-demo-key01)를 사용하여 암호화합니다. 암호화된 데이터는 새 파일인 gcp-kms-demo.txt.encrypted에 저장됩니다.

–location “global” \
–keyring “kms-demo-keyring” \
–key “kms-demo-key01” \
–plaintext-file ./gcp-kms-demo.txt \

–ciphertext-file ./gcp-kms-demo.txt.encrypted
4. 이제 다음 명령을 실행하여 암호화된 파일의 데이터를 확인해보십시오 (gcp-kms-demo.txt.encrypted).
아래와 같이 깨져 있고 이상한 읽을 수 없는 기호가 표시됩니다. 이 출력은 파일이 성공적으로 암호화되었음을 나타냅니다.
이 암호화된 파일을 안전한 위치에 저장해야 합니다. 예를 들어, AWS S3, GCP 클라우드 스토리지 또는 Azure Blob 스토리지에 여러 복사본을 저장할 수 있습니다. Google Cloud는 데이터의 평문 버전을 저장하지 않습니다. 따라서 암호화된 파일을 잃어 버리면 원래 데이터를 되돌릴 수 없습니다.

AWS CLI를 사용하여 파일을 S3에 업로드하는 방법
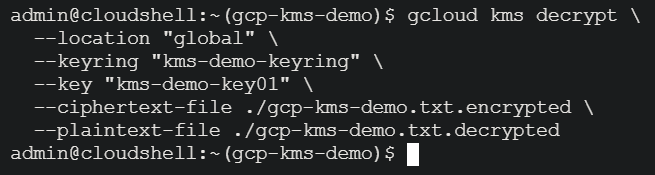
5. 암호화된 후, 동일한 키 (kms-demo-key01)를 사용하여 데이터를 복호화하기 위해 아래 명령을 실행하십시오. 그러나 이번에는 복호화된 데이터가 gcp-kms-demo.txt.decrypted라는 새 파일에 저장됩니다.
암호화와 마찬가지로이 명령은 출력을 제공하지 않지만 다음 단계에서 복호화를 확인할 것입니다.
–location “global” \
–keyring “kms-demo-keyring” \

–key “kms-demo-key01” \
–ciphertext-file ./gcp-kms-demo.txt.encrypted \
–plaintext-file ./gcp-kms-demo.txt.decrypted
6. 마지막으로 다음 명령을 실행하여 (cat) 해독된 파일 (gcp-kms-demo.txt.decrypted)을 보고 데이터가 성공적으로 해독되었는지 확인하십시오.
아래에서 텍스트 파일에 저장된 원본 데이터를 볼 수 있습니다. 축하합니다! Google Cloud KMS를 사용하여 데이터를 성공적으로 암호화하고 해독했습니다.
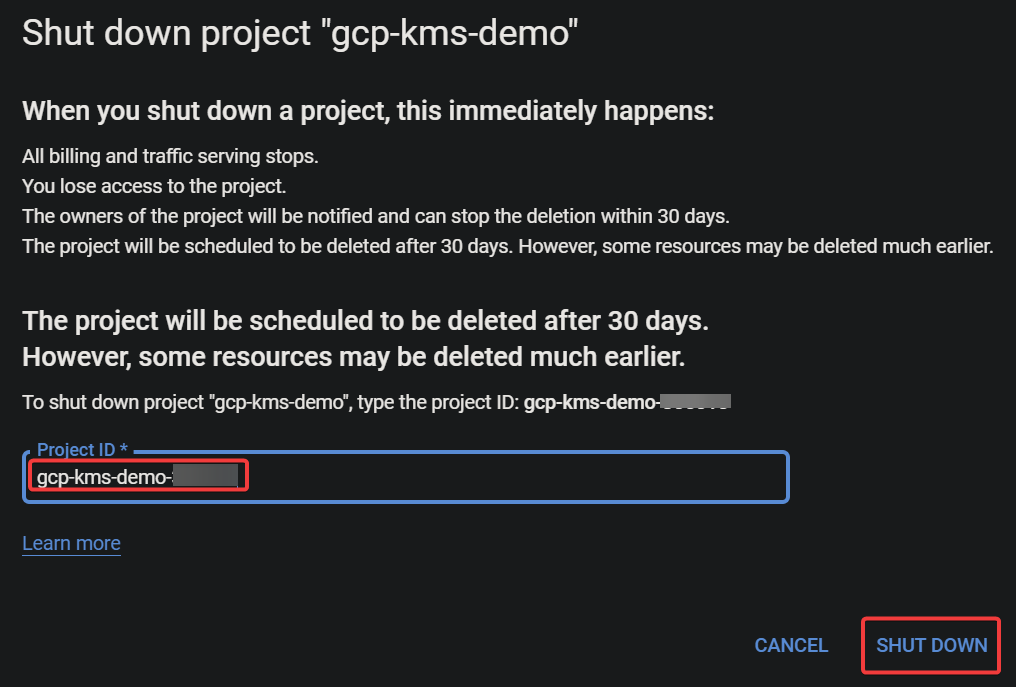
Google Cloud 리소스 정리