このチュートリアルでは、Android ConstraintLayoutの詳細について説明します。Googleは2016年のGoogle I/OカンファレンスでAndroid ConstraintLayoutエディターを紹介しました。新しいレイアウトエディターには、開発者が複雑なレイアウトのためのフラットUI階層を作成するための強力なツールセットが用意されています。
Android ConstraintLayout
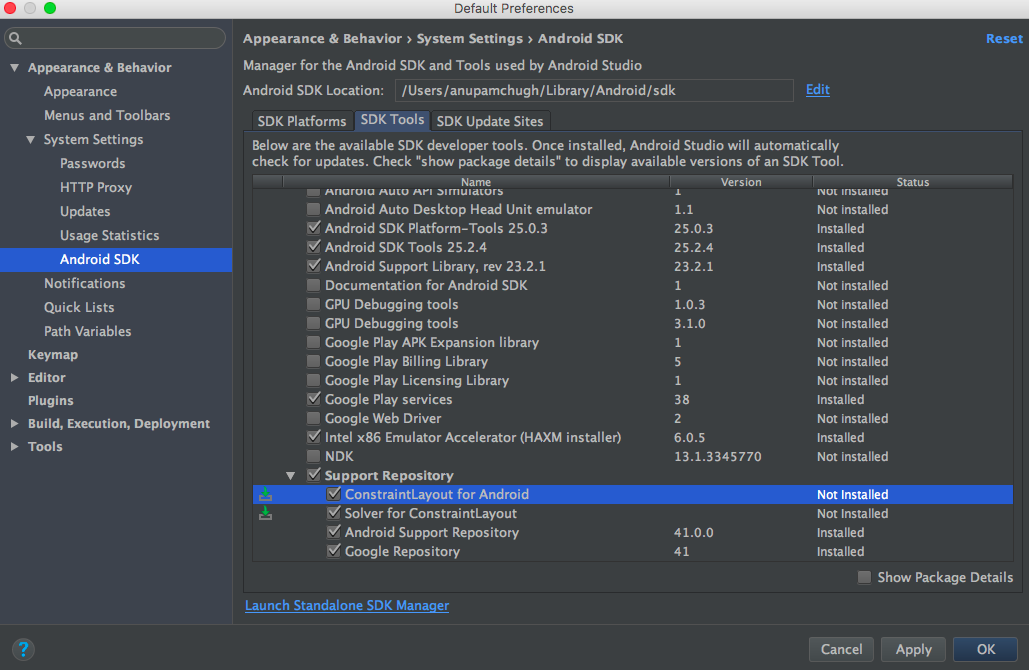 最新のAndroid Studioバージョンを使用して、Android ConstraintLayoutを使用するには、理想的にはAndroid Studio 2.2以降を使用してください。必要なSDKツールをSDKマネージャからConstraintLayoutのためにダウンロードする必要があります。build.gradleファイル内に以下の依存関係を追加して、新しい空のアクティビティプロジェクトを作成します。
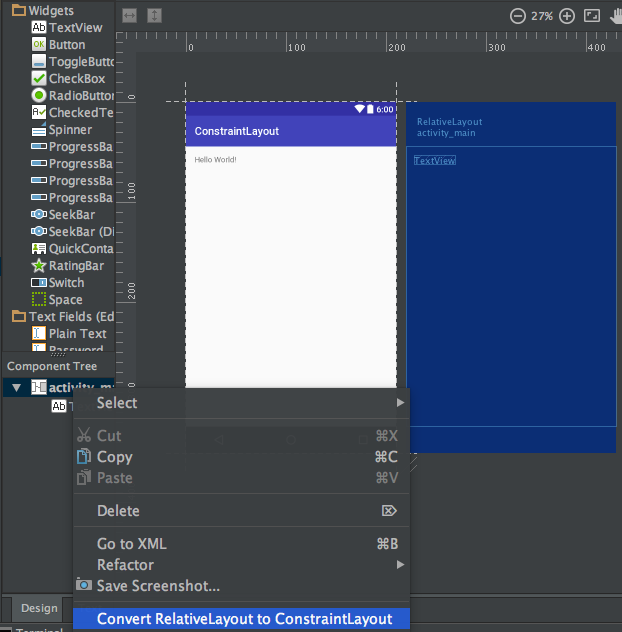
compile 'com.android.support.constraint:constraint-layout:1.0.0-beta4' 以下の画像に示すように、ルートクラスをConstraintLayoutに設定して新しいレイアウトを作成します。 古いレイアウトをConstraintLayoutに変換するには、該当するレイアウトのデザインペインを開き、ルートコンポーネントを右クリックして以下の画像に示すように適切なオプションを選択します。
Android Constraint Layout概要
AndroidのConstraintLayoutは、各子ビュー/ウィジェットに他のビューとの相対的な制約を割り当てることでレイアウトを定義するために使用されます。ConstraintLayoutはRelativeLayoutに似ていますが、より強力です。ConstraintLayoutの目的は、フラットで柔軟なデザインにより、アプリケーションのパフォーマンスを向上させることです。ConstraintLayout内のビューには、各側面にハンドル(またはアンカーポイント)があり、これらは制約を割り当てるために使用されます。レイアウトにTextViewをドラッグアンドドロップして制約を割り当てましょう。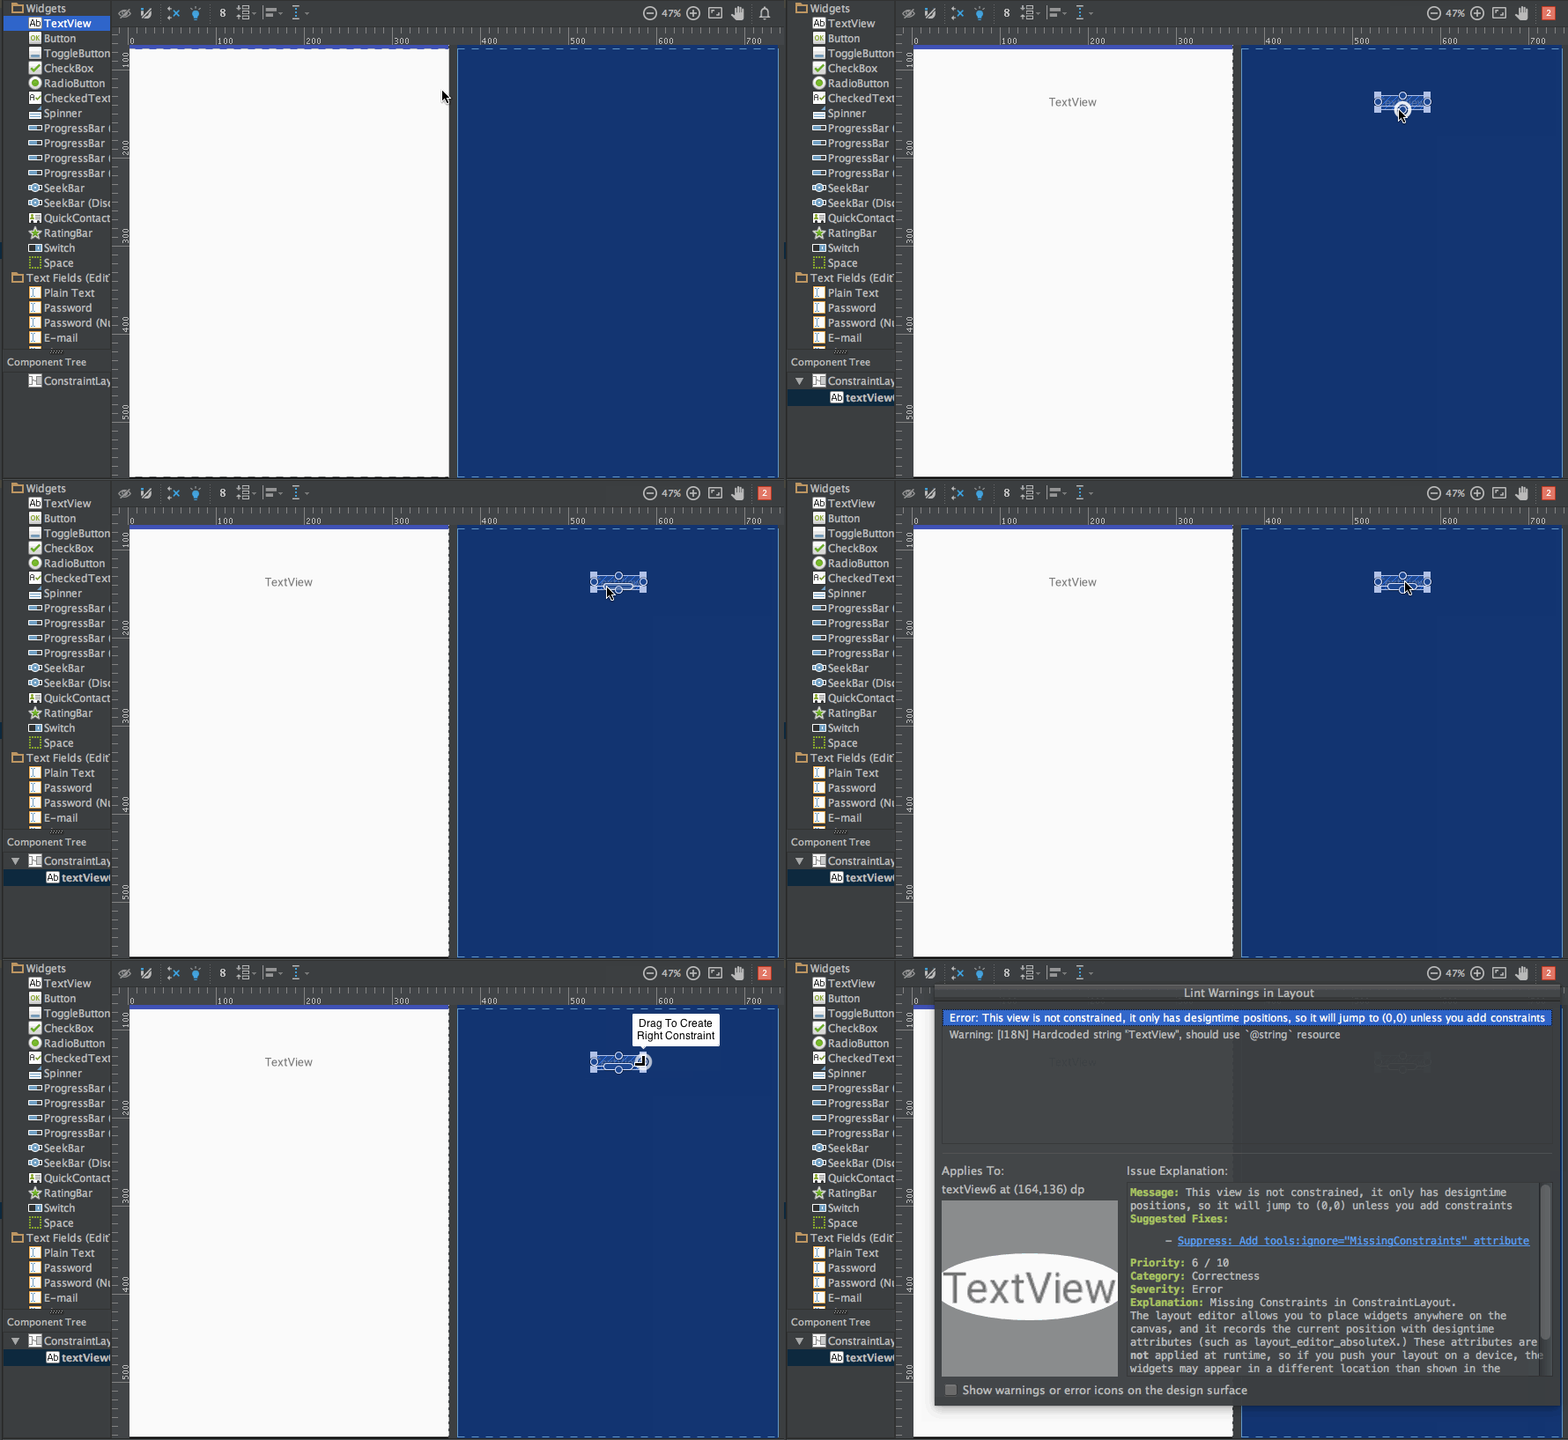 上記のTextViewには、3種類のハンドルがあります:
リサイズハンドル – これは四隅にあるサイズを変更するためのもので、制約を保持したままビューのサイズを変更します。サイドハンドル – これは各側面の中央にある円形のハンドルで、ビューの上部、左部、下部、右部の制約を設定するために使用されます。ベースラインハンドル – これはレイアウト内の別のテキストビューのベースラインに合わせるために使用されます。
レイアウトに制約を割り当て、そのxmlコードを確認しましょう。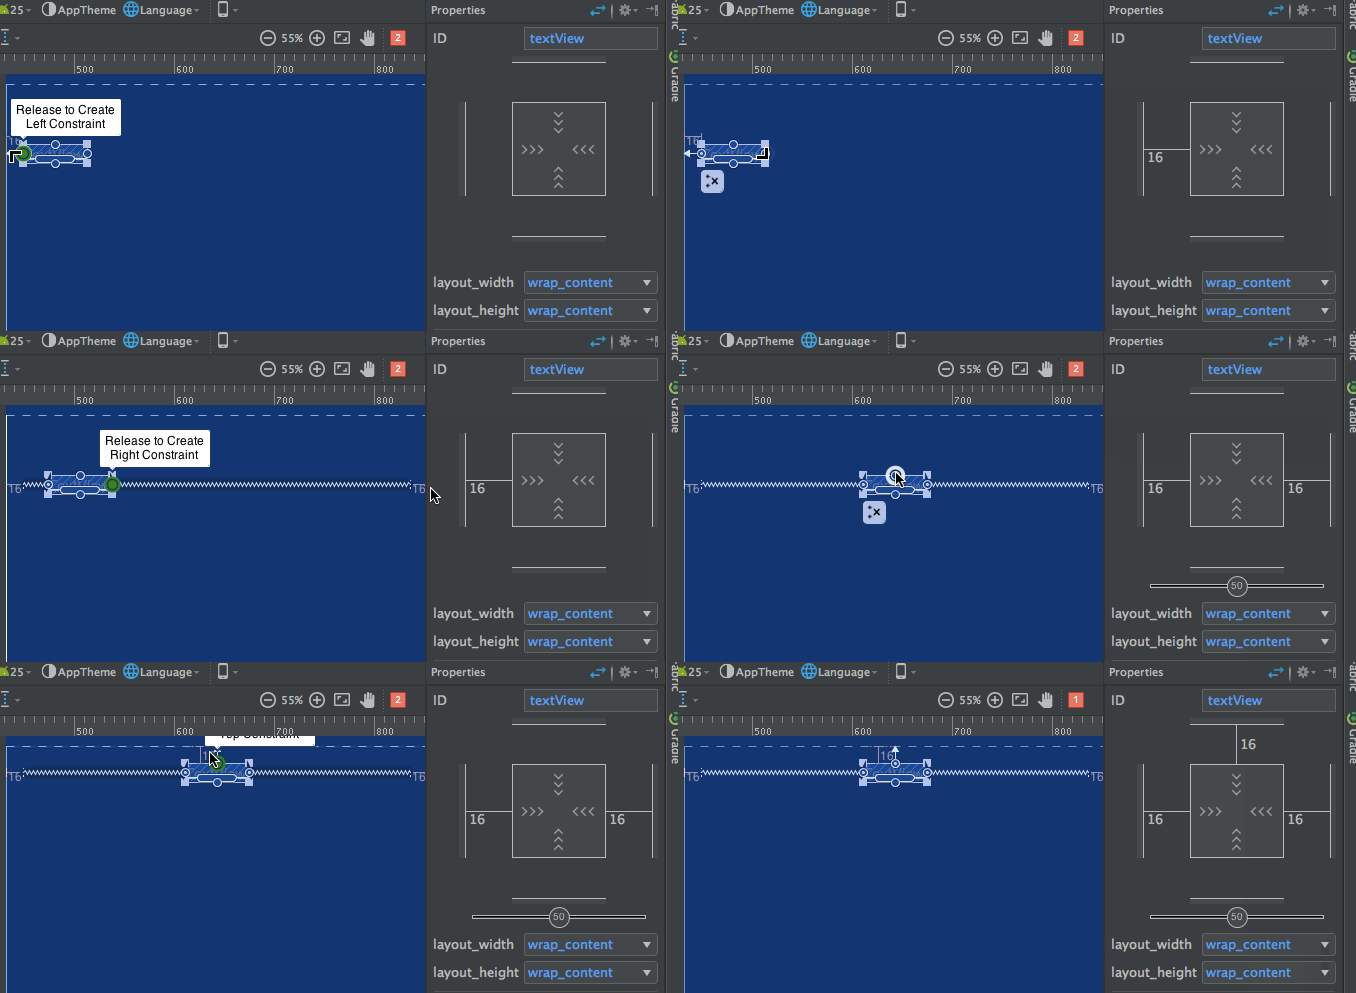 右側のプロパティインスペクターペインに注意してください:
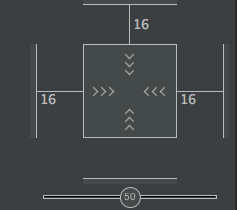 そこにはビューの各側面に設定されたマージンが表示されます。また、次のモード間を切り替えることでビューのサイズを変更することもできます:
- Wrap Content – これはビューをコンテンツで埋めるようにラップします。

- Any Size – これはmatch parentに似ています。

- Fixed Size – これにより、定数の幅と高さを設定できます。

上記のレイアウトのxmlコードは次のようになります:sample.xml
<?xml version="1.0" encoding="utf-8"?>
<android.support.constraint.ConstraintLayout
    xmlns:android="https://schemas.android.com/apk/res/android"
    xmlns:app="https://schemas.android.com/apk/res-auto"
    android:layout_width="match_parent"
    android:layout_height="match_parent">

    <TextView
        android:text="TextView"
        android:layout_width="wrap_content"
        android:layout_height="wrap_content"
        android:id="@+id/textView"
        android:layout_marginStart="16dp"
        android:layout_marginTop="16dp"
        app:layout_constraintLeft_toLeftOf="parent"
        app:layout_constraintTop_toTopOf="parent"
        android:layout_marginLeft="16dp"
        android:layout_marginEnd="16dp"
        app:layout_constraintRight_toRightOf="parent"
        android:layout_marginRight="16dp" />
</android.support.constraint.ConstraintLayout>
app:layout_constraintLeft_toLeftOf="parent"– constraintLeftはビューの左端のアンカーポイントです。toLeftOfは、この場合は「parent」に割り当てられたビューの左にビューを配置することを示します。
ビューに絶対位置が設定されている場合、使用されるxmlプロパティは以下の通りです –
tools:layout_editor_absoluteY="48dp"
tools:layout_editor_absoluteX="40dp"
別のTextViewを追加し、そのベースラインを整列させます。 上記レイアウトのxmlコードは次のとおりです:
<?xml version="1.0" encoding="utf-8"?>
<android.support.constraint.ConstraintLayout
    xmlns:android="https://schemas.android.com/apk/res/android"
    xmlns:app="https://schemas.android.com/apk/res-auto"
    xmlns:tools="https://schemas.android.com/tools"
    android:layout_width="match_parent"
    android:layout_height="match_parent">

    <TextView
        android:text="TextView"
        android:layout_width="wrap_content"
        android:layout_height="wrap_content"
        android:id="@+id/textView"
        android:layout_marginStart="16dp"
        app:layout_constraintLeft_toLeftOf="parent"
        android:layout_marginLeft="16dp"
        android:layout_marginEnd="16dp"
        app:layout_constraintRight_toRightOf="parent"
        android:layout_marginRight="16dp"
        android:layout_marginTop="16dp"
        app:layout_constraintTop_toTopOf="parent" />

    <TextView
        android:text="TextView"
        android:layout_width="wrap_content"
        android:layout_height="wrap_content"
        android:id="@+id/textView2"
        app:layout_constraintBaseline_toBaselineOf="@+id/textView"
        android:layout_marginStart="16dp"
        app:layout_constraintLeft_toLeftOf="parent"
        android:layout_marginLeft="16dp"
        app:layout_constraintRight_toLeftOf="@+id/textView"
        android:layout_marginEnd="8dp"
        android:layout_marginRight="8dp" />

</android.support.constraint.ConstraintLayout>
自動接続と推論という2つの他のツールがあり、制約を自動的に作成するために使用されます。
- 自動接続 – この機能は、クリックして有効にできます:
 名前が示すように、Auto-connectは隣接する2つのビュー間に制約を自動的に作成します
 - 推論 – この機能は、クリックして有効にできます:
 推論エンジンは、レイアウト内のすべての要素の間に制約を作成します。推論エンジンは、ウィジェットの位置やサイズなど、さまざまな要因に基づいて最適な接続を見つけて作成しようとします。
A demo of Auto-Connect layout is given below: 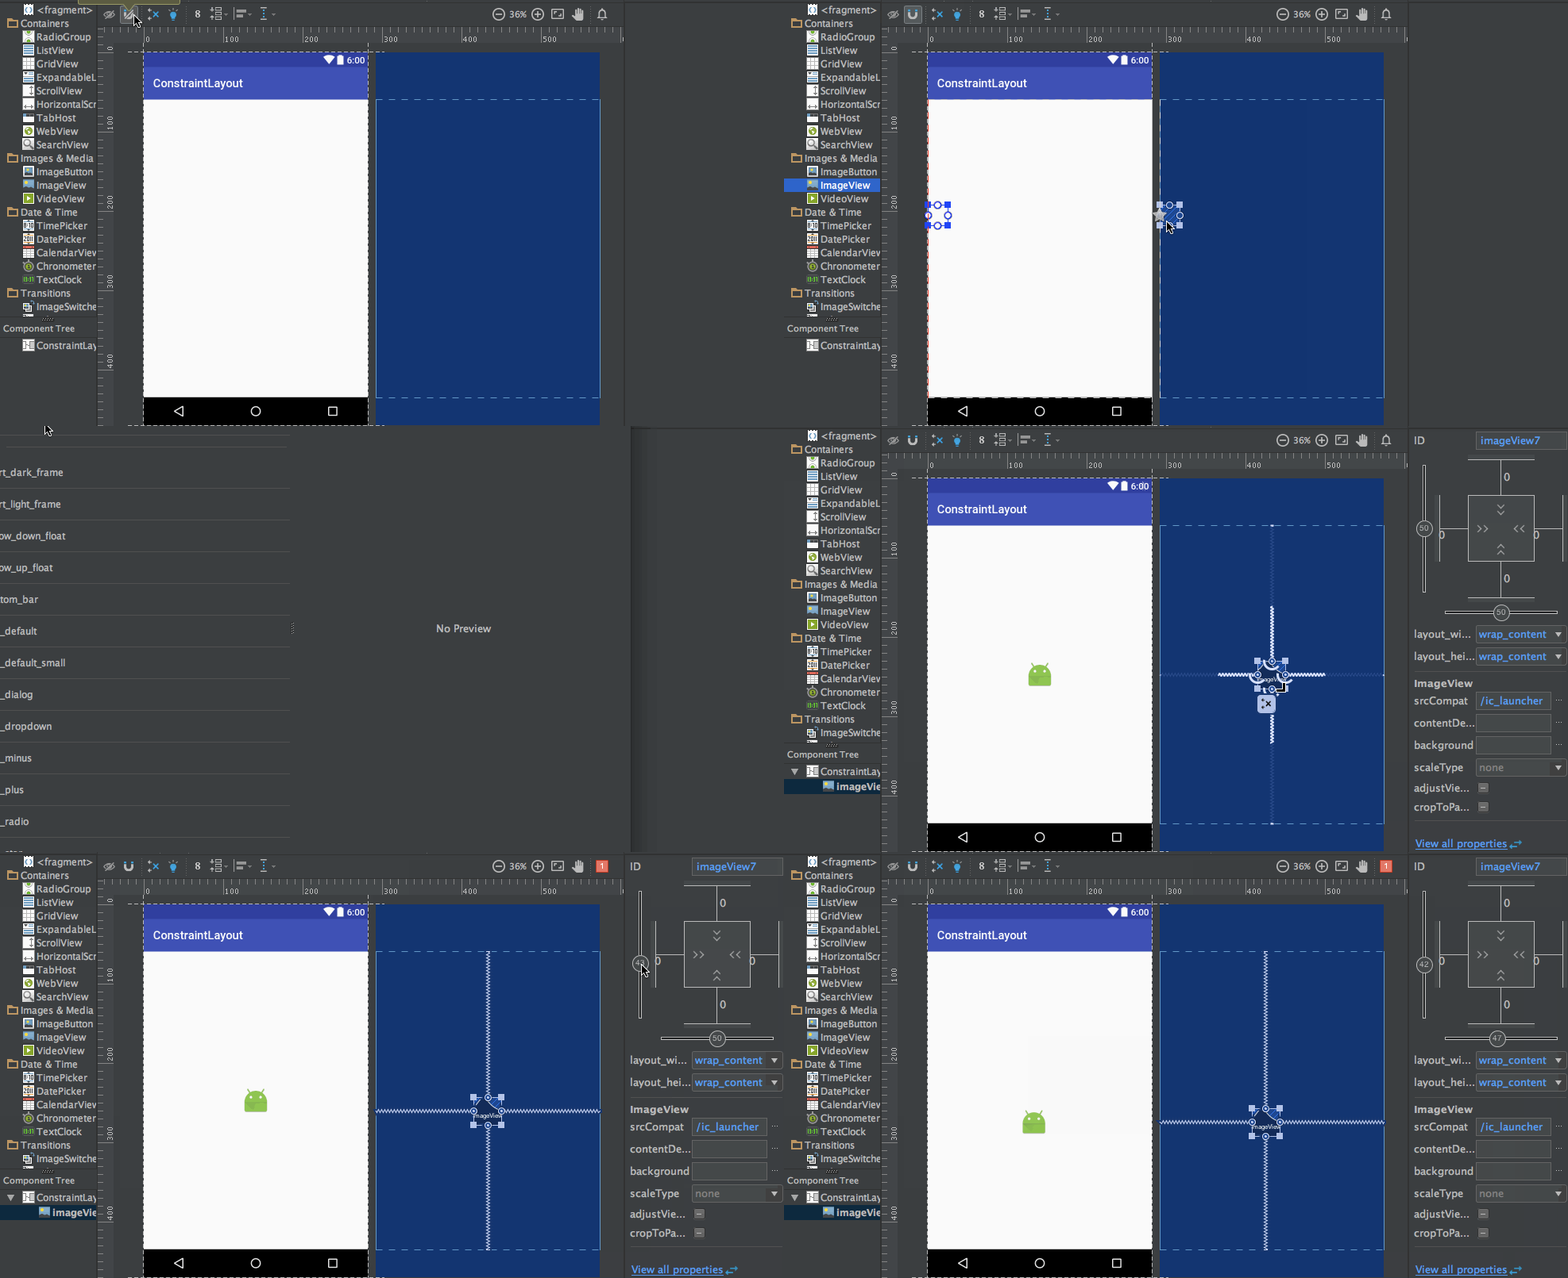 As you can see in the above gif, The constraints are animated automatically. Notice the horizontal and vertical sliders in the properties pane. They are called horizontal and vertical bias respectively. They allow us to position a view along the horizontal or vertical axis using a bias value, this will be relative to it’s constrained position. The xml code for the above demo is given below:
<?xml version="1.0" encoding="utf-8"?>
<android.support.constraint.ConstraintLayout
    xmlns:android="https://schemas.android.com/apk/res/android"
    xmlns:app="https://schemas.android.com/apk/res-auto"
    xmlns:tools="https://schemas.android.com/tools"
    android:layout_width="match_parent"
    android:layout_height="match_parent">

    <ImageView
        android:layout_width="wrap_content"
        android:layout_height="wrap_content"
        app:srcCompat="@mipmap/ic_launcher"
        android:id="@+id/imageView7"
        app:layout_constraintBottom_toBottomOf="parent"
        app:layout_constraintRight_toRightOf="parent"
        app:layout_constraintLeft_toLeftOf="parent"
        app:layout_constraintTop_toTopOf="parent"
        app:layout_constraintVertical_bias="0.58000004"
        app:layout_constraintHorizontal_bias="0.47" />
</android.support.constraint.ConstraintLayout>
デモのレイアウトは、有効な推論を使用したものです。以下に示します: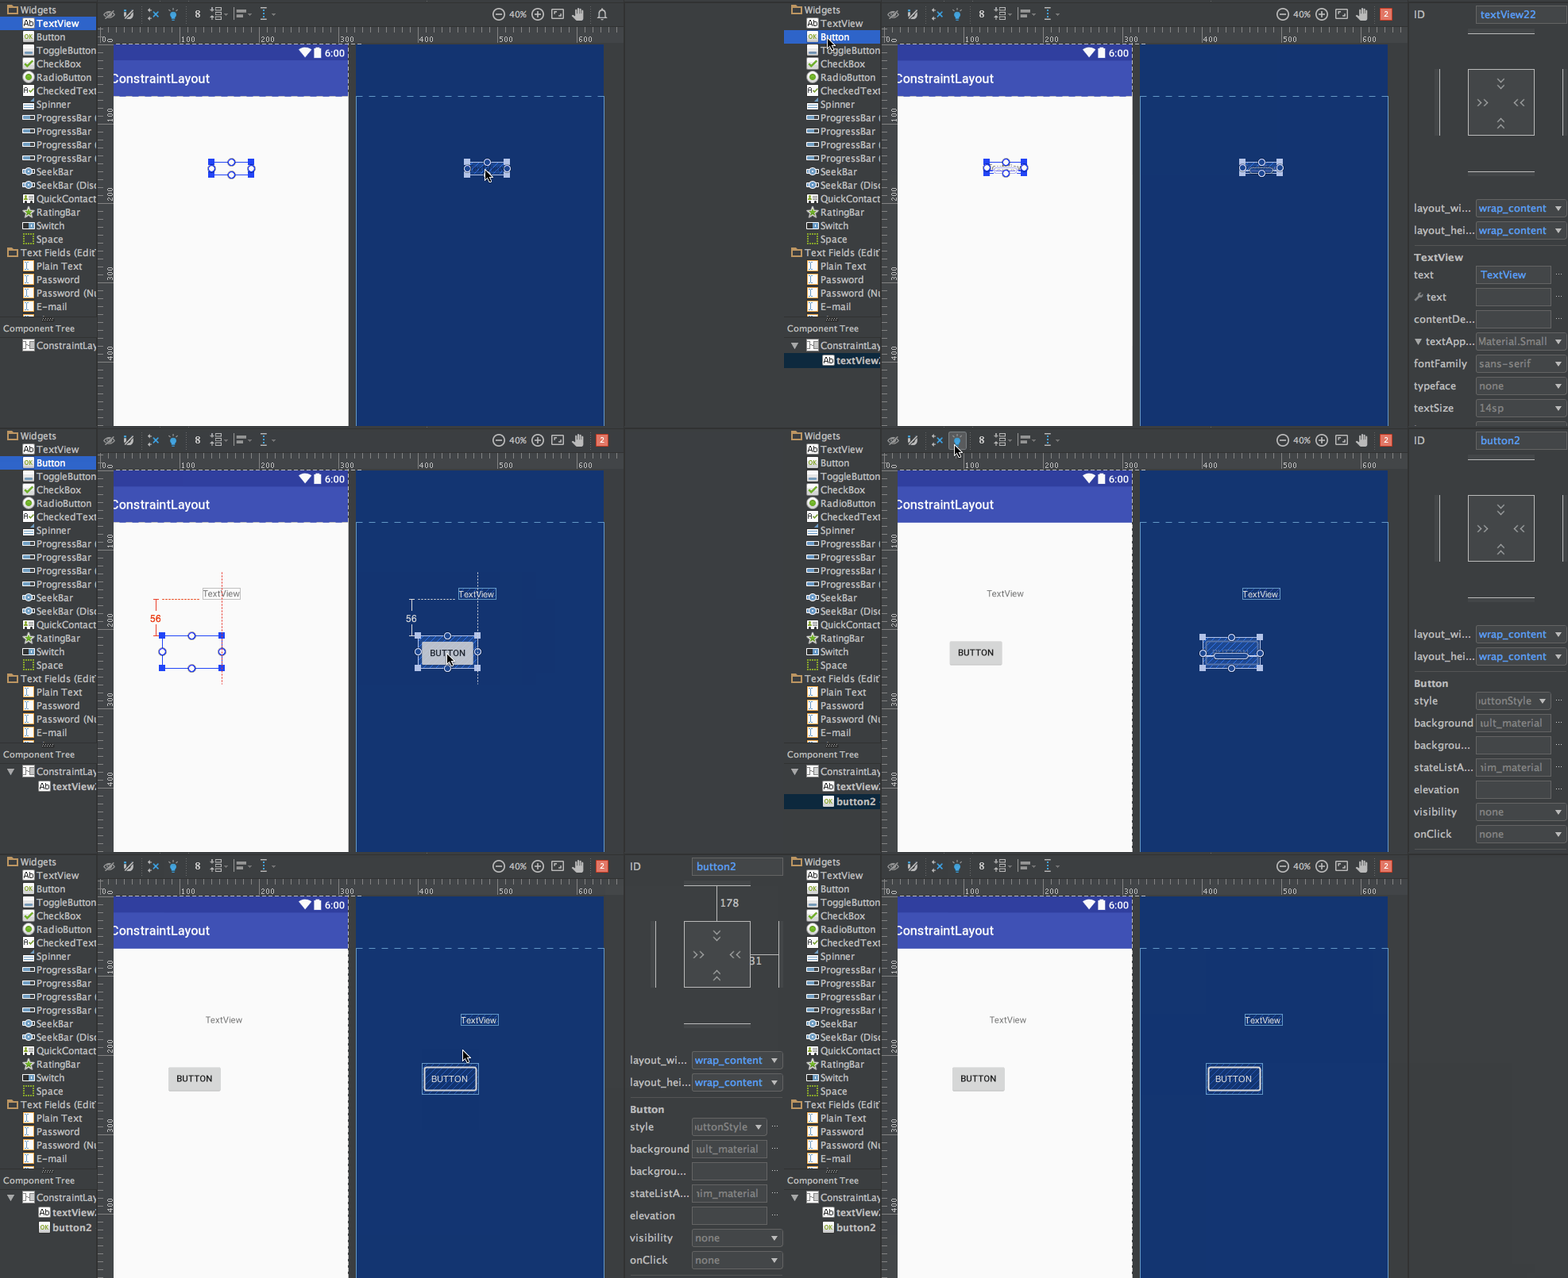 上記のgifのxmlコードは:
<?xml version="1.0" encoding="utf-8"?>
<android.support.constraint.ConstraintLayout
    xmlns:android="https://schemas.android.com/apk/res/android"
    xmlns:app="https://schemas.android.com/apk/res-auto"
    xmlns:tools="https://schemas.android.com/tools"
    android:layout_width="match_parent"
    android:layout_height="match_parent">

    <TextView
        android:text="TextView"
        android:layout_width="wrap_content"
        android:layout_height="wrap_content"
        android:id="@+id/textView22"
        tools:layout_constraintRight_creator="1"
        tools:layout_constraintBottom_creator="1"
        app:layout_constraintBottom_toTopOf="@+id/button2"
        app:layout_constraintRight_toRightOf="parent"
        tools:layout_constraintLeft_creator="1"
        android:layout_marginBottom="59dp"
        app:layout_constraintLeft_toLeftOf="parent" />

    <Button
        android:text="Button"
        android:layout_width="wrap_content"
        android:layout_height="wrap_content"
        android:id="@+id/button2"
        tools:layout_constraintTop_creator="1"
        tools:layout_constraintRight_creator="1"
        android:layout_marginEnd="31dp"
        app:layout_constraintRight_toRightOf="@+id/textView22"
        android:layout_marginTop="178dp"
        app:layout_constraintTop_toTopOf="parent"
        android:layout_marginRight="31dp" />
</android.support.constraint.ConstraintLayout>
tools:layout_constraintTop_creator="1"です。これは制約を作成した人物を追跡するための作成者属性であり、特にそれらが推論エンジンによって作成された場合は1に割り当てられます。
制約の削除
個々の制約を削除するには、円形ハンドルにカーソルを合わせ、それが赤くなるとクリックします。ビューのすべての制約を削除するには、その下にあるシンボルをクリックします: サンプルデモgifは以下の通りです:
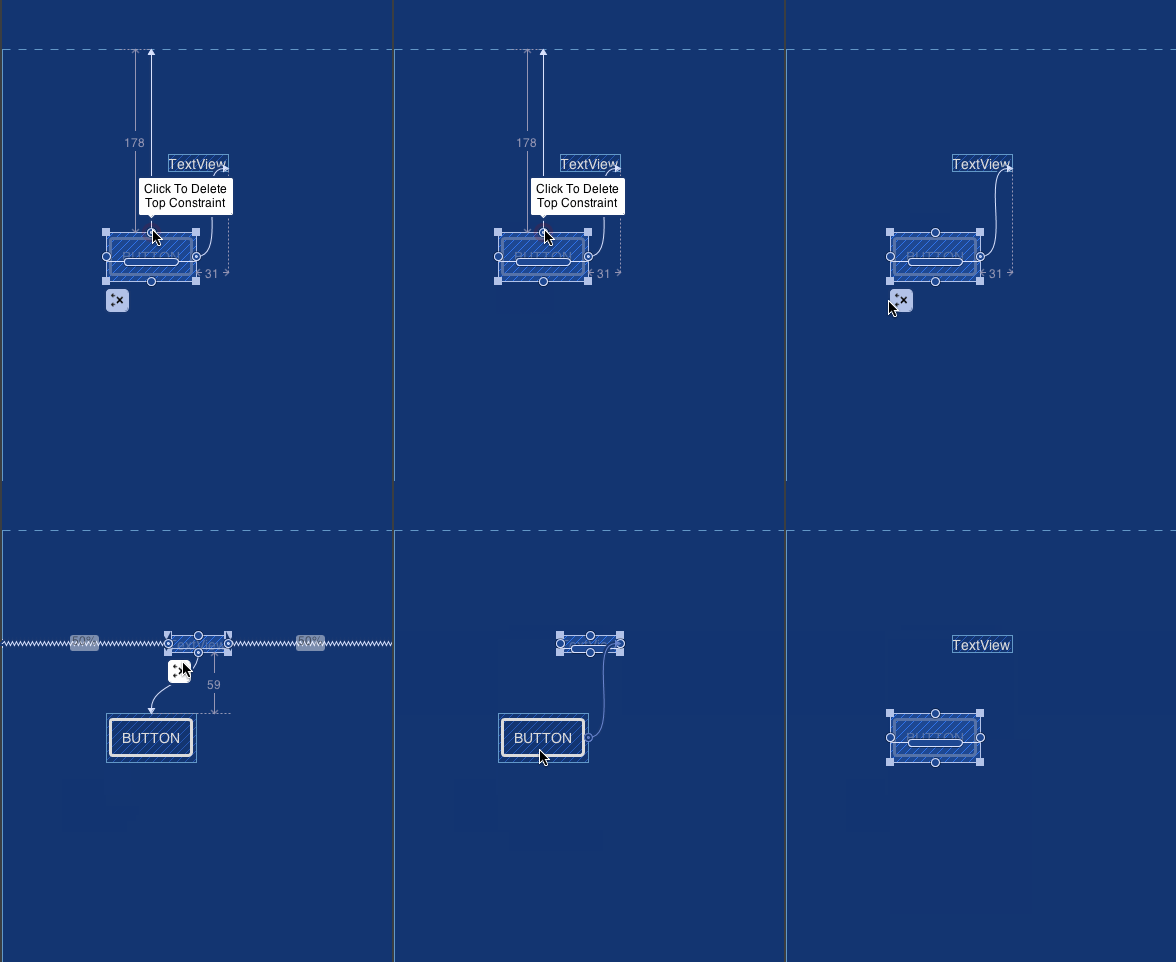 これでチュートリアルは終了です。自分のレイアウトの一部を制約レイアウトに置き換えてみてください。
Source:
https://www.digitalocean.com/community/tutorials/android-constraintlayout


