في هذا البرنامج التعليمي، سنناقش تفاصيل تخطيط القيد في أندرويد. قد قامت Google بتقديم محرر تخطيط القيد في أندرويد في مؤتمر Google I/O 2016. يحتوي محرر التخطيط الجديد على مجموعة من الأدوات القوية التي تتيح للمطورين إنشاء تسلسلات واجهة مستخدم مسطحة لتخطيطاتهم المعقدة.
تخطيط القيد في أندرويد
تأكد من استخدام أحدث إصدار لـ Android Studio لاستخدام ConstraintLayout على Android. في الأفضل، يجب أن يكون الإصدار 2.2 وما فوق. يجب تنزيل أدوات SDK اللازمة لـ ConstraintLayout من مدير SDK. 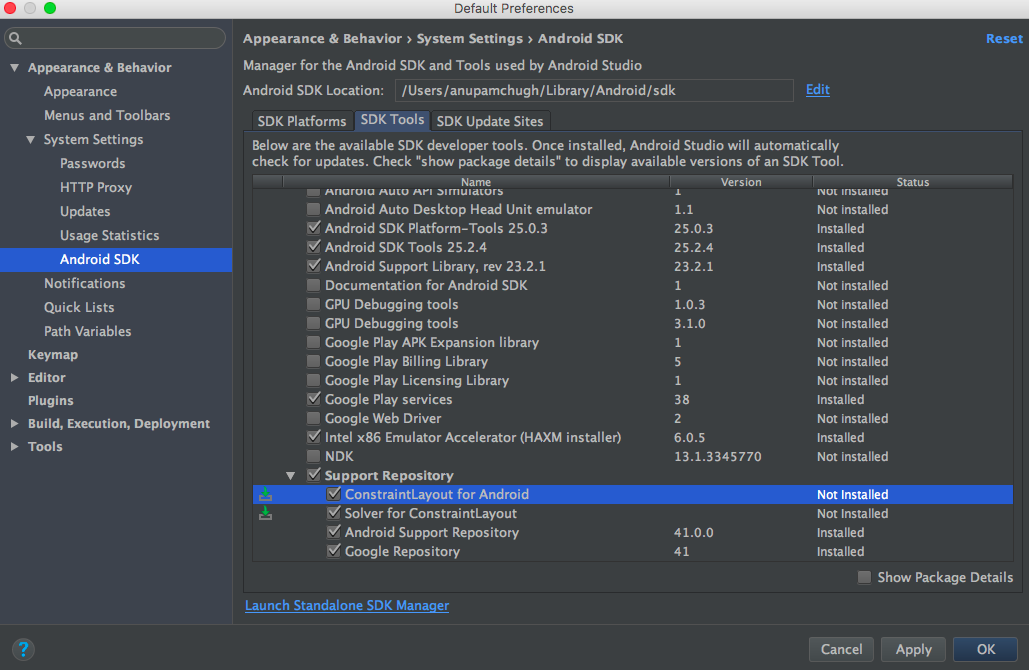 قم بإنشاء مشروع نشاط جديد فارغ وأضف التبعية التالية داخل ملف build.gradle.
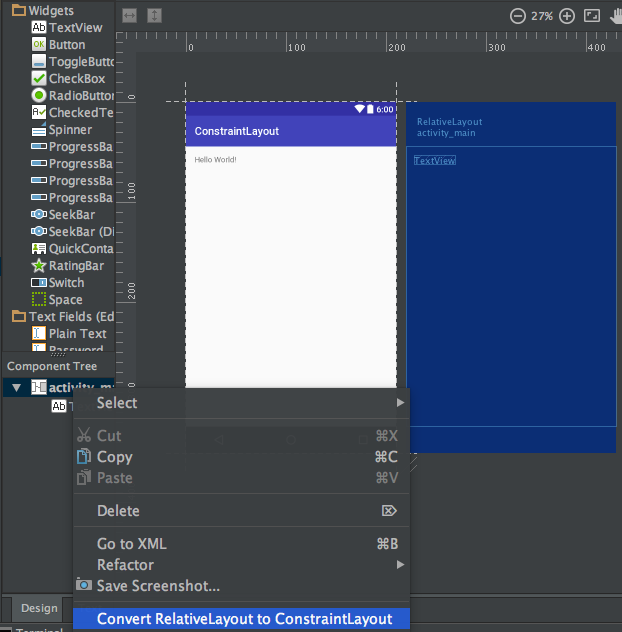
 compile 'com.android.support.constraint:constraint-layout:1.0.0-beta4' قم بإنشاء تخطيط جديد واجعل فئته الرئيسية تكون ConstraintLayout كما هو موضح في الصورة أدناه.  لتحويل تخطيط قديم إلى ConstraintLayout، افتح لوحة التصميم للتخطيط المعني، انقر بزر الماوس الأيمن فوق مكون الجذر واختر الخيار المناسب كما هو موضح في الصورة أدناه.
نظرة عامة على Android Constraint Layout
تُستخدم ConstraintLayout في أندرويد لتعريف تخطيط عن طريق تعيين قيود لكل عنصر فيو/عنصر واجهة مستخدم مرتبط بعناصر واجهة مستخدم أخرى. يشبه ConstraintLayout تخطيط RelativeLayout ولكنه يتمتع بمزيد من القوة. يهدف ConstraintLayout إلى تحسين أداء التطبيقات عن طريق إزالة العناصر المتداخلة واستخدام تصميم مسطح ومرن. تحتوي العناصر داخل ConstraintLayout على مقابض (نقاط مرجعية) على كل جانب يتم استخدامها لتعيين القيود. دعنا نقوم بسحب وإفلات عنصر TextView على التخطيط وتعيين القيود له. 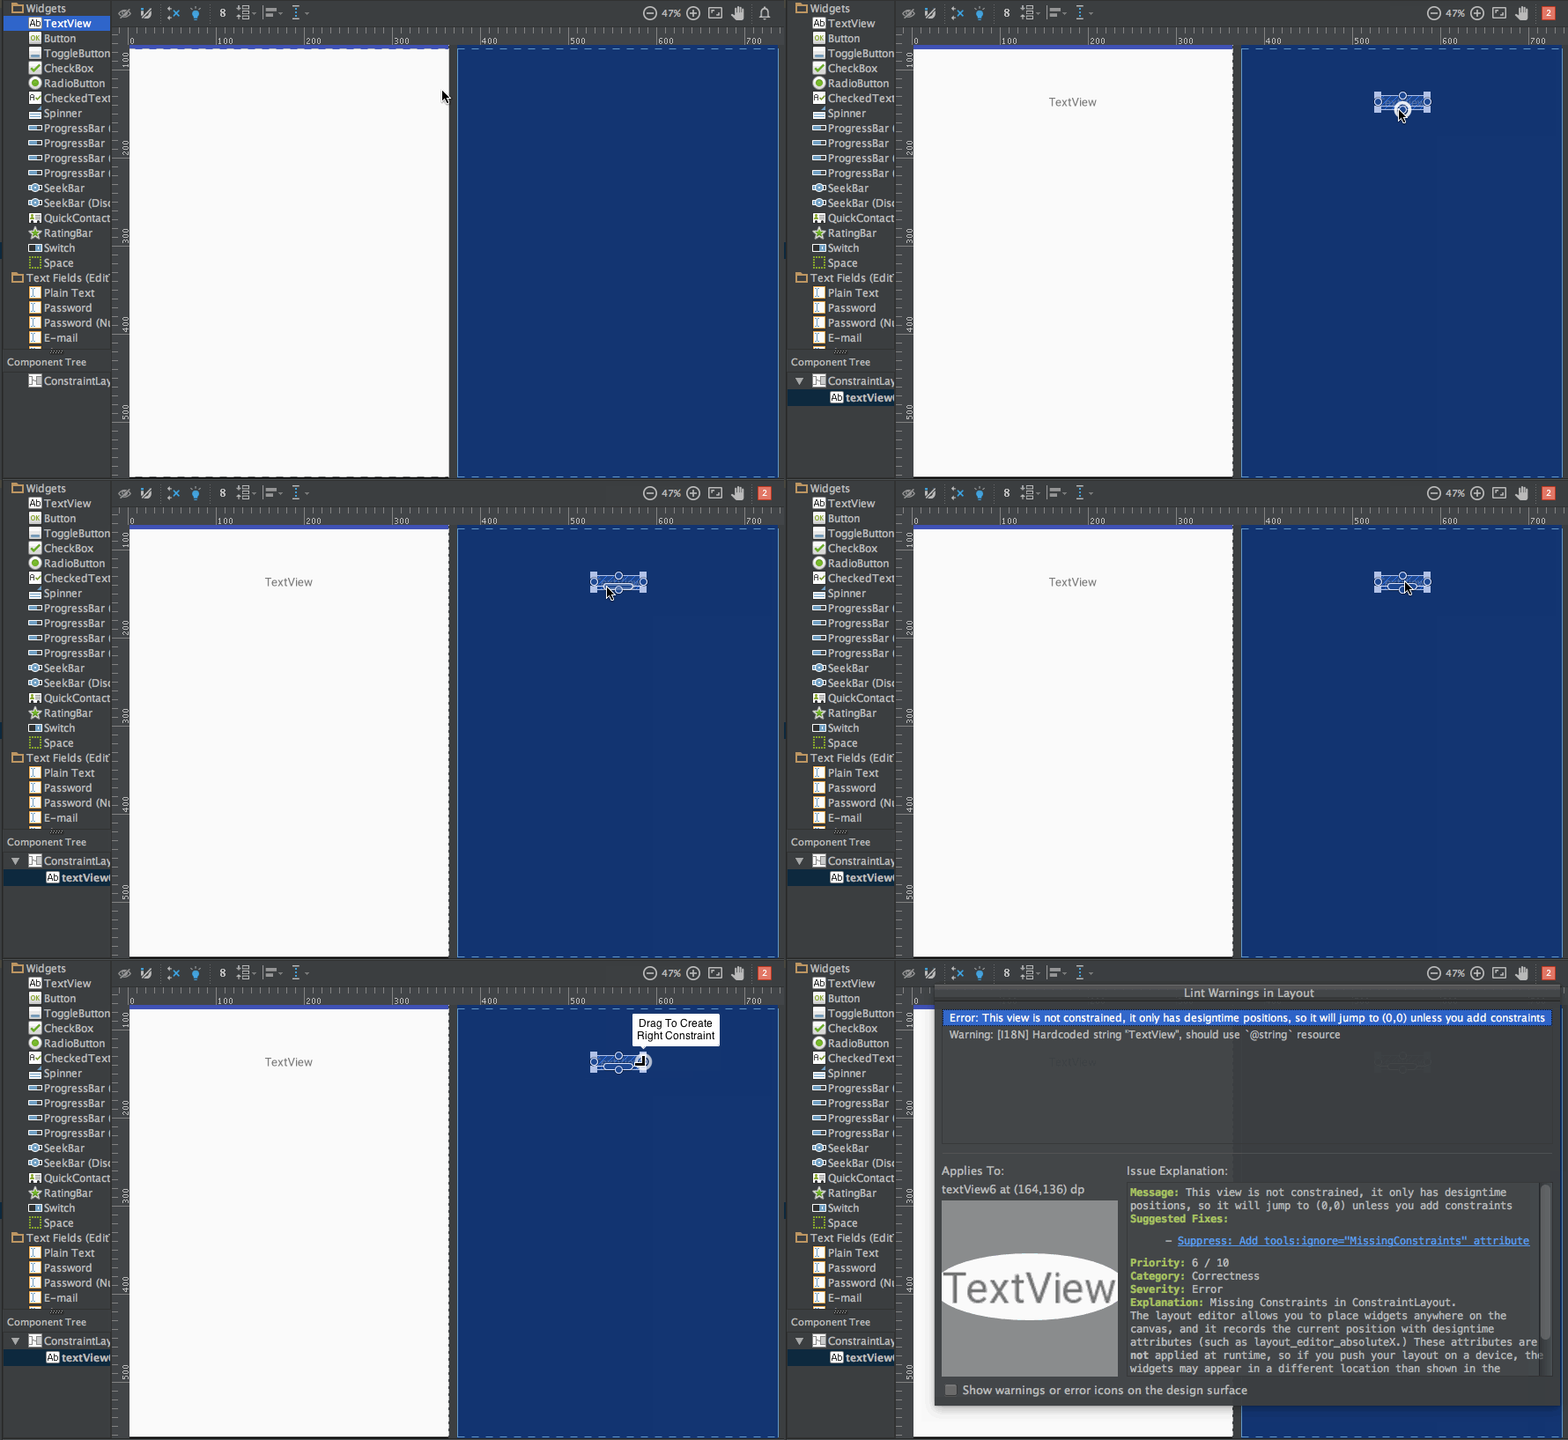 الـ TextView أعلاه لديه ثلاثة أنواع من المقابض:
مقبض التغيير في الحجم – يوجد على الزوايا الأربعة ويستخدم لتغيير حجم العنصر مع الحفاظ على القيود الخاصة به. مقبض الجانب – هو المقبض الدائري الموجود في وسط كل جانب. يُستخدم لتعيين قيود الأعلى واليسار والأسفل واليمين للعنصر. مقبض الخط القاعدي – يُستخدم لمحاذاة الخط القاعدي مع TextView أخرى في التخطيط.
لنضع القيود على TextView وننظر إلى رمز XML الخاص به. 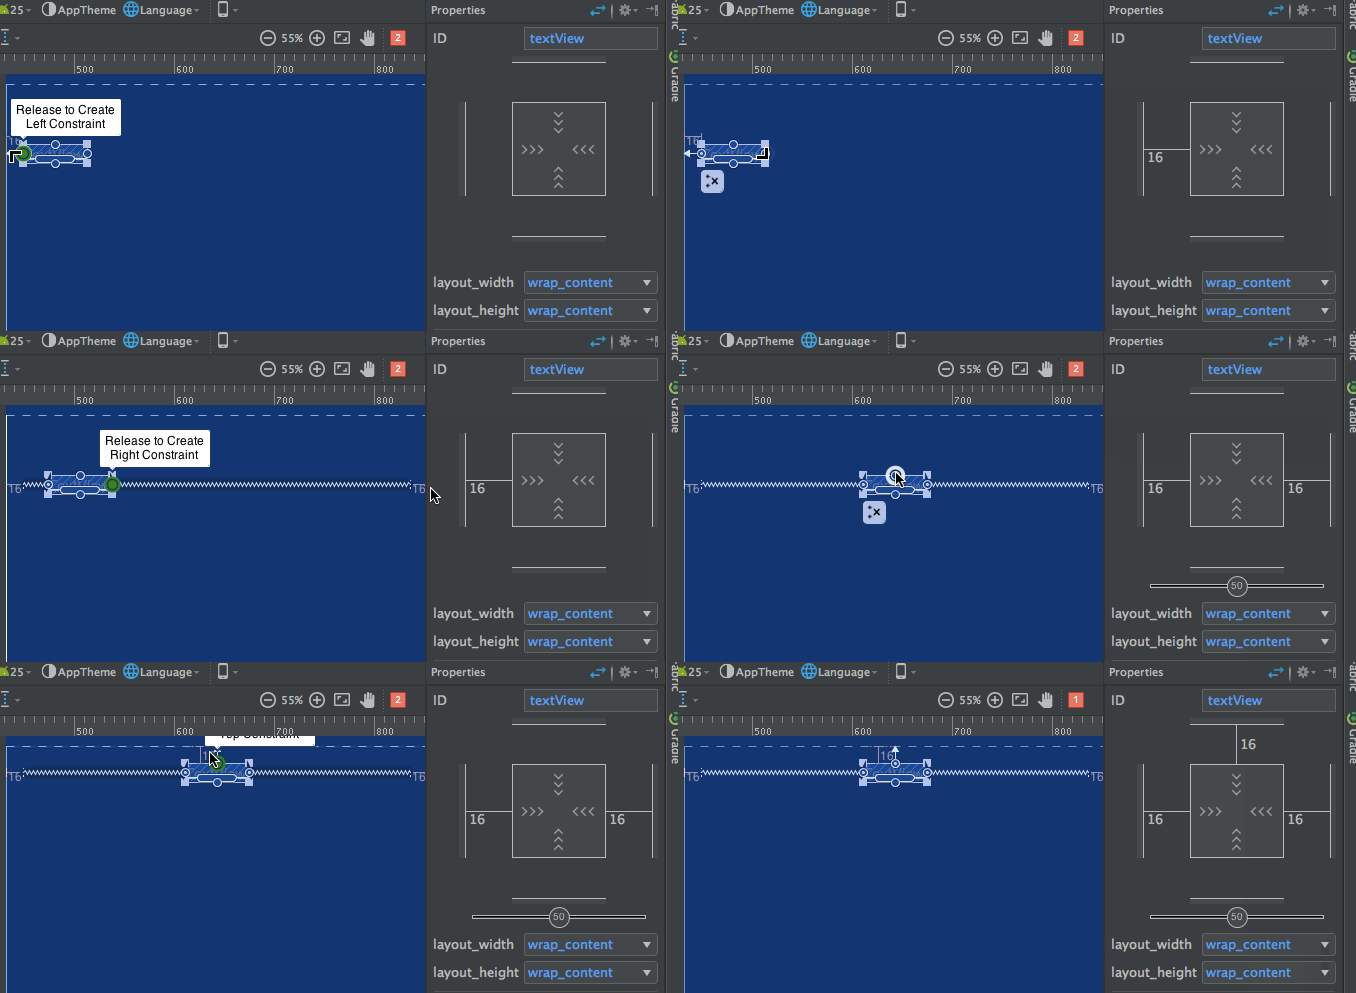 لاحظ لوحة تفاصيل الخصائص في الجانب الأيمن:
 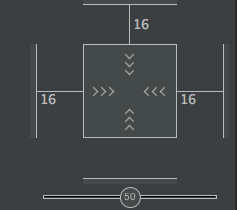 تظهر المسافات المحددة لكل جانب من العرض. كما يتيح لتغيير حجم العرض عن طريق التبديل بين الأوضاع التالية:
- التفاف المحتوى – يلف العرض لملء محتواه.

- أي حجم – هذا مشابه لملء الوالدين.

- حجم ثابت – يتيح لنا تحديد عرض وارتفاع ثابتين.

يبدو رمز XML للتخطيط أعلاه كالتالي: sample.xml
<?xml version="1.0" encoding="utf-8"?>
<android.support.constraint.ConstraintLayout
    xmlns:android="https://schemas.android.com/apk/res/android"
    xmlns:app="https://schemas.android.com/apk/res-auto"
    android:layout_width="match_parent"
    android:layout_height="match_parent">

    <TextView
        android:text="TextView"
        android:layout_width="wrap_content"
        android:layout_height="wrap_content"
        android:id="@+id/textView"
        android:layout_marginStart="16dp"
        android:layout_marginTop="16dp"
        app:layout_constraintLeft_toLeftOf="parent"
        app:layout_constraintTop_toTopOf="parent"
        android:layout_marginLeft="16dp"
        android:layout_marginEnd="16dp"
        app:layout_constraintRight_toRightOf="parent"
        android:layout_marginRight="16dp" />
</android.support.constraint.ConstraintLayout>
app:layout_constraintLeft_toLeftOf="parent"– يعتبر constraintLeft نقطة الارتكاز إلى اليسار من العرض. يشير toLeftOf إلى محاذاة العرض إلى اليسار من العرض المعين والذي هو “parent” في هذه الحالة.
عند تعيين المواقع المطلقة على العرض، يتم استخدام خصائص XML التالية:
tools:layout_editor_absoluteY="48dp"
tools:layout_editor_absoluteX="40dp"
لنضيف TextView أخرى ونحاذي أساسها.  الشيفرة XML للتخطيط أعلاه هي:
<?xml version="1.0" encoding="utf-8"?>
<android.support.constraint.ConstraintLayout
    xmlns:android="https://schemas.android.com/apk/res/android"
    xmlns:app="https://schemas.android.com/apk/res-auto"
    xmlns:tools="https://schemas.android.com/tools"
    android:layout_width="match_parent"
    android:layout_height="match_parent">

    <TextView
        android:text="TextView"
        android:layout_width="wrap_content"
        android:layout_height="wrap_content"
        android:id="@+id/textView"
        android:layout_marginStart="16dp"
        app:layout_constraintLeft_toLeftOf="parent"
        android:layout_marginLeft="16dp"
        android:layout_marginEnd="16dp"
        app:layout_constraintRight_toRightOf="parent"
        android:layout_marginRight="16dp"
        android:layout_marginTop="16dp"
        app:layout_constraintTop_toTopOf="parent" />

    <TextView
        android:text="TextView"
        android:layout_width="wrap_content"
        android:layout_height="wrap_content"
        android:id="@+id/textView2"
        app:layout_constraintBaseline_toBaselineOf="@+id/textView"
        android:layout_marginStart="16dp"
        app:layout_constraintLeft_toLeftOf="parent"
        android:layout_marginLeft="16dp"
        app:layout_constraintRight_toLeftOf="@+id/textView"
        android:layout_marginEnd="8dp"
        android:layout_marginRight="8dp" />

</android.support.constraint.ConstraintLayout>
هناك أداةان أخريين، Auto-connect وInferences، يتم استخدامهما لإنشاء القيود تلقائيًا.
- Auto-Connect – يمكن تمكين هذه الميزة عن طريق النقر:
 كما يوحي الاسم، يقوم Auto-connect بإنشاء القيود تلقائيًا بين عناصر العرض المجاورة
 - Inference – يمكن تمكين هذه الميزة عن طريق النقر:
 يقوم محرك الاستنتاج بإنشاء قيود بين جميع العناصر في التخطيط. يحاول محرك الاستنتاج العثور على وإنشاء اتصالات مثلى بناءً على عوامل متنوعة مثل مواقع الودجت وحجمها.
A demo of Auto-Connect layout is given below: 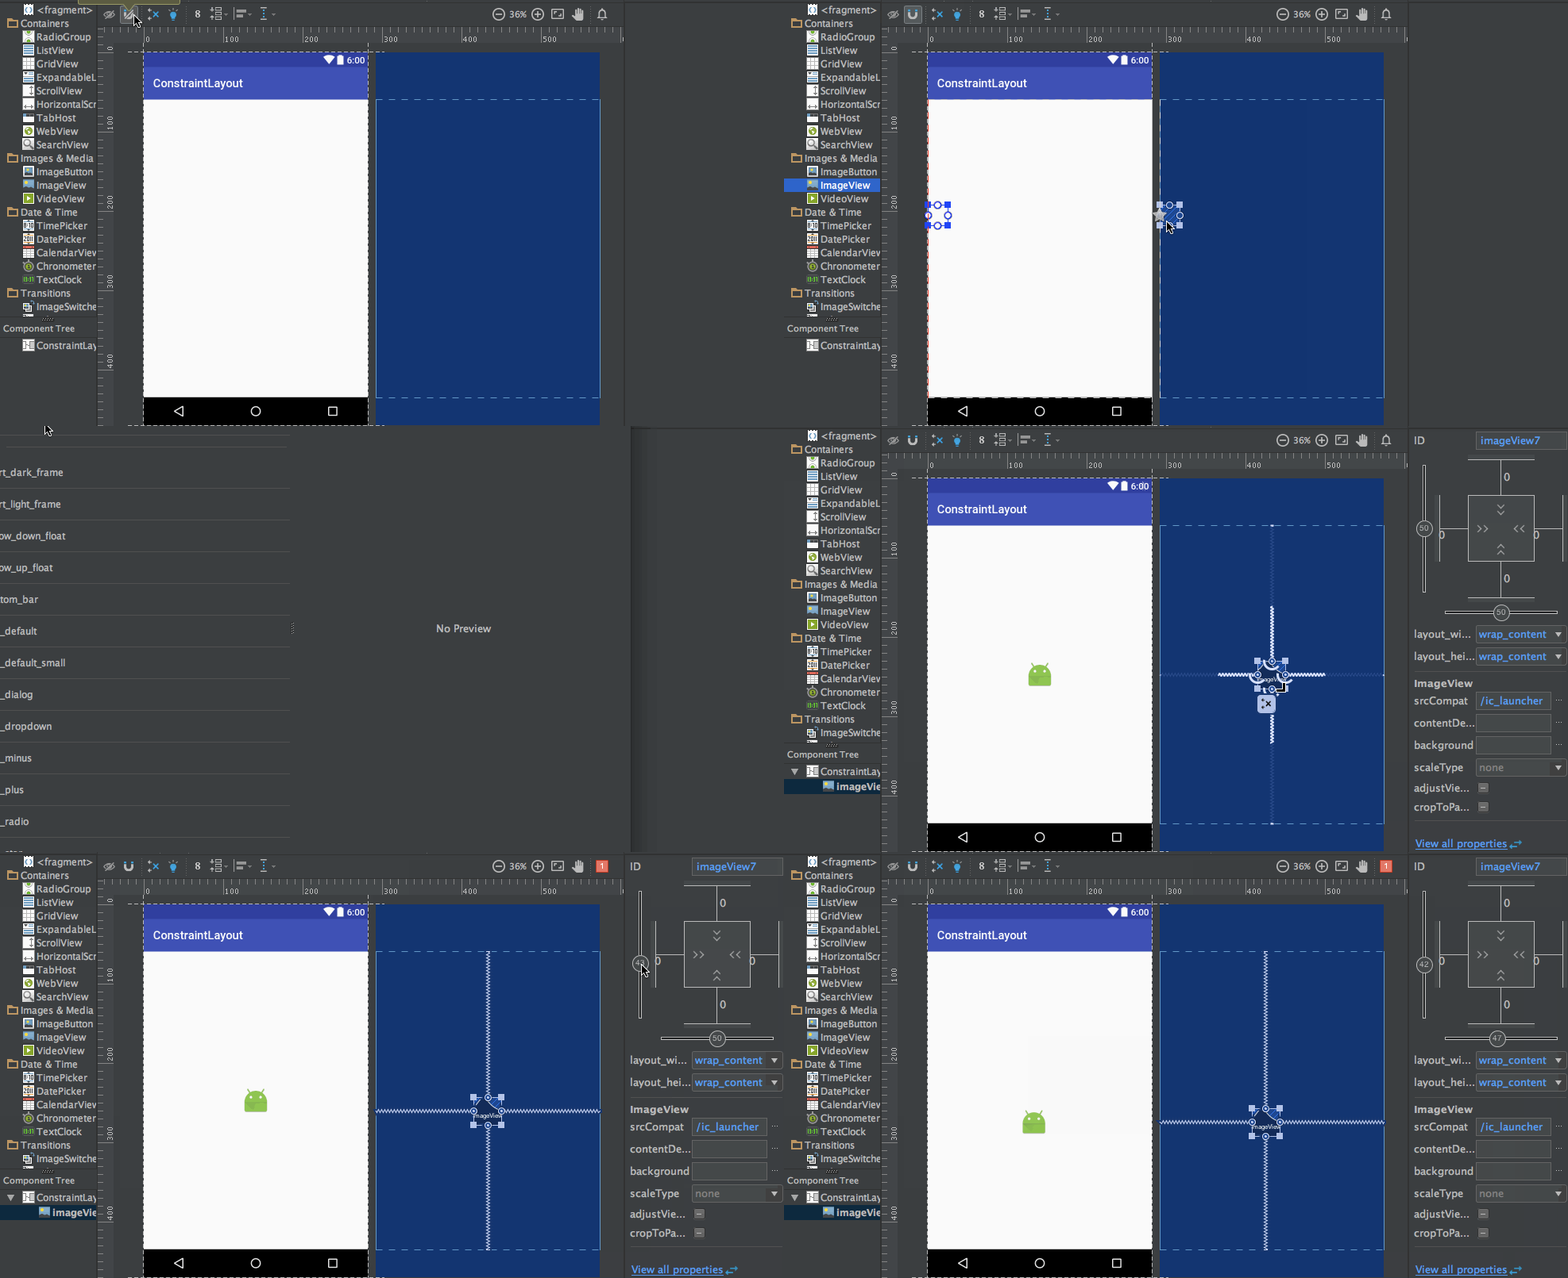 As you can see in the above gif, The constraints are animated automatically. Notice the horizontal and vertical sliders in the properties pane. They are called horizontal and vertical bias respectively. They allow us to position a view along the horizontal or vertical axis using a bias value, this will be relative to it’s constrained position. The xml code for the above demo is given below:
<?xml version="1.0" encoding="utf-8"?>
<android.support.constraint.ConstraintLayout
    xmlns:android="https://schemas.android.com/apk/res/android"
    xmlns:app="https://schemas.android.com/apk/res-auto"
    xmlns:tools="https://schemas.android.com/tools"
    android:layout_width="match_parent"
    android:layout_height="match_parent">

    <ImageView
        android:layout_width="wrap_content"
        android:layout_height="wrap_content"
        app:srcCompat="@mipmap/ic_launcher"
        android:id="@+id/imageView7"
        app:layout_constraintBottom_toBottomOf="parent"
        app:layout_constraintRight_toRightOf="parent"
        app:layout_constraintLeft_toLeftOf="parent"
        app:layout_constraintTop_toTopOf="parent"
        app:layout_constraintVertical_bias="0.58000004"
        app:layout_constraintHorizontal_bias="0.47" />
</android.support.constraint.ConstraintLayout>
تم تقديم عرض توضيحي لتخطيط مع التفسير الممكّن كما يلي: 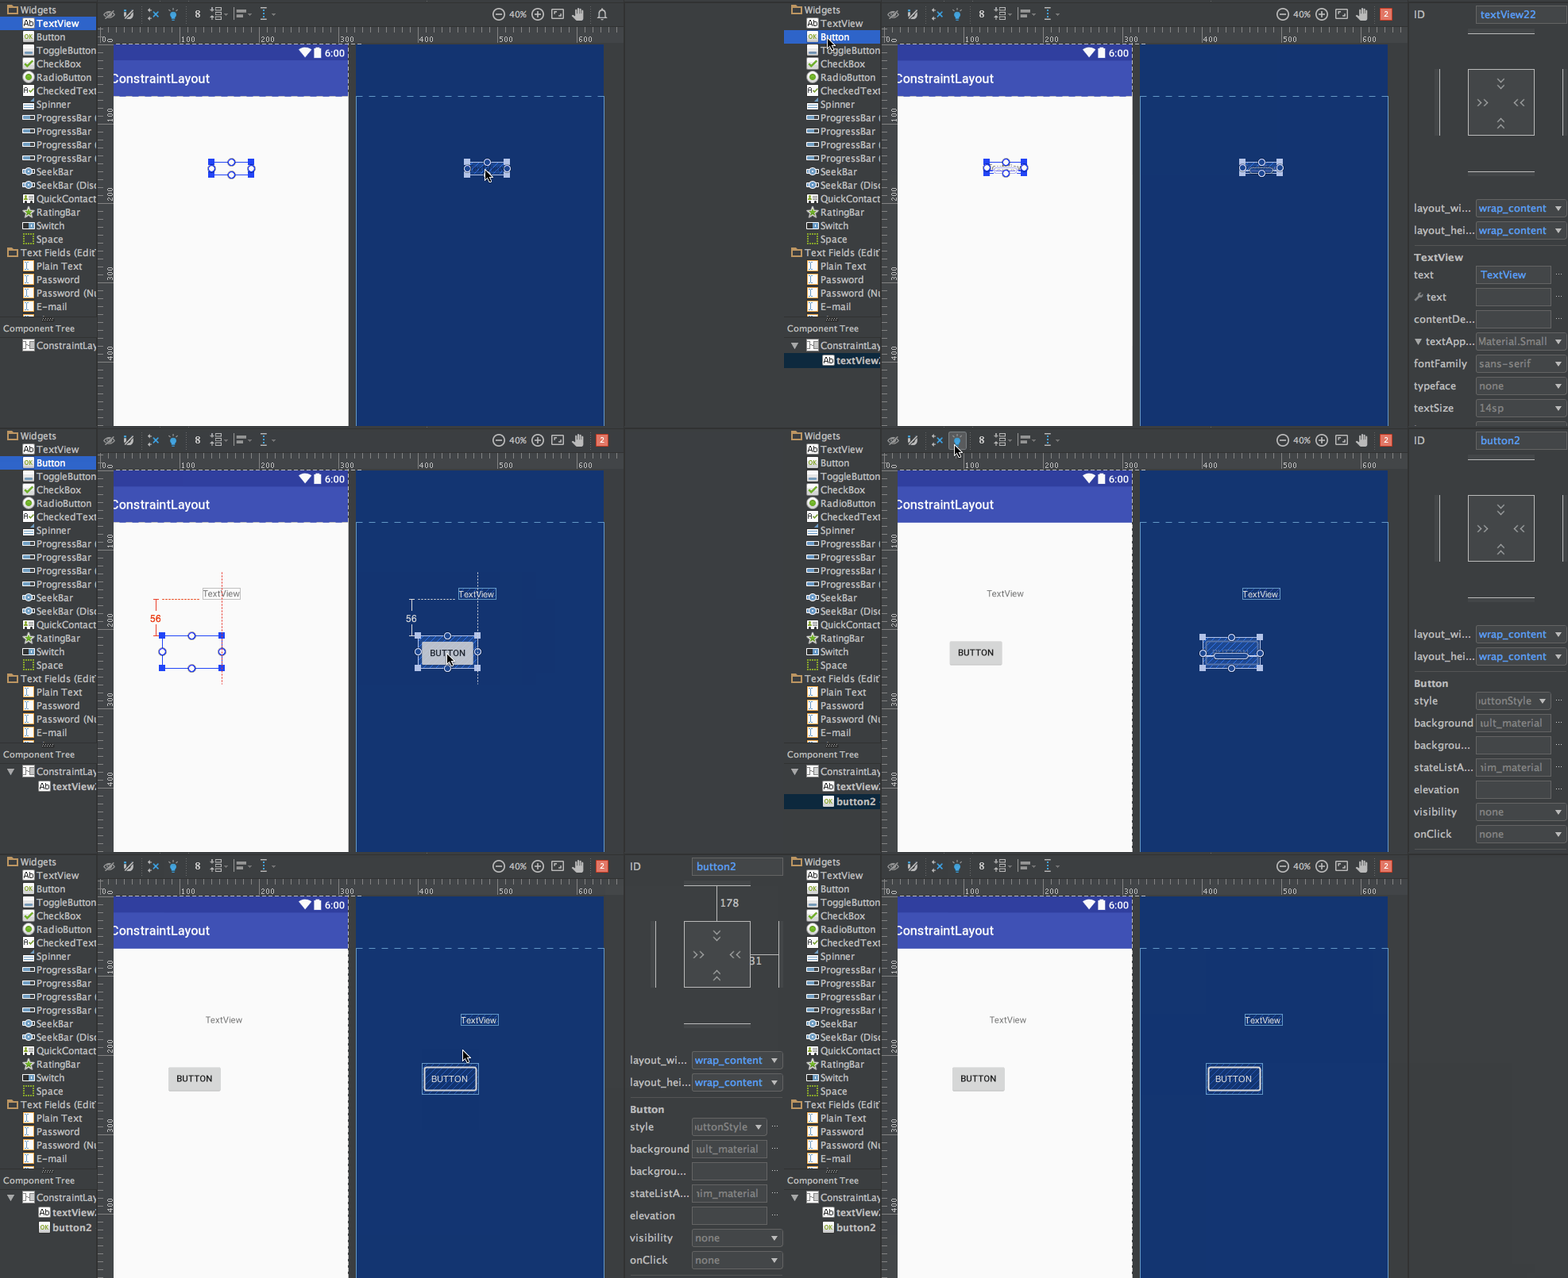 يمكن العثور على الشفرة xml للصورة المتحركة أعلاه:
<?xml version="1.0" encoding="utf-8"?>
<android.support.constraint.ConstraintLayout
    xmlns:android="https://schemas.android.com/apk/res/android"
    xmlns:app="https://schemas.android.com/apk/res-auto"
    xmlns:tools="https://schemas.android.com/tools"
    android:layout_width="match_parent"
    android:layout_height="match_parent">

    <TextView
        android:text="TextView"
        android:layout_width="wrap_content"
        android:layout_height="wrap_content"
        android:id="@+id/textView22"
        tools:layout_constraintRight_creator="1"
        tools:layout_constraintBottom_creator="1"
        app:layout_constraintBottom_toTopOf="@+id/button2"
        app:layout_constraintRight_toRightOf="parent"
        tools:layout_constraintLeft_creator="1"
        android:layout_marginBottom="59dp"
        app:layout_constraintLeft_toLeftOf="parent" />

    <Button
        android:text="Button"
        android:layout_width="wrap_content"
        android:layout_height="wrap_content"
        android:id="@+id/button2"
        tools:layout_constraintTop_creator="1"
        tools:layout_constraintRight_creator="1"
        android:layout_marginEnd="31dp"
        app:layout_constraintRight_toRightOf="@+id/textView22"
        android:layout_marginTop="178dp"
        app:layout_constraintTop_toTopOf="parent"
        android:layout_marginRight="31dp" />
</android.support.constraint.ConstraintLayout>
tools:layout_constraintTop_creator="1": السمات المُنشئة لتتبع من قام بإنشاء القيود، خاصة إذا تم إنشاؤها بواسطة محرك التفسير حيث يتم تعيينها كـ1.
حذف القيود
لحذف قيد فردي، امرر المؤشر فوق المقبض الدائري وانقر فوقه لتحول لونه إلى أحمر. لحذف جميع القيود لعرض، انقر على الرمز أسفله الذي يبدو كما يلي:  تم تقديم عرض توضيحي عينة أدناه:
 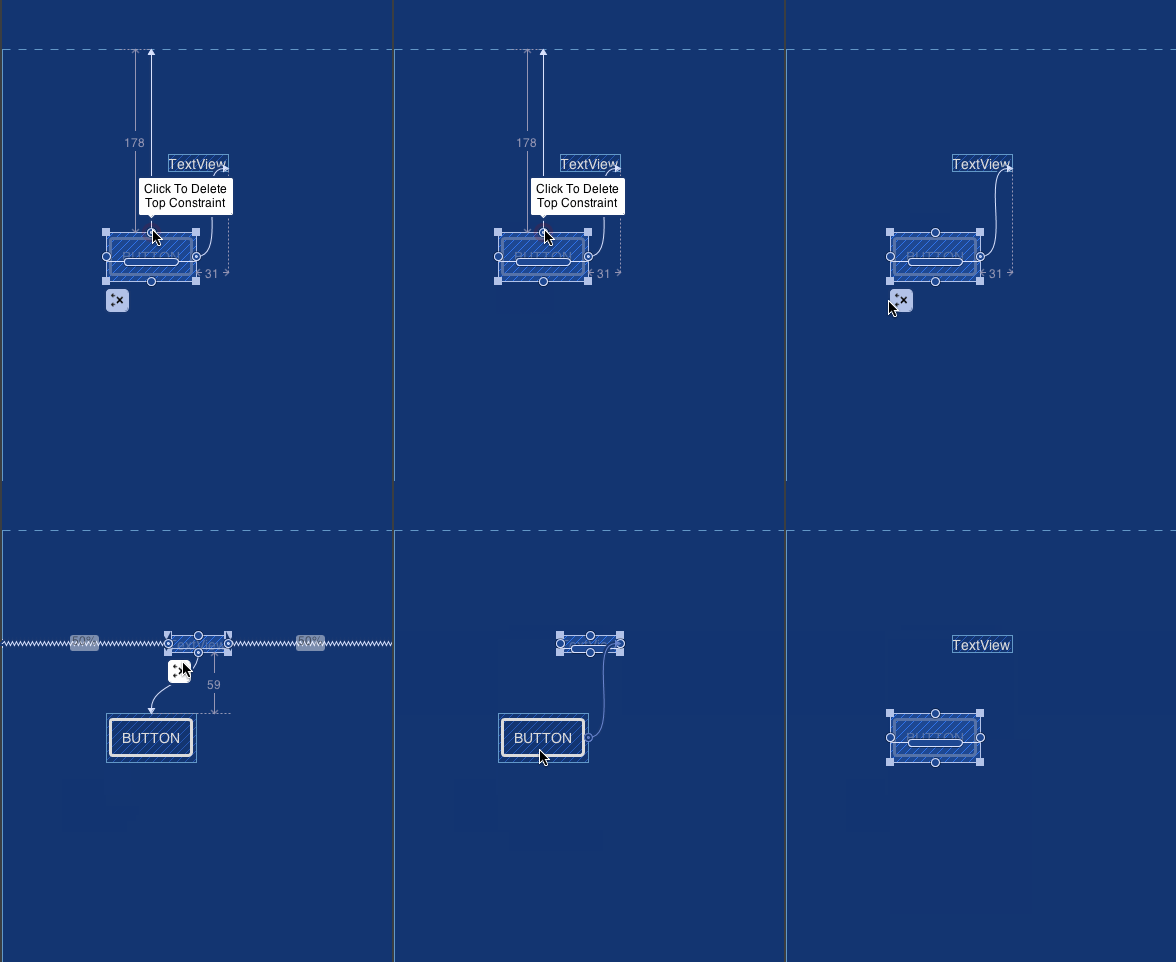 هذا ينهي هذا البرنامج التعليمي. يمكنك المضي قدمًا ومحاولة استبدال بعض تخطيطاتك الخاصة بتخطيط القيود.
Source:
https://www.digitalocean.com/community/tutorials/android-constraintlayout


