在本教程中,我们将学习关于 Sigmoid 激活函数的知识。Sigmoid 函数始终返回介于 0 和 1 之间的输出。
完成本教程后,您将了解到:
- 什么是激活函数?
- 如何在 Python 中实现 Sigmoid 函数?
- 如何在 Python 中绘制 Sigmoid 函数?
- 我们在何处使用 Sigmoid 函数?
- 由 Sigmoid 激活函数引起的问题有哪些?
- Sigmoid 激活函数的更好替代方案是什么?
什么是激活函数?
激活函数是一种数学函数,用于控制神经网络的输出。激活函数有助于确定是否应该激活神经元。
一些流行的激活函数包括:
- Binary Step
- Linear
- Sigmoid
- Tanh
- ReLU
- Leaky ReLU
- Softmax
激活函数负责为神经网络模型的输出增加 非线性。没有激活函数,神经网络就只是一个线性回归模型。
神经网络输出的计算数学方程为:

在这个教程中,我们将专注于sigmoid激活函数。该函数源自数学中的sigmoid函数。
让我们从讨论该函数的公式开始。
sigmoid激活函数的公式
在数学上,你可以表示sigmoid激活函数为:

你可以看到分母始终大于1,因此输出始终介于0和1之间。
在Python中实现Sigmoid激活函数
在这一部分,我们将学习如何在Python中实现sigmoid激活函数。
我们可以在Python中定义该函数为:
import numpy as np
def sig(x):
 return 1/(1 + np.exp(-x))
让我们尝试在一些输入上运行该函数。
import numpy as np
def sig(x):
 return 1/(1 + np.exp(-x))


x = 1.0
print('Applying Sigmoid Activation on (%.1f) gives %.1f' % (x, sig(x)))

x = -10.0
print('Applying Sigmoid Activation on (%.1f) gives %.1f' % (x, sig(x)))

x = 0.0
print('Applying Sigmoid Activation on (%.1f) gives %.1f' % (x, sig(x)))

x = 15.0
print('Applying Sigmoid Activation on (%.1f) gives %.1f' % (x, sig(x)))

x = -2.0
print('Applying Sigmoid Activation on (%.1f) gives %.1f' % (x, sig(x)))
输出:
Applying Sigmoid Activation on (1.0) gives 0.7
Applying Sigmoid Activation on (-10.0) gives 0.0
Applying Sigmoid Activation on (0.0) gives 0.5
Applying Sigmoid Activation on (15.0) gives 1.0
Applying Sigmoid Activation on (-2.0) gives 0.1
使用Python绘制Sigmoid激活函数
绘制Sigmoid激活函数我们将使用Numpy库:
import numpy as np
import matplotlib.pyplot as plt
x = np.linspace(-10, 10, 50)
p = sig(x)
plt.xlabel("x")
plt.ylabel("Sigmoid(x)")
plt.plot(x, p)
plt.show()
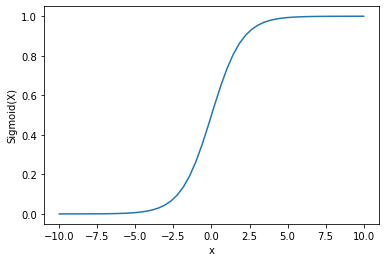
输出:

我们可以看到输出在0和1之间。
Sigmoid函数通常用于预测概率,因为概率始终在0和1之间。
Sigmoid函数的一个缺点是,在末端区域Y值对X值的变化反应非常小。
这导致了一个称为梯度消失问题的问题。
梯度消失会减慢学习过程,因此不可取。
让我们讨论一些能克服这个问题的替代方案。
ReLu激活函数
A better alternative that solves this problem of vanishing gradient is the ReLu activation function.
ReLu激活函数在输入为负时返回0,否则返回输入本身。
数学上表示为:

你可以在Python中实现它如下:
def relu(x):
    return max(0.0, x)
让我们看看它如何处理一些输入。
def relu(x):
    return max(0.0, x)

x = 1.0
print('Applying Relu on (%.1f) gives %.1f' % (x, relu(x)))
x = -10.0
print('Applying Relu on (%.1f) gives %.1f' % (x, relu(x)))
x = 0.0
print('Applying Relu on (%.1f) gives %.1f' % (x, relu(x)))
x = 15.0
print('Applying Relu on (%.1f) gives %.1f' % (x, relu(x)))
x = -20.0
print('Applying Relu on (%.1f) gives %.1f' % (x, relu(x)))
输出:
Applying Relu on (1.0) gives 1.0
Applying Relu on (-10.0) gives 0.0
Applying Relu on (0.0) gives 0.0
Applying Relu on (15.0) gives 15.0
Applying Relu on (-20.0) gives 0.0
ReLu的问题在于负输入的梯度为零。
这再次导致了负输入的梯度消失问题(零梯度)。
为了解决这个问题,我们有另一种选择,称为Leaky ReLu激活函数。
Leaky ReLu激活函数解决了负值的梯度为零的问题,通过给负输入一个极小的线性分量x。
f(x)= 0.01x, x<0
    = x,   x>=0
def leaky_relu(x):
  if x>0 :
    return x
  else :
    return 0.01*x

x = 1.0
print('Applying Leaky Relu on (%.1f) gives %.1f' % (x, leaky_relu(x)))

x = -10.0
print('Applying Leaky Relu on (%.1f) gives %.1f' % (x, leaky_relu(x)))

x = 0.0
print('Applying Leaky Relu on (%.1f) gives %.1f' % (x, leaky_relu(x)))

x = 15.0
print('Applying Leaky Relu on (%.1f) gives %.1f' % (x, leaky_relu(x)))

x = -20.0
print('Applying Leaky Relu on (%.1f) gives %.1f' % (x, leaky_relu(x)))
输出:
Applying Leaky Relu on (1.0) gives 1.0
Applying Leaky Relu on (-10.0) gives -0.1
Applying Leaky Relu on (0.0) gives 0.0
Applying Leaky Relu on (15.0) gives 15.0
Applying Leaky Relu on (-20.0) gives -0.2
这个教程是关于Sigmoid激活函数的。我们学习了如何在Python中实现和绘制这个函数。
Source:
https://www.digitalocean.com/community/tutorials/sigmoid-activation-function-python


