


如果你曾想在 PHP 和 Laravel 开发中使用 Neovim,本指南应该能帮你入门。
在这篇文章中,我将使用 Neovim 和 LazyVim。LazyVim 是一个出色的 Neovim 设置,具有许多开箱即用的功能和工具。我花在配置 Vim 和 Neovim 上的时间比我愿意承认的还要多。LazyVim 节省了几乎所有的时间。当您开始熟练配置 LazyVim 时,您可以考虑从头开始创建自己的配置。
安装
本文章假定您使用的是最新版本的 Neovim(发布时为 v0.10.0)。
安装 Neovim 后,我们将使用 LazyVim。
要安装 LazyVim,您需要克隆该 repo 并将其移动到 Neovim 配置文件夹(~/.
git clone https://github.com/LazyVim/starter ~/.config/nvim
克隆完成后,您可以移除 .git 文件夹,因为您现在不需要它,而且可能希望对配置更改进行版本控制。
rm -rf ~/.config/nvim/.git
安装完成后,您可以运行 Neovim,它会调出 LazyVim 的所有插件和依赖项
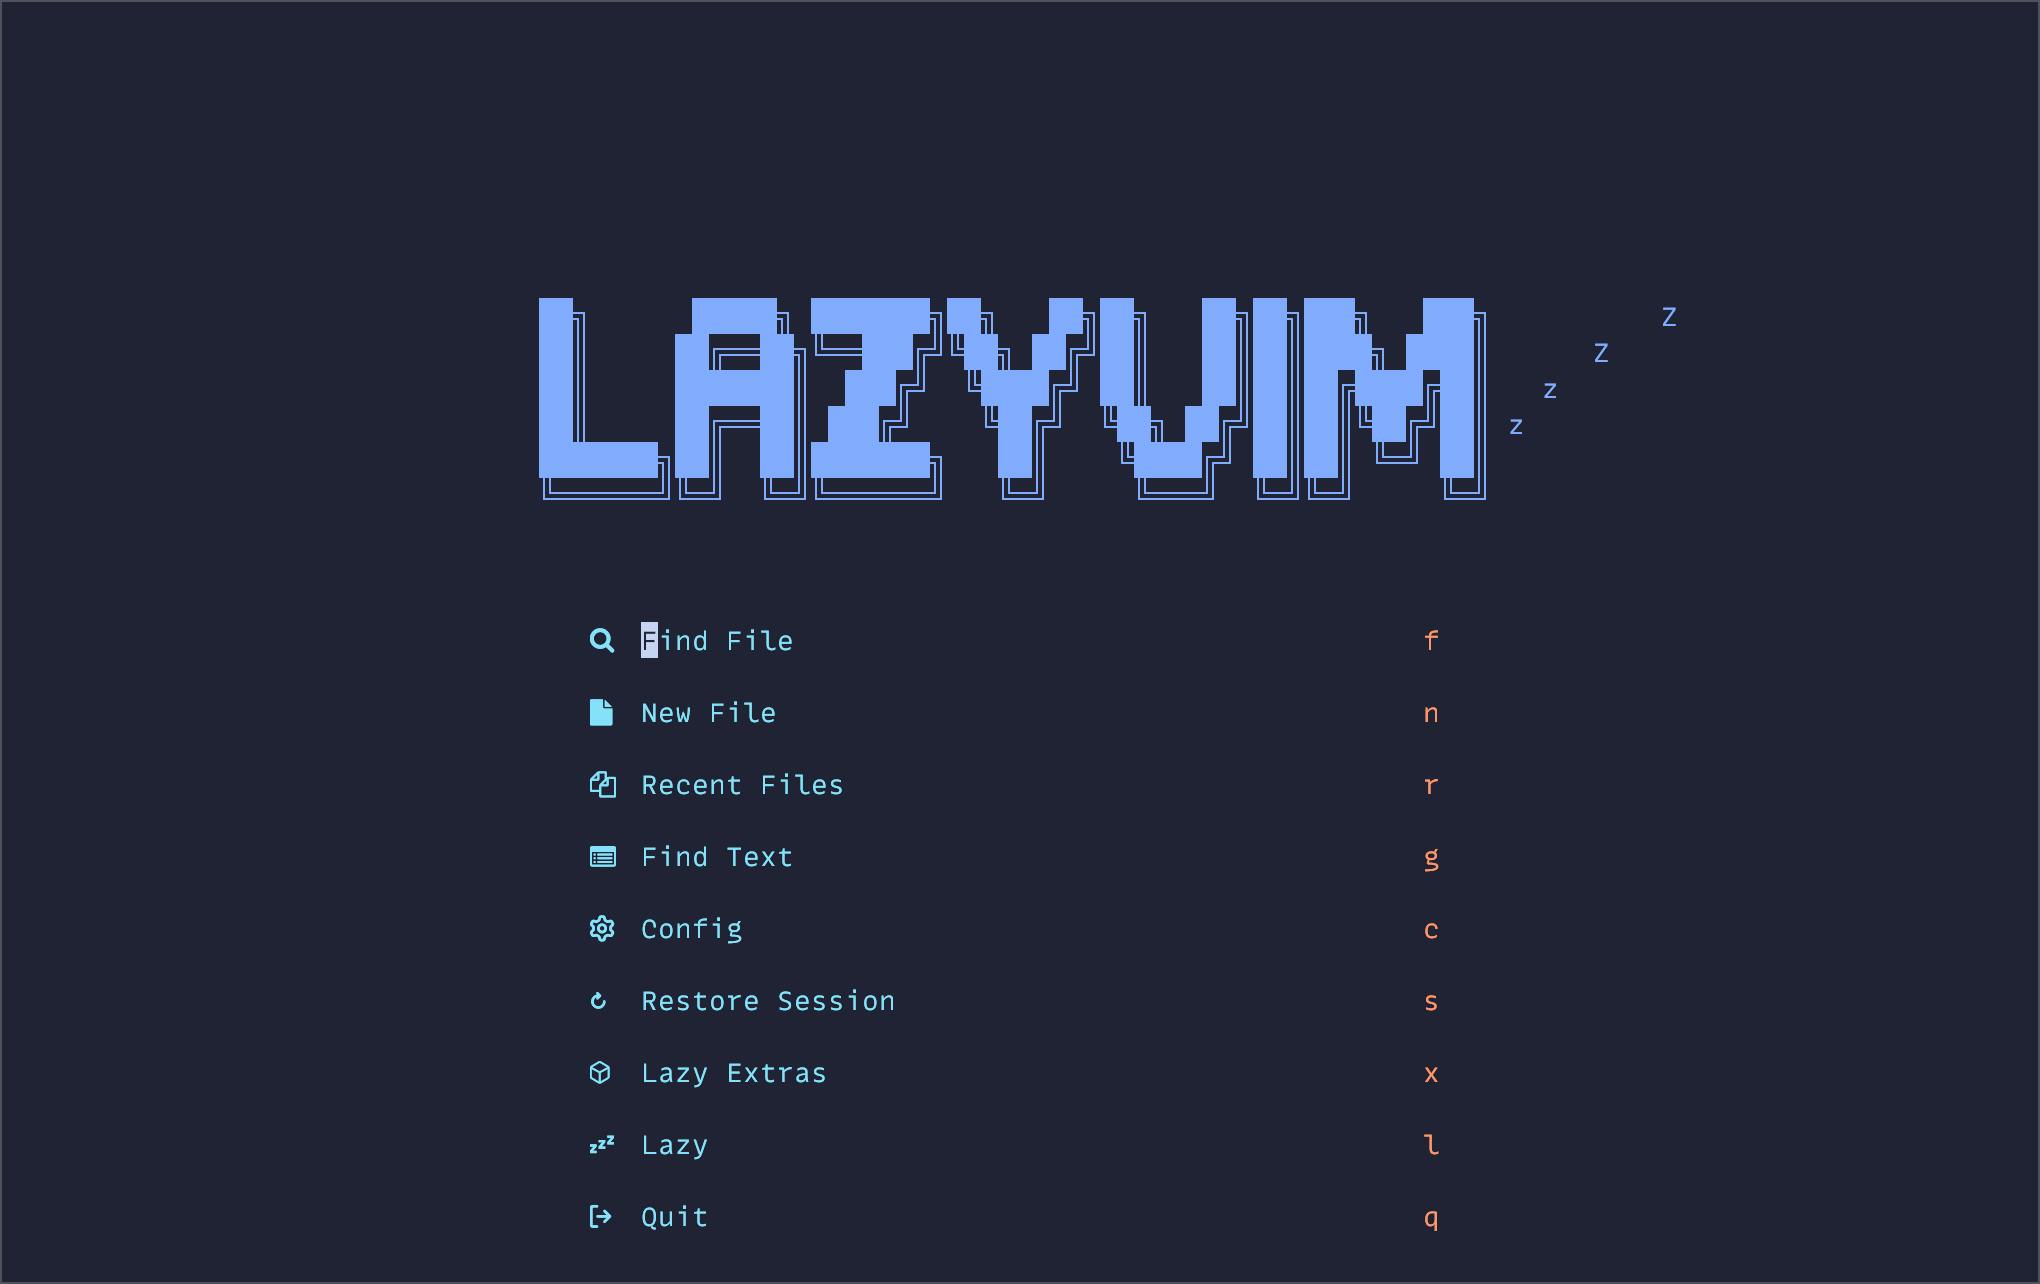
开箱后,LazyVim 提供了一个不错的菜单,您可以根据需要进行导航。
LazyVim PHP Extras
LazyVim 最近添加了一个更新,以快速添加 PHP 支持。您只需在主屏幕中点击 x 即可进入额外功能菜单,或键入 :LazyExtras.
在菜单中,您可以首先键入斜线,然后键入 php 来搜索 PHP,因此 /php。/开始在 Neovim 中搜索。
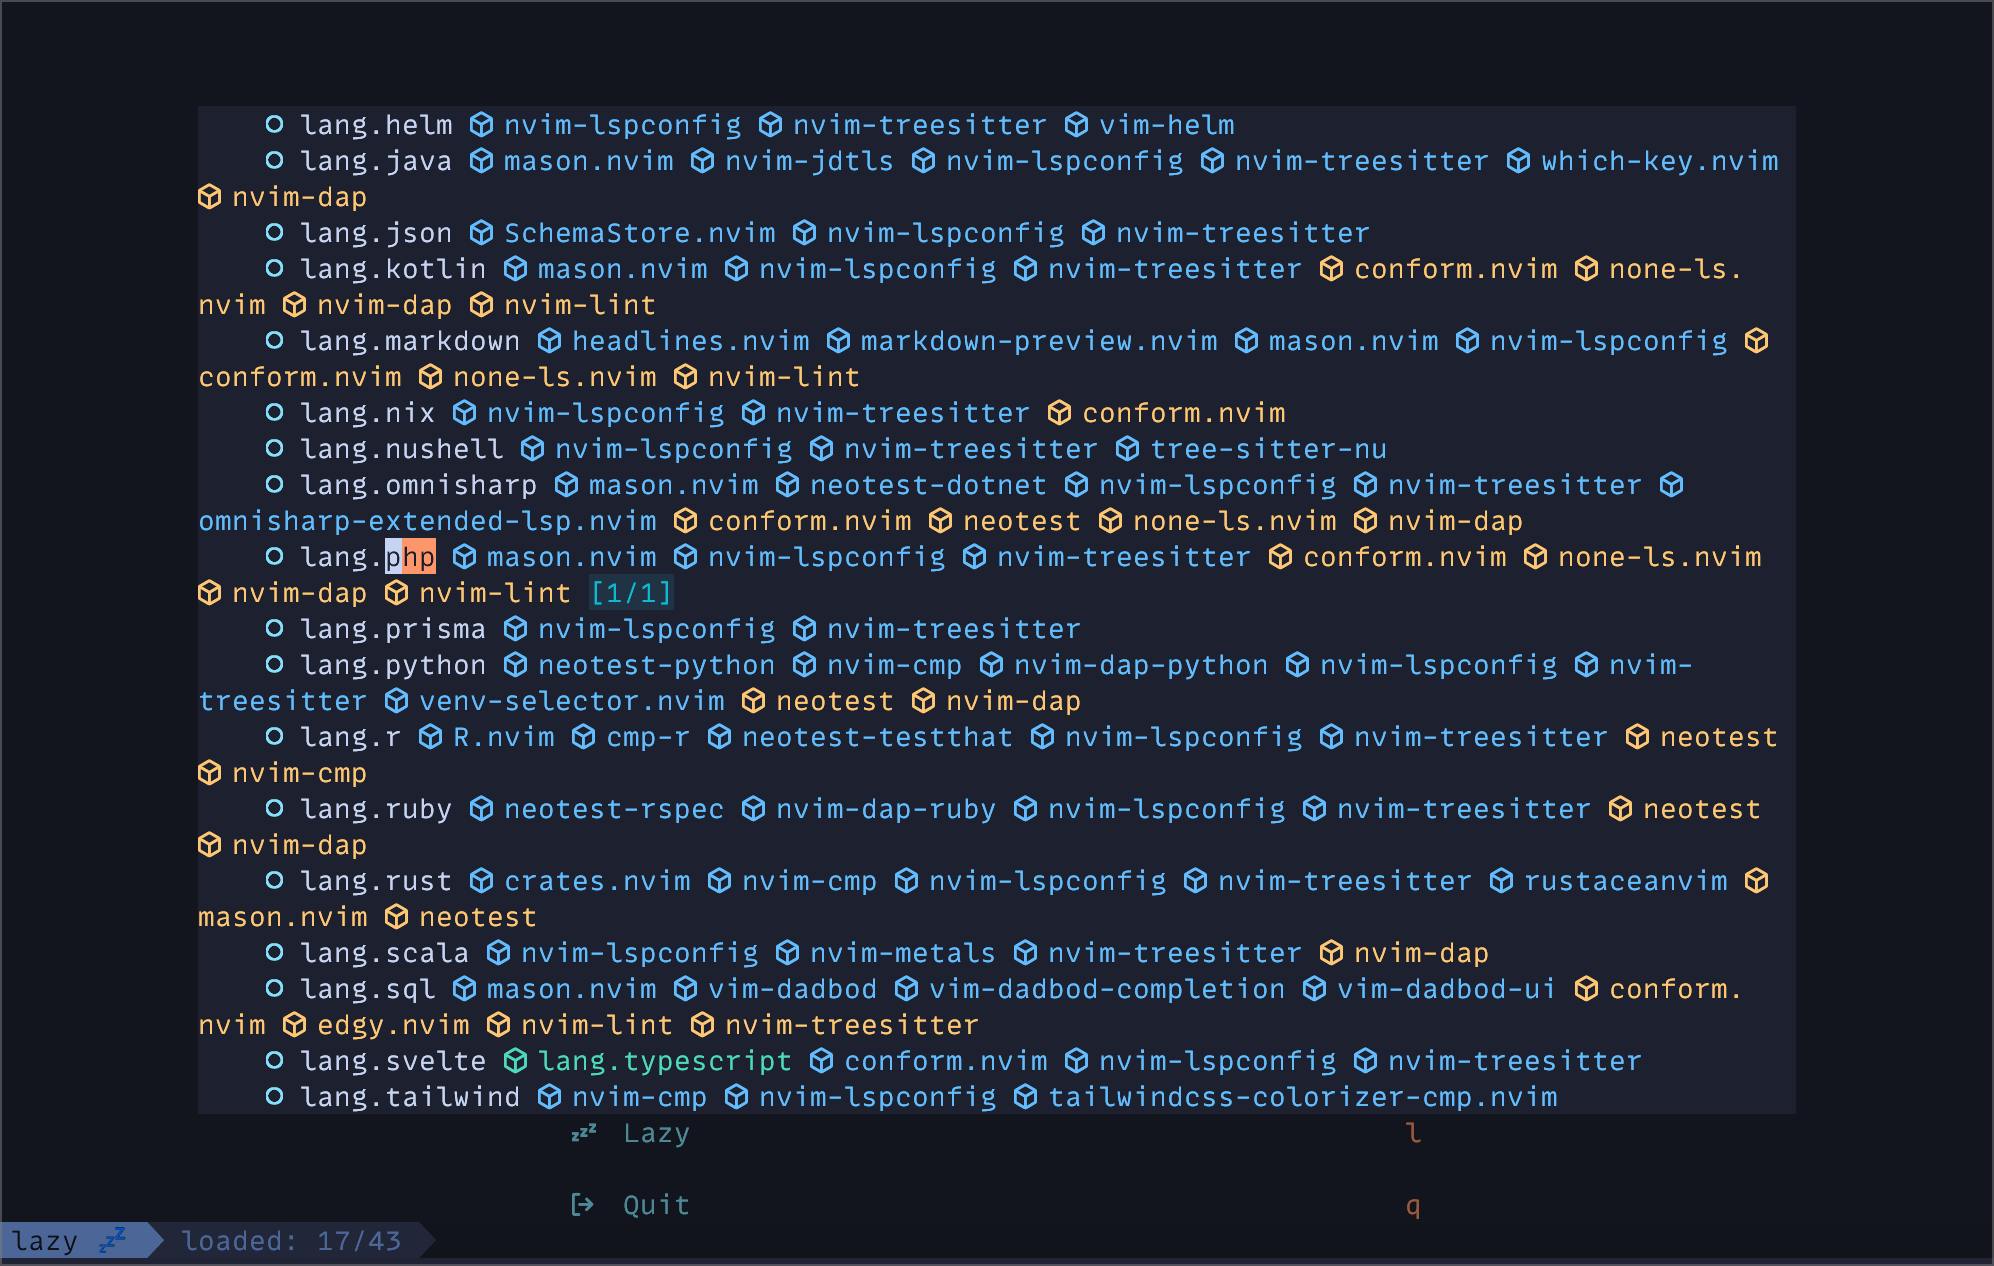
将光标放在 lang.php 行上,点击 x 以切换额外的内容。然后重新启动 Neovim。现在,Neovim 将支持 PHP 语法并安装 Phpactor LSP。
为了测试 LSP,我用 Laravel Breeze 创建了一个新的 Laravel 项目。在项目目录下,打开 Neovim,使用 <leader>ff 打开 ProfileController 。在 Neovim 中,许多键盘命令都以 <leader> 键为前缀,该键默认设置为 space。因此,要查找文件,请键入 space + f + f。
首次加载控制器时,Phpactor 将开始索引代码库,通常是从项目的 Git 根目录开始。
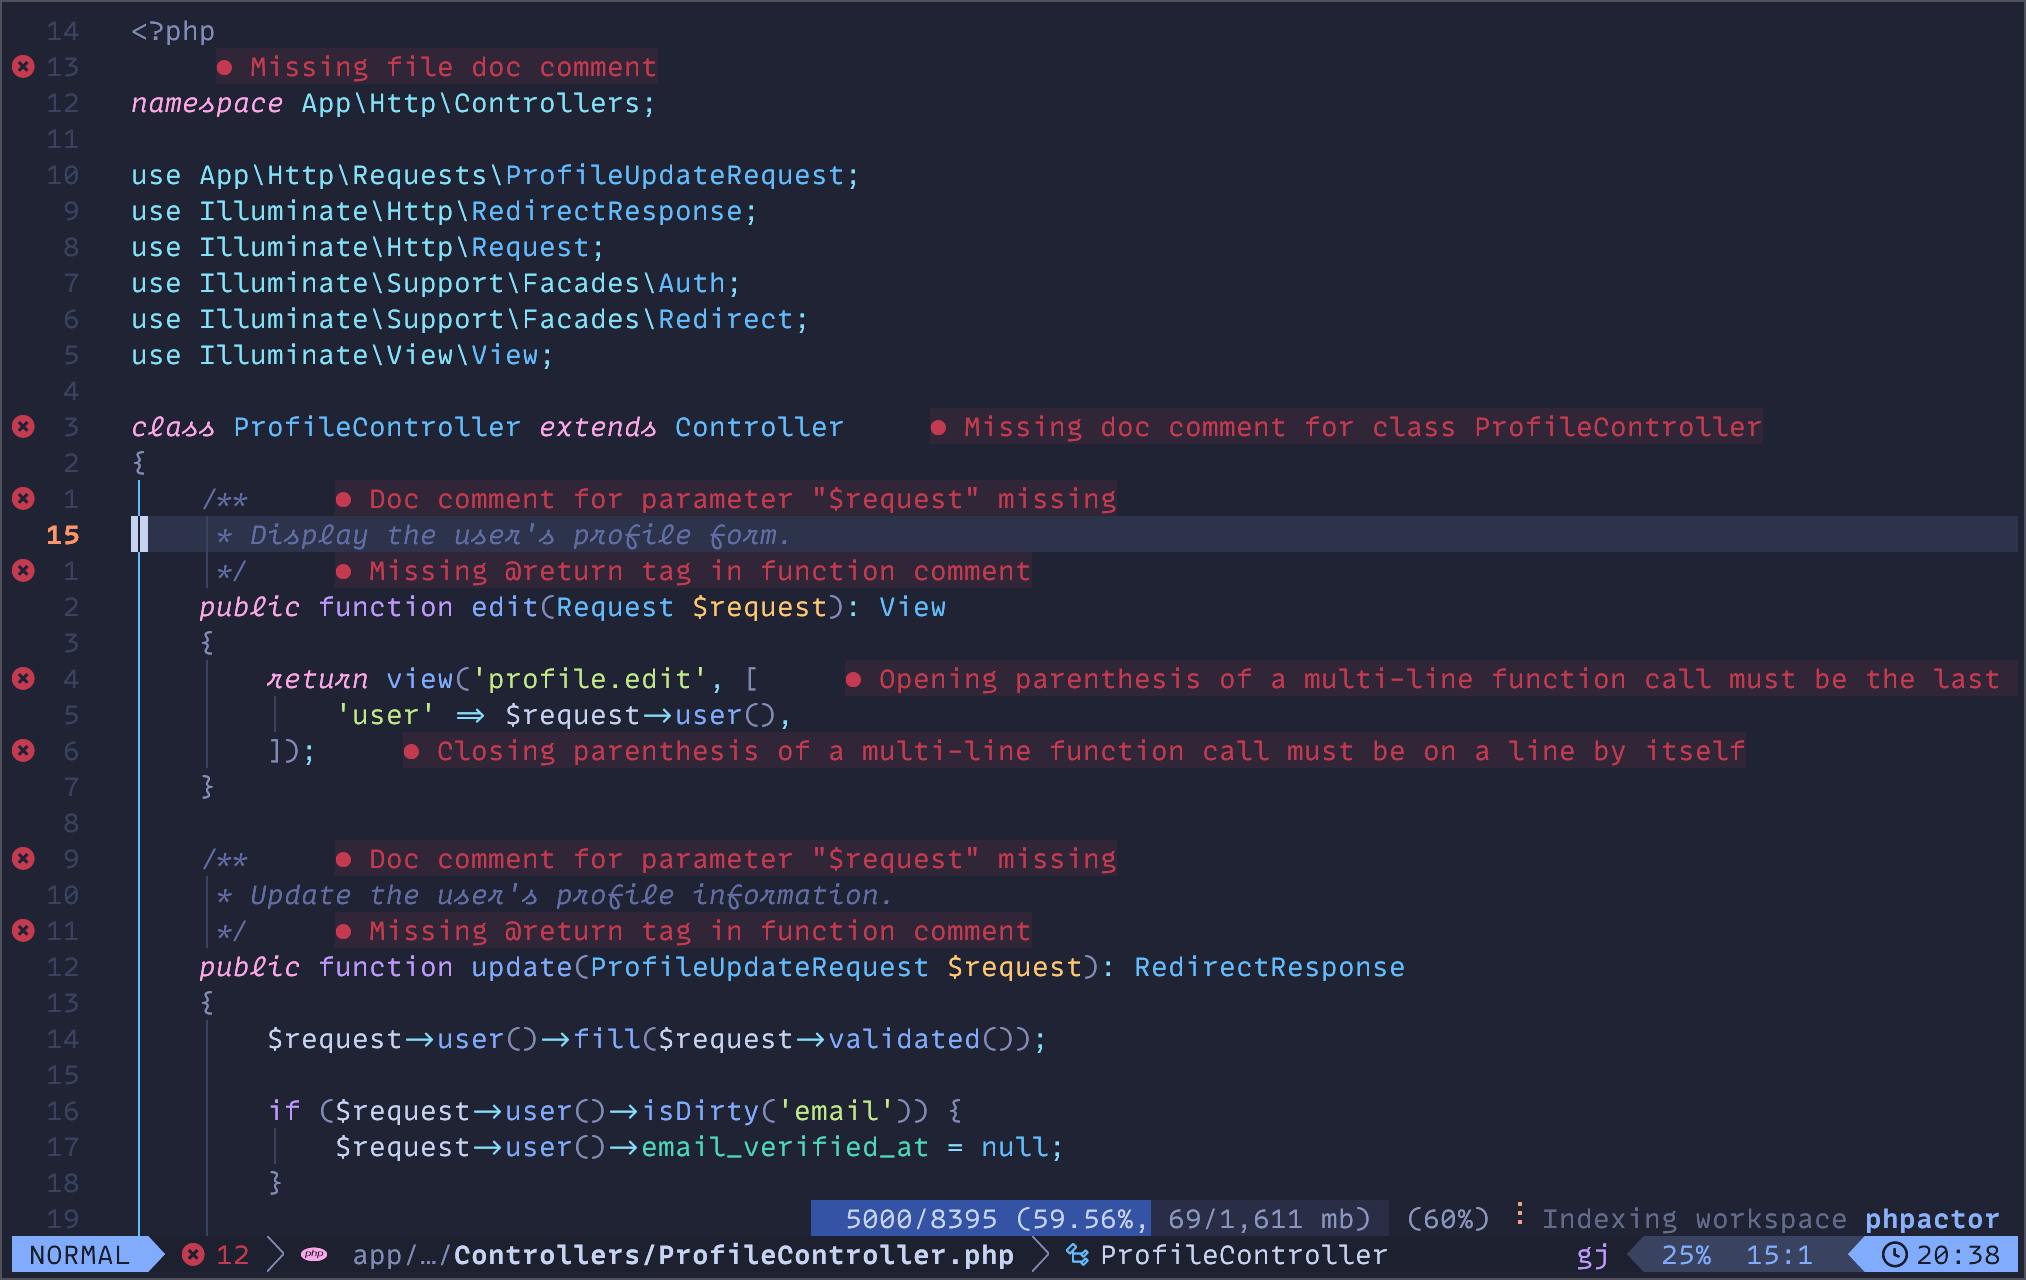
您还将看到许多错误和其他诊断信息。
如果您想修改基本控制器,您可以导航到 Controller 并单击 gd 转到定义。
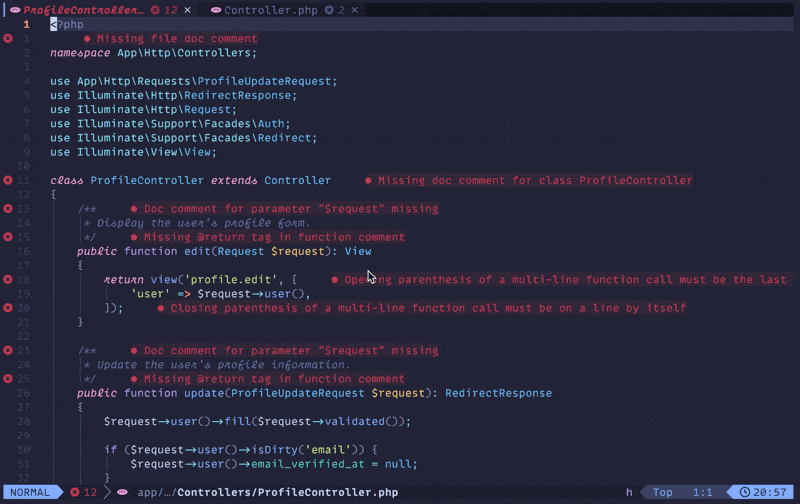
转到定义后,您可以返回到类定义并单击 gr 转到 Controller 类的引用。接下来,您可以使用 ctrl+o 跳回之前的位置。
如果 Phpactor 对您有用,请不要犹豫继续使用它。它在处理 Laravel 中的一些神奇和缺失的类型时很吃力,但它是完全免费和开源的。
就我个人而言,使用 Intelephense LSP 有更好的体验,如果你来自 VSCode,你可能对它很熟悉。遗憾的是,如果没有 Intelephense 的高级版本,你确实会错过 Phpactor 的某些功能,因此我建议你购买 Intelephense。单个许可证适用于 VSCode、Neovim 和其他任何支持 LSP 的编辑器。
要设置 Intelephense,您需要修改 LazyVim 配置。在 ~/.config/nvim 文件夹中,打开 options.lua 并添加以下一行:
vim.g.lazyvim_php_lsp = "intelephense"
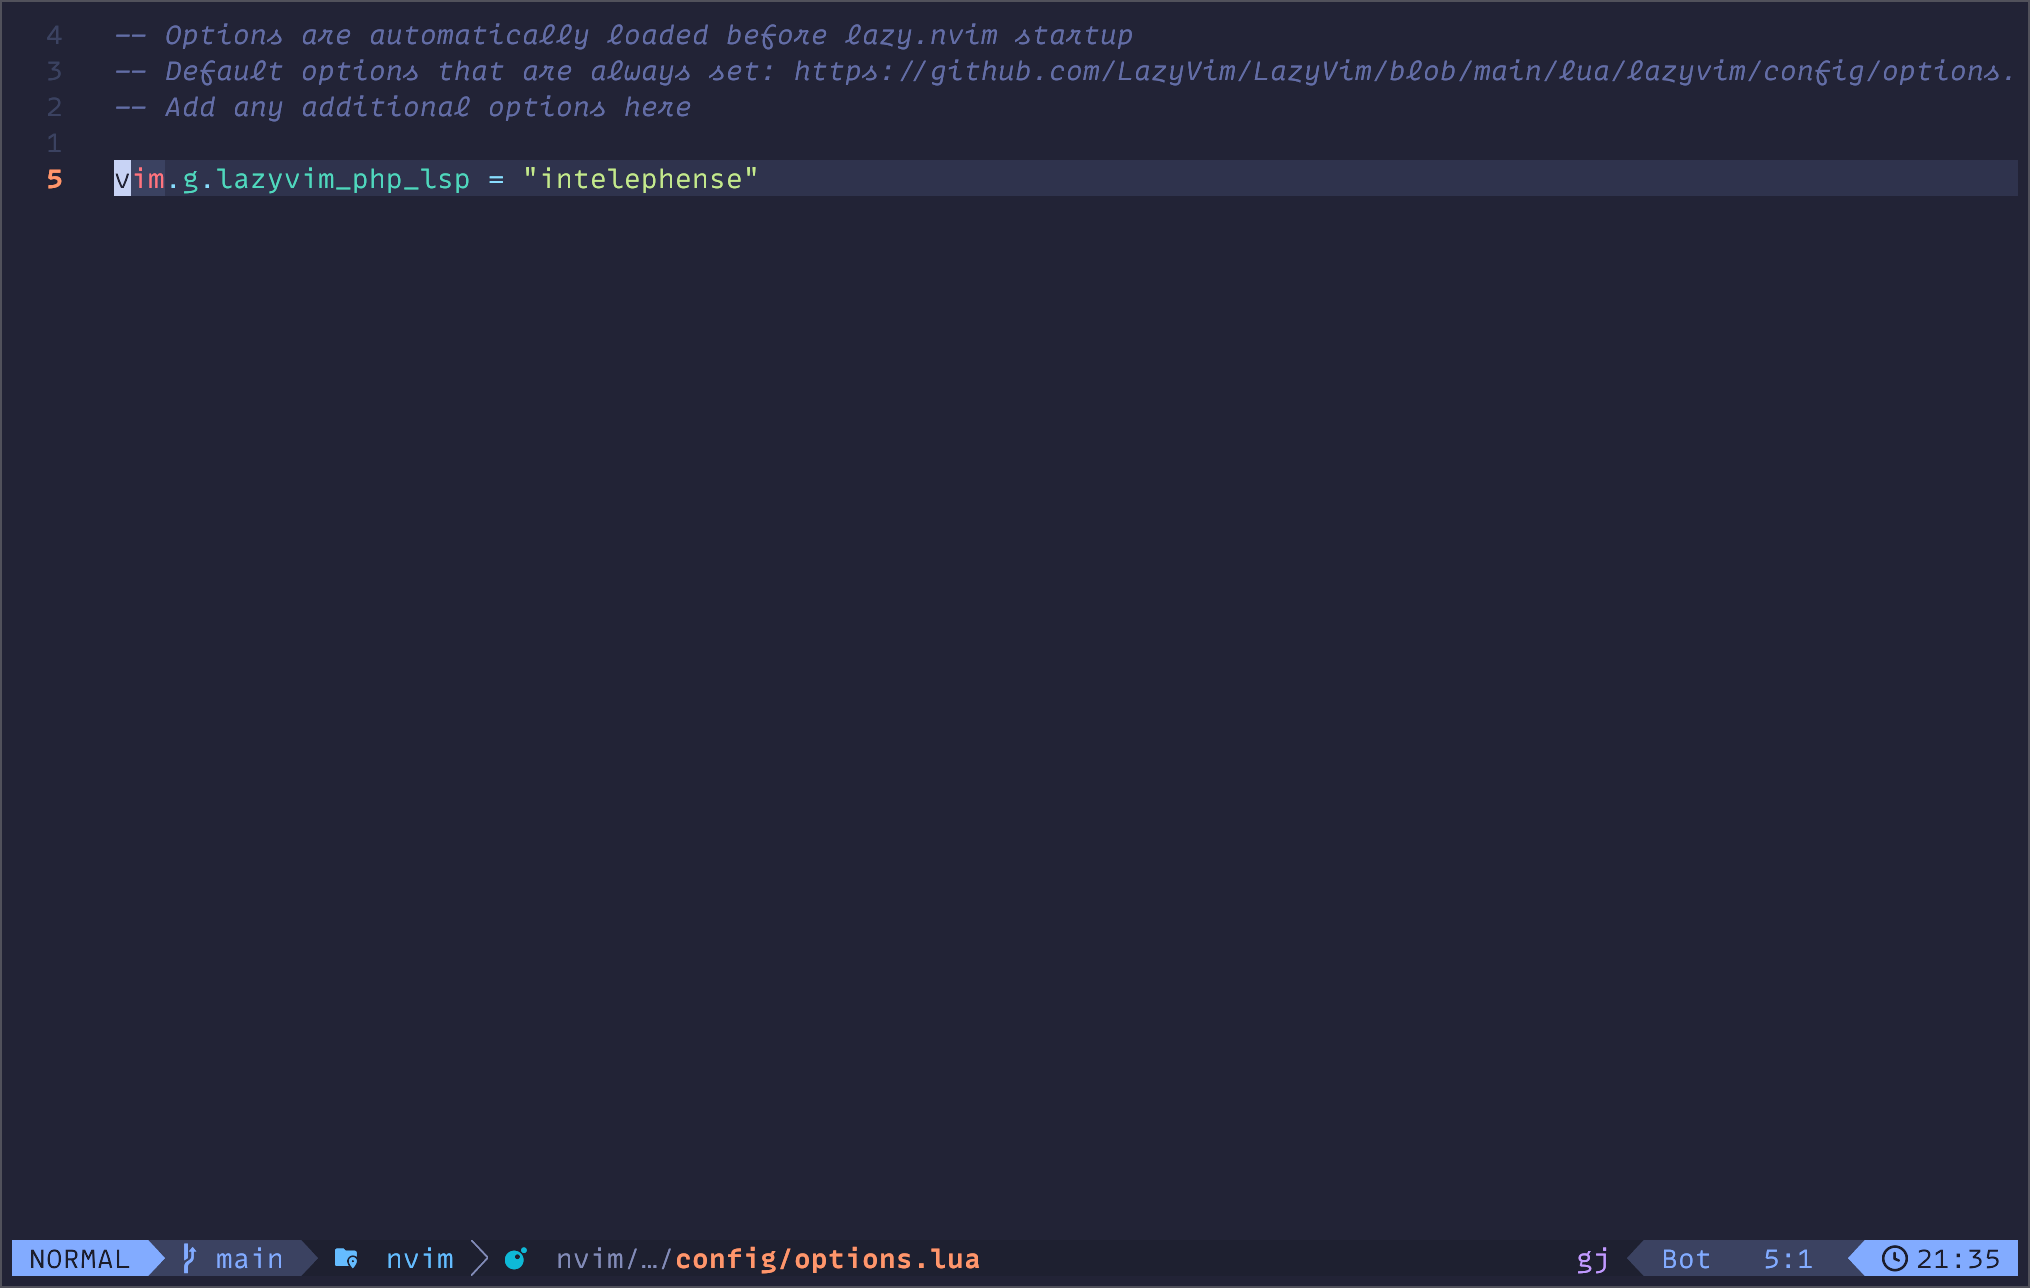
这告诉 LazyVim 设置 Intelephense。不过,你可能需要移除 Phpactor。为此,你可以输入 <leader>cm 来打开 Mason。Mason 是一个用于安装各种格式化工具、代码检查器和 LSP 的工具。在 Mason 菜单中,找到 Phpactor 并使用 X 卸载它。
设置 Laravel Pint 格式化
由于我们安装了 PHP 的 Lazy Extras,Laravel Pint 和 PHP-CS-Fixer 已经被安装。然而,PHP-CS-Fixer 被设置为默认格式化工具。要更改这个设置,我们可以在 Neovim 配置中创建一个新文件: ~/.config/nvim/lua/plugins/php.lua。你可以根据自己的需要命名这个文件,但在这篇文章中,我们将使用它来配置所有与 PHP/Laravel 相关的设置。
在文件中,你可以包含以下内容:
return {
  {
    "stevearc/conform.nvim",
    optional = true,
    opts = {
      formatters_by_ft = {
        php = { { "pint", "php_cs_fixer" } },
      },
    },
  },
}
这将使 Pint 成为默认的格式化工具,如果找不到则回退到 PHP-CS-Fixer。通过这个更改,我可以回到 ProfileController 并添加一个未使用的导入和乱掉缩进,保存时将触发格式化。

你还可以选择移除 phpcs,如果你不使用它的话。在 php.lua 文件中,只需添加另一个块,如下所示:
return {
  {
    -- 将 Laravel Pint 设置为默认的 PHP 格式化工具,PHP CS Fixer 作为备选。
    "stevearc/conform.nvim",
    optional = true,
    opts = {
      formatters_by_ft = {
        php = { { "pint", "php_cs_fixer" } },
      },
    },
  },
  {
    -- 移除 phpcs 代码检查器。
    "mfussenegger/nvim-lint",
    optional = true,
    opts = {
      linters_by_ft = {
        php = {},
      },
    },
  },
}
我从 LazyVim 文档 中获取了这些配置。
测试
接下来,我们将设置 Neatest,以便在 Neovim 中直接运行测试。这是另一个 LazyVim 附加组件,可以通过键入 :LazyExtras 然后搜索 “test.core “并用 X 切换来添加。
然后,我们需要安装 Neotest P plugin。在php.lua配置中添加以下代码块。
return {
  {
    ...
  },
  {
    -- 添加 neotest-pest 插件,用于运行 PHP 测试。
    -- 如果需要,还可以为 PHPUnit 安装一个软件包。
    "nvim-neotest/neotest",
    dependencies = { "V13Axel/neotest-pest" },
    opts = { adapters = { "neotest-pest" } },
  }
}
测试配置就绪后,加载测试文件,您可以使用 <leader>tr 运行单个测试,或使用 <leader>tt 运行整个文件。
使用<leader>to切换测试结果摘要。
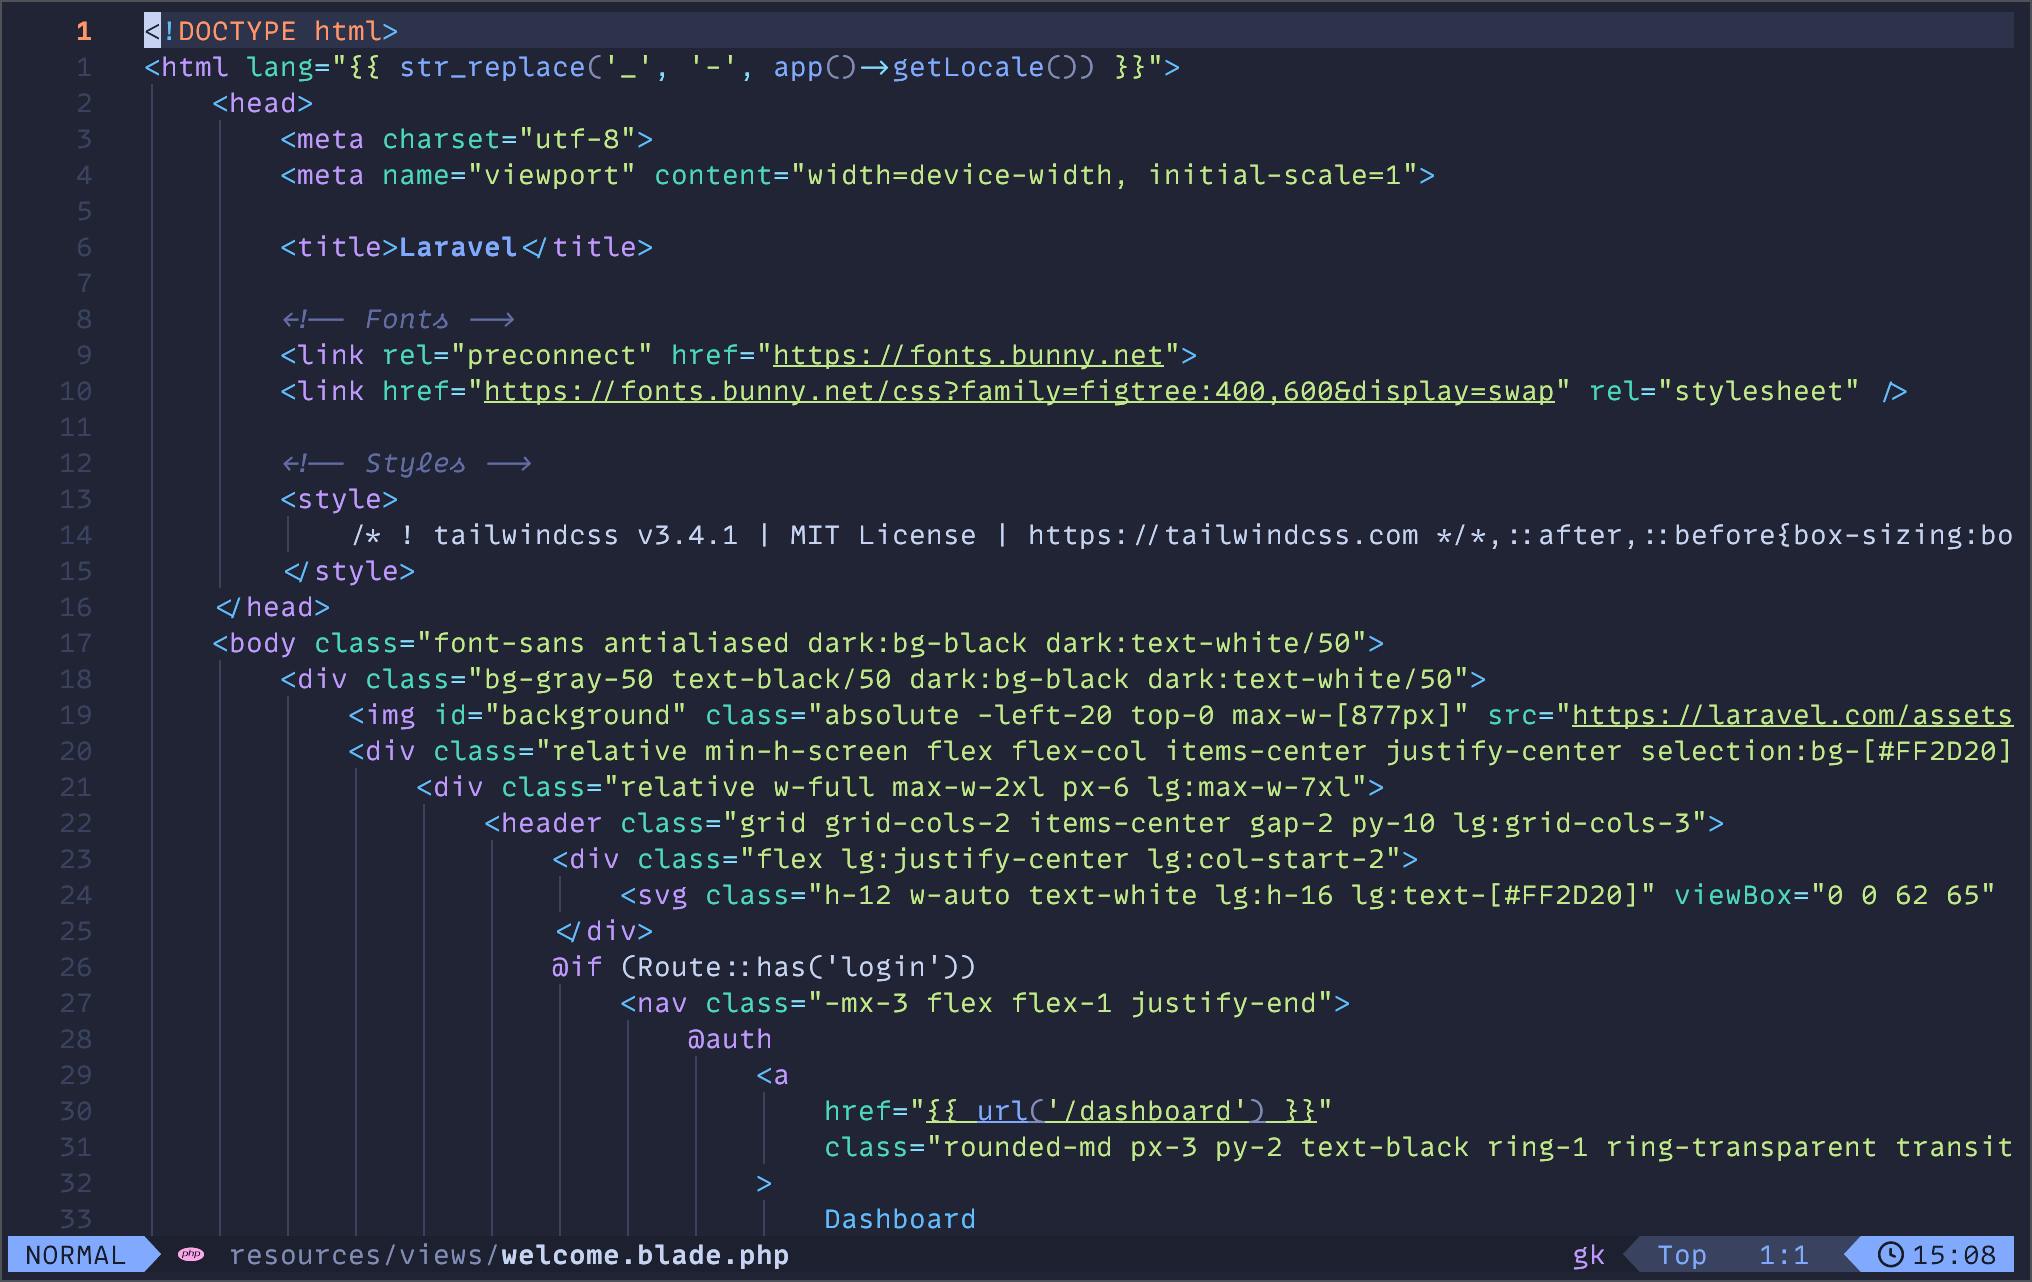
Blade语法
添加对Laravel Blade的支持有点复杂。LazyVim 的 Treesitter 设置支持大多数语言的语法高亮。
return {
  {
    ...
  },
  {
    --为 Laravel Blade 添加 Treesitter 解析器,以提供 Blade 语法高亮。
    "nvim-treesitter/nvim-treesitter",
    opts = function(_, opts)
      vim.list_extend(opts.ensure_installed, {
        "blade",
        "php_only",
      })
    end,
    config = function(_, opts)
      vim.filetype.add({
        pattern = {
          [".*%.blade%.php"] = "blade",
        },
      })

      require("nvim-treesitter.configs").setup(opts)
      local parser_config = require("nvim-treesitter.parsers").get_parser_configs()
      parser_config.blade = {
        install_info = {
          url = "https://github.com/EmranMR/tree-sitter-blade",
          files = { "src/parser.c" },
          branch = "main",
        },
        filetype = "blade",
      }
    end,
  },
}
我们扩展了默认 Treesitter 配置,以设置新的文件类型并下拉 Blade 解析器。
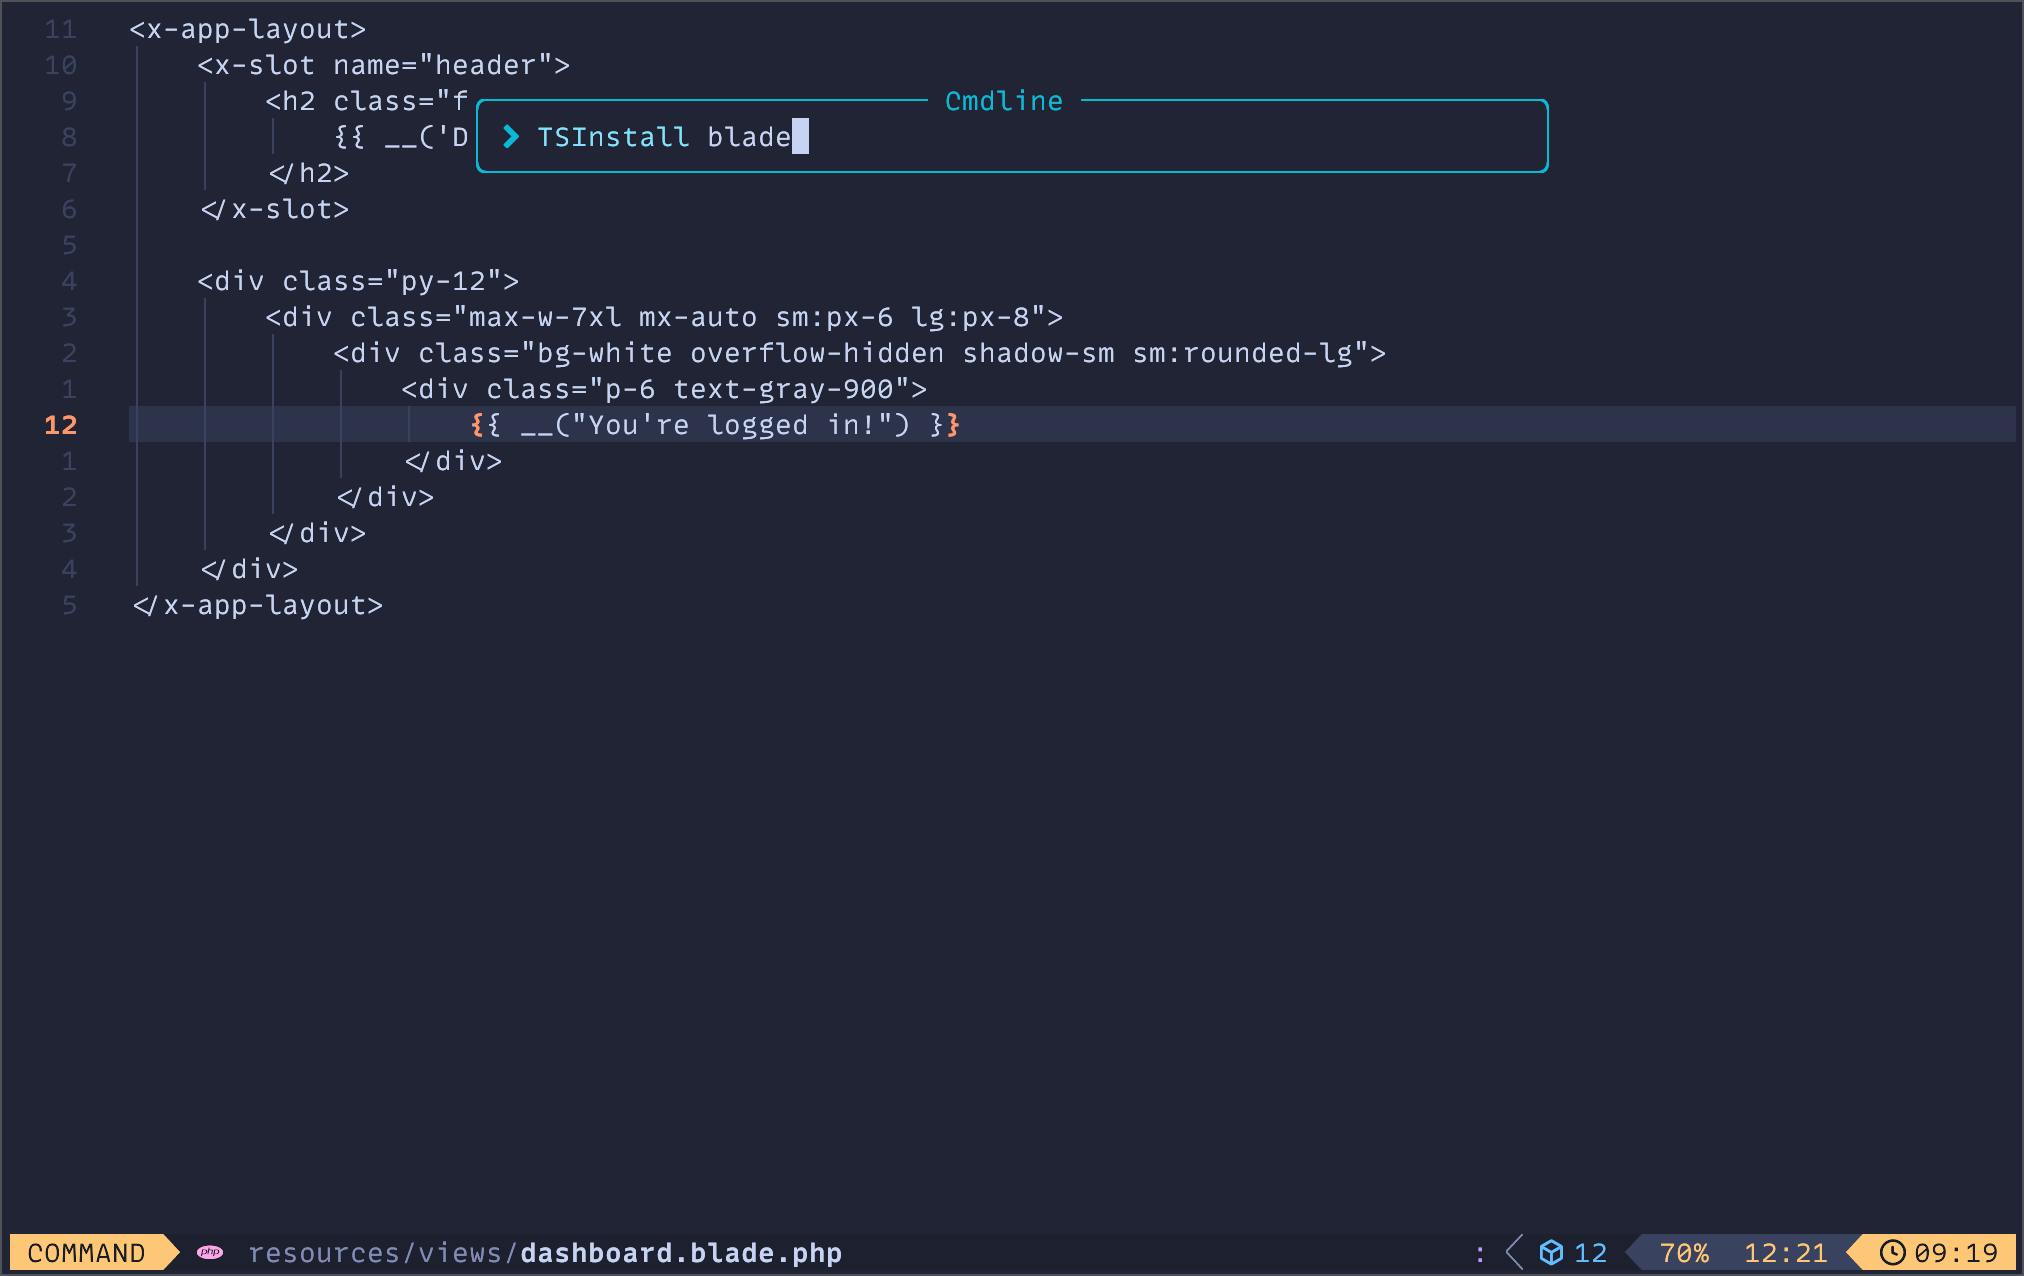
一旦我们重启 Neovim,你就可以运行 :TSInstall blade 来下载分析器。
接下来,我们需要添加一些 Treesitter 查询来获得更好的代码支持。
刀片注入
键入 :TSEditQuery injections blade 并添加以下内容:
((text) @injection.content
    (#not-has-ancestor? @injection.content "envoy")
    (#set! injection.combined)
    (#set! injection.language php))

; tree-sitter-comment injection
; if available
((comment) @injection.content
 (#set! injection.language "comment"))

; could be bash or zsh
; or whatever tree-sitter grammar you have.
((text) @injection.content
    (#has-ancestor? @injection.content "envoy")
    (#set! injection.combined)
    (#set! injection.language bash))

((php_only) @injection.content
    (#set! injection.language php_only))

((parameter) @injection.content
    (#set! injection.include-children) ; You may need this, depending on your editor e.g Helix
    (#set! injection.language "php-only"))
刀片亮点
输入 :TSEditQuery highlights blade 并添加:
(directive) @tag
(directive_start) @tag
(directive_end) @tag
(comment) @comment
Blade Folds
输入 :TSEditQuery folds blade 并添加:
((directive_start) @start
    (directive_end) @end.after
    (#set! role block))


((bracket_start) @start
    (bracket_end) @end
    (#set! role block))
HTML Injections
最后,我们将为 Alpine 支持添加一些注入查询。输入 :TSEditQuery 并添加:
;; extends

; AlpineJS attributes
(attribute
  (attribute_name) @_attr
    (#lua-match? @_attr "^x%-%l")
  (quoted_attribute_value
    (attribute_value) @injection.content)
  (#set! injection.language "javascript"))

; Blade escaped JS attributes
; <x-foo ::bar="baz" />
(element
  (_
    (tag_name) @_tag
      (#lua-match? @_tag "^x%-%l")
  (attribute
    (attribute_name) @_attr
      (#lua-match? @_attr "^::%l")
    (quoted_attribute_value
      (attribute_value) @injection.content)
    (#set! injection.language "javascript"))))

; Blade PHP attributes
; <x-foo :bar="$baz" />
(element
  (_
    (tag_name) @_tag
      (#lua-match? @_tag "^x%-%l")
    (attribute
      (attribute_name) @_attr
        (#lua-match? @_attr "^:%l")
      (quoted_attribute_value
        (attribute_value) @injection.content)
      (#set! injection.language "php_only"))))
现在,添加完所有内容后,保存并重新启动,你应该现在已经为 Blade 文件启用了语法高亮!
有关更多信息和安装说明,请访问 Blade Treesitter 解析器的仓库。
代码片段
LazyVim 提供了一个插件,可以轻松创建代码片段。要创建 PHP 代码片段,可以创建一个新文件:~/.config/nvim/snippets/php.json,类似于下面的示例:
{
  "strict types": {
    "prefix": "strict",
    "description": "Add strict types declaration",
    "body": [
      "declare(strict_types=1);"
    ]
  },
  "inv": {
    "prefix": "inv",
    "description": "Create PHP __invoke method",
    "body": [
      "public function __invoke(${1}): ${2:void}",
      "{",
      "    ${3}",
      "}",
      ""
    ]
  },
  "public method": {
    "prefix": "pubf",
    "description": "Create a public method",
    "body": [
      "public function ${1}(${2}): ${3:void}",
      "{",
      "    ${0}",
      "}",
      ""
    ]
  },
  "protected method": {
    "prefix": "prof",
    "description": "Create a protected method",
    "body": [
      "protected function ${1}(${2}): ${3:void}",
      "{",
      "    ${0}",
      "}",
      ""
    ]
  },
  "private method": {
    "prefix": "prif",
    "description": "Create a private method",
    "body": [
      "private function ${1}(${2}): ${3:void}",
      "{",
      "    ${0}",
      "}",
      ""
    ]
  },
  "public static method": {
    "prefix": "pubsf",
    "description": "Create a public static method",
    "body": [
      "public static function ${1}(${2}): ${3:void}",
      "{",
      "    ${0}",
      "}",
      ""
    ]
  },
  "pest test (it) method": {
    "prefix": "it",
    "description": "Create a pest test",
    "body": [
      "it('${1}', function () {",
      "    // Arrange",
      "    ${0}",
      "",
      "    // Act",
      "",
      "    // Assert",
      "",
      "});"
    ]
  }
}
你可以将任何其他你可能需要的代码片段添加到此文件中,或者为其他语言创建文件以添加代码片段。
附加插件
Laravel.nvim
此插件可用于快速运行 Artisan 命令,并且使用 <leader>la 提供了很好的搜索功能。或者,你可以使用 <leader>lr 列出应用程序中的所有路由。
return {
  {
    ...
  },
  {
    -- 添加 Laravel.nvim 插件,使其能够从 Neovim 中运行 Artisan 命令
    -- 。
    "adalessa/laravel.nvim",
    dependencies = {
      "nvim-telescope/telescope.nvim",
      "tpope/vim-dotenv",
      "MunifTanjim/nui.nvim",
      "nvimtools/none-ls.nvim",
    },
    cmd = { "Sail", "Artisan", "Composer", "Npm", "Yarn", "Laravel" },
    keys = {
      { "la", ":Laravel artisan" },
      { "lr", ":Laravel routes" },
      { "lm", ":Laravel related" },
    },
    event = { "VeryLazy" },
    config = true,
    opts = {
      lsp_server = "intelephense",
      features = { null_ls = { enable = false } },
    },
  },
}
Blade-Nav.nvim
return {
  {
    ...
  },
  {
    --添加 blade-nav.nvim 插件,为 Blade 文件提供 Goto File 功能
    --
    "ricardoramirezr/blade-nav.nvim",
    dependencies = {
      "hrsh7th/nvim-cmp",
    },
    ft = { "blade", "php" },
  },
}
附加提示
LazyVim 的一大优点是文档。如果您习惯于在 VSCode 中进行某些操作,而您希望在 Neovim 中实现这些操作,那么 LazyVim 有可能已经内置了这些操作。
最重要的部分之一可能就是键图。LazyVim 使用 which-key.nvim 来帮助您在编辑器中记住已配置的键帽,但要获得完整列表,请点击 此处。
您想要 Git 支持吗?LazyVim 提供了 LazyGit,这是一个非常不错的 Git 终端用户界面。使用 <leader>gg 打开它。你甚至可以使用类似 Homebrew 的工具直接安装LazyGit,然后使用 lazygit 在命令行上直接运行。
需要额外的工具,比如 PHPStan 或 Psalm?使用 <leader>cm 或 :Mason 调出 Mason 菜单并搜索您需要的工具。它有许多常用的衬垫和格式器可供安装。
其他资源
LazyVim文档
就像我上面提到的,LazyVim提供了非常棒的文档,绝对值得一读。
Neovim作为PHP和JavaScript IDE
Jess Archer在Laracasts上有一个非常棒的课程来设置Neovim。如果您还没有订阅 Laracasts,我再推荐不过了。自 2017 年以来,我一直是它的终身用户。如果您对此感兴趣,请使用我的推荐链接。
Omakub
DHH(Ruby on Rails 的创建者)创建了 Omakub 软件包,作为在 Ubuntu Linux 上快速设置开发环境的方法。
Kickstart.nvim
如果您需要比 LazyVim 更简约的工具,那么 Kickstart.nvim 是一个不错的开始。您可以观看 TJ DeVries 制作的视频,了解如何开始使用。即使你想继续使用 LazyVim,这仍然是了解更多有关配置 Neovim 的重要资源。
摘要
希望这能帮助你开始你的 Neovim 之旅。它是一个功能强大的编辑器,具有无限的可配置性。虽然不如 PhpStorm 这样强大,但它可以让你免费获得相当接近的体验,并且需要更少的 CPU 资源。
即使你不打算将 Neovim 作为主要编辑器,我认为学习其键绑定仍然是有益的。我通常在 Neovim 和 PhpStorm 之间分配时间,并尽量保持键绑定尽可能相似。幸运的是,JetBrains IDE 的 IdeaVim 插件使这变得很简单。
供你参考,我创建了一个 repo,里面包含了我们在这篇文章中创建的所有文件。
如果你对设置有任何其他问题,或者我遗漏了什么附加功能,请告诉我。
感谢阅读!