


保护您的应用程序并不仅仅是在表面层次上授予或拒绝访问权限。作为一名开发者,您需要实现细粒度授权(FGA)以在更详细、更细粒度的层面上管理权限。
FGA允许您设置详细的访问控制,以指定在什么条件下谁可以执行什么操作。
在本教程中,您将学习如何在Java和Spring Boot中使用Permit.io实现细粒度授权。
以下是源代码(别忘了给它点个赞⭐)。
我希望您喜欢我之前的博客,其中讲述了使用Stream和Next.js构建自定义视频会议应用程序。这些博客反映了我在创建DevTools Academy的过程,这是一个旨在帮助开发者发现精彩开发者工具的平台。
本教程是向您介绍我最近探索的另一个非常实用的开发者工具的努力。
目录:
-
如何实现细粒度授权
-
如何在Java和SpringBoot中实现FGA
什么是许可?
Permit.io是一个完整的堆栈、即插即用的应用程序级授权解决方案,它允许您在几分钟内实现一个
安全、灵活、授权层,这样您就可以专注于最重要的事情。

先决条件
为了完全理解教程,你需要对Java和Spring Boot有一个基本的了解。你还需要以下内容:
-
Spring Boot Starter Web:提供构建web应用程序所需的基本组件,包括RESTful API。
-
Gradle:一个用于管理依赖关系的构建工具。
-
JDK 11或更高版本:编译和运行您的Spring Boot应用程序所需的Java开发工具包版本。
-
Postman或cURL:测试您的
API端点的工具。
什么是细粒度授权?
细粒度授权 通过确定谁能访问资源、访问的程度以及特定的条件来提供访问控制。
与粗粒度授权(基于类别如用户角色,例如”管理员“或”用户“)相反,细粒度授权为您提供了定义特定资源或操作及属性的访问权限的灵活性。
在细粒度授权中,有三种策略模型用于管理授权;基于角色的访问控制(RBAC),基于属性的访问控制(ABAC),以及基于关系的访问控制(ReBAC)。
让我们来看看这些方法,以及如何在您的应用程序中实现它们。
基于角色的访问控制(RBAC)
RBAC是一种基于用户在组织内角色来控制资源访问的安全方法。该模型通过将用户组织到角色中,并按照这些定义的角色管理访问控制,简化了权限管理。
RBAC中的关键概念:
用户:使用系统的员工或客户等人员。
角色:基于用户的责任或任务,将一组权限或访问权限分配给用户组,例如管理员、经理或客户。
权限:用户与资源交互的权利,例如读、写或删除。
基于属性的访问控制(ABAC)
ABAC 是一种通用且适应性强的访问控制模型,基于属性(如用户详细信息)决定谁可以或不能访问资源。ABAC 模型允许您根据用户属性定义细粒度的授权。
ABAC 中的关键概念:
属性: 用于做出访问控制决策的特征或属性。属性通常分为:
-
用户属性: 用户信息(例如角色、部门、职位、年龄等)。
-
资源属性: 资源的特征(例如文件类型、数据分类级别、创建日期、所有者)。
-
操作属性: 用户试图执行的操作(例如读取、写入、删除、批准)。
-
环境属性: 访问请求的上下文信息(例如时间、位置、设备类型、IP 地址)。
基于关系的访问控制(ReBAC):
ReBAC是一种基于系统内实体之间关系的访问控制系统。该方法强调通过绘制用户与资源及其他实体(如组织或群组)之间的关系来定义和管理访问控制。
ReBAC的关键概念:
实体:用户、资源(如文件和文档)以及其他实体,如群组或组织单位。
关系:指定两个实体之间关系的连接。例如,用户可能是文档的“所有者”或团队的“成员”。
策略:使用关系来确定访问权限的规则。如果用户与资源有特定的关系,则可以访问该资源或对其执行操作。
如何实现细粒度授权:
既然您已经对RBAC、ABAC和ReBAC有了基本了解,让我们来看看如何在电子商务应用程序中实现这些模型。
实现基于角色的访问控制:
步骤1:访问Permit.io,然后创建一个账户和您的 workspace。

默认情况下,您应该看到一个包含两个环境的项目:开发和生产。
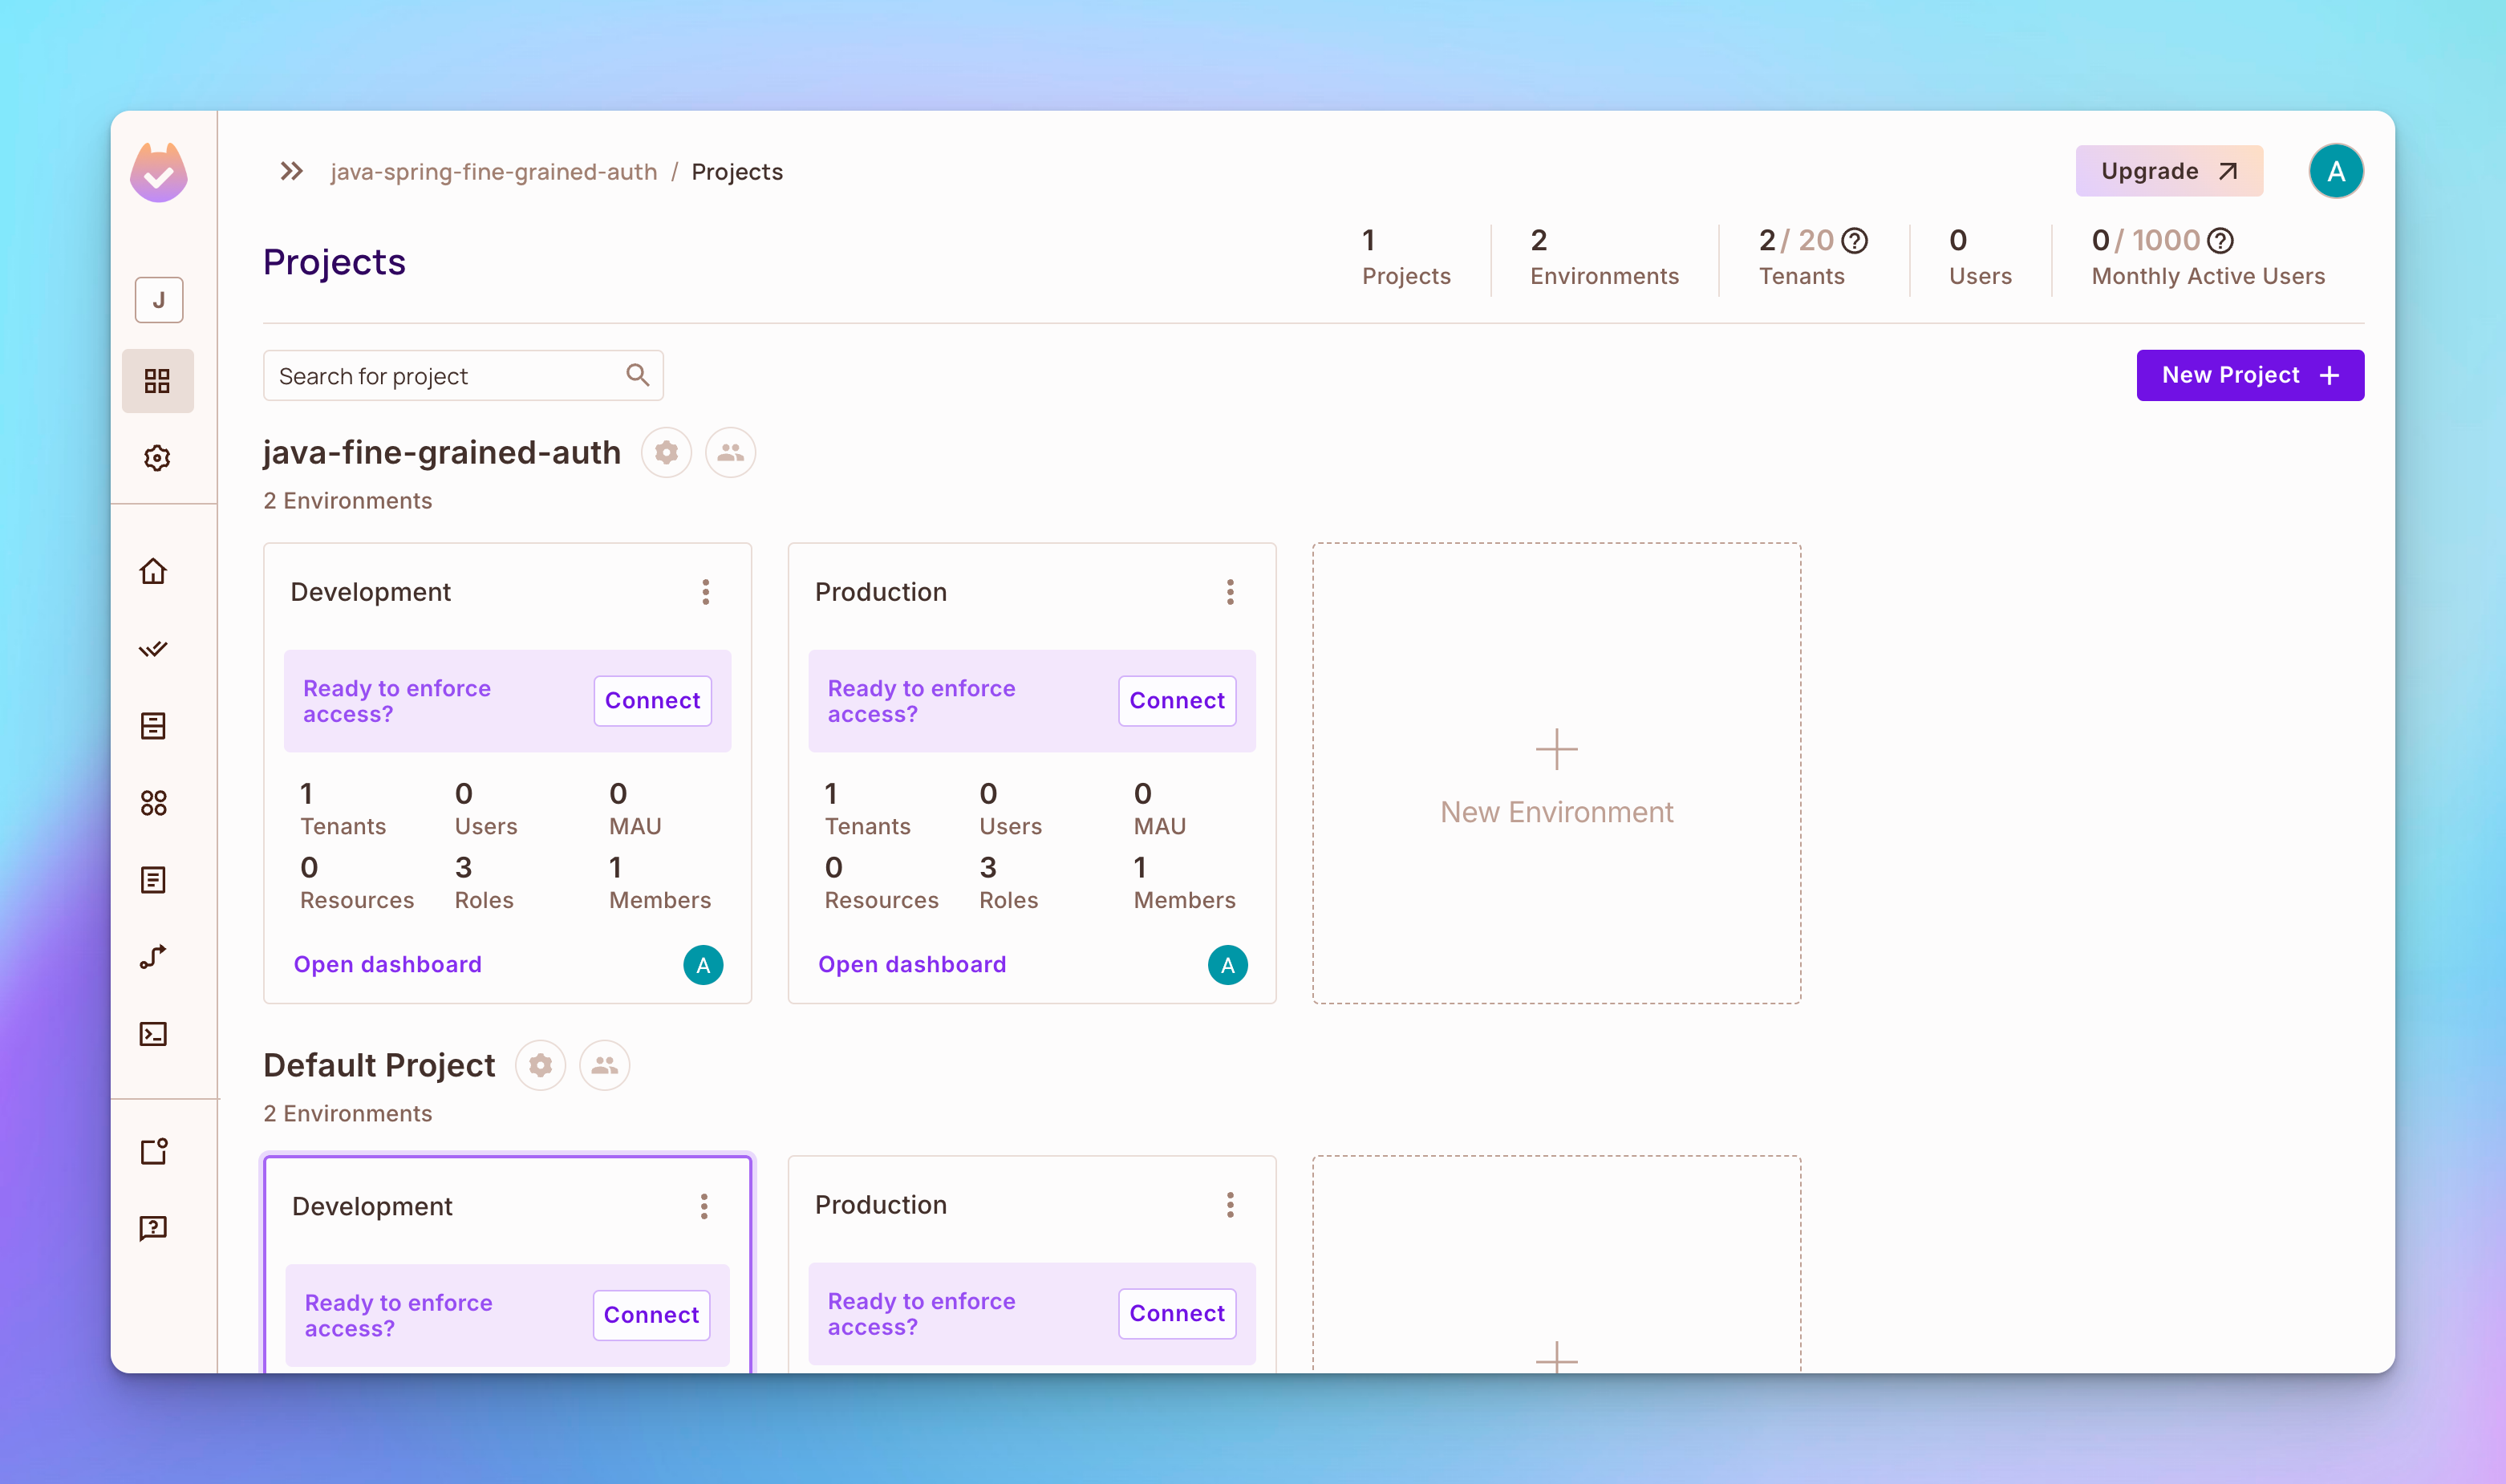
步骤 2: 创建一个名为 产品 的资源。要创建资源,请打开左侧边栏的 策略 标签,然后打开顶部的 资源 标签。之后,点击 创建资源 按钮,然后创建一个名为 产品 的资源,具有 read、create、update 和 delete 操作。
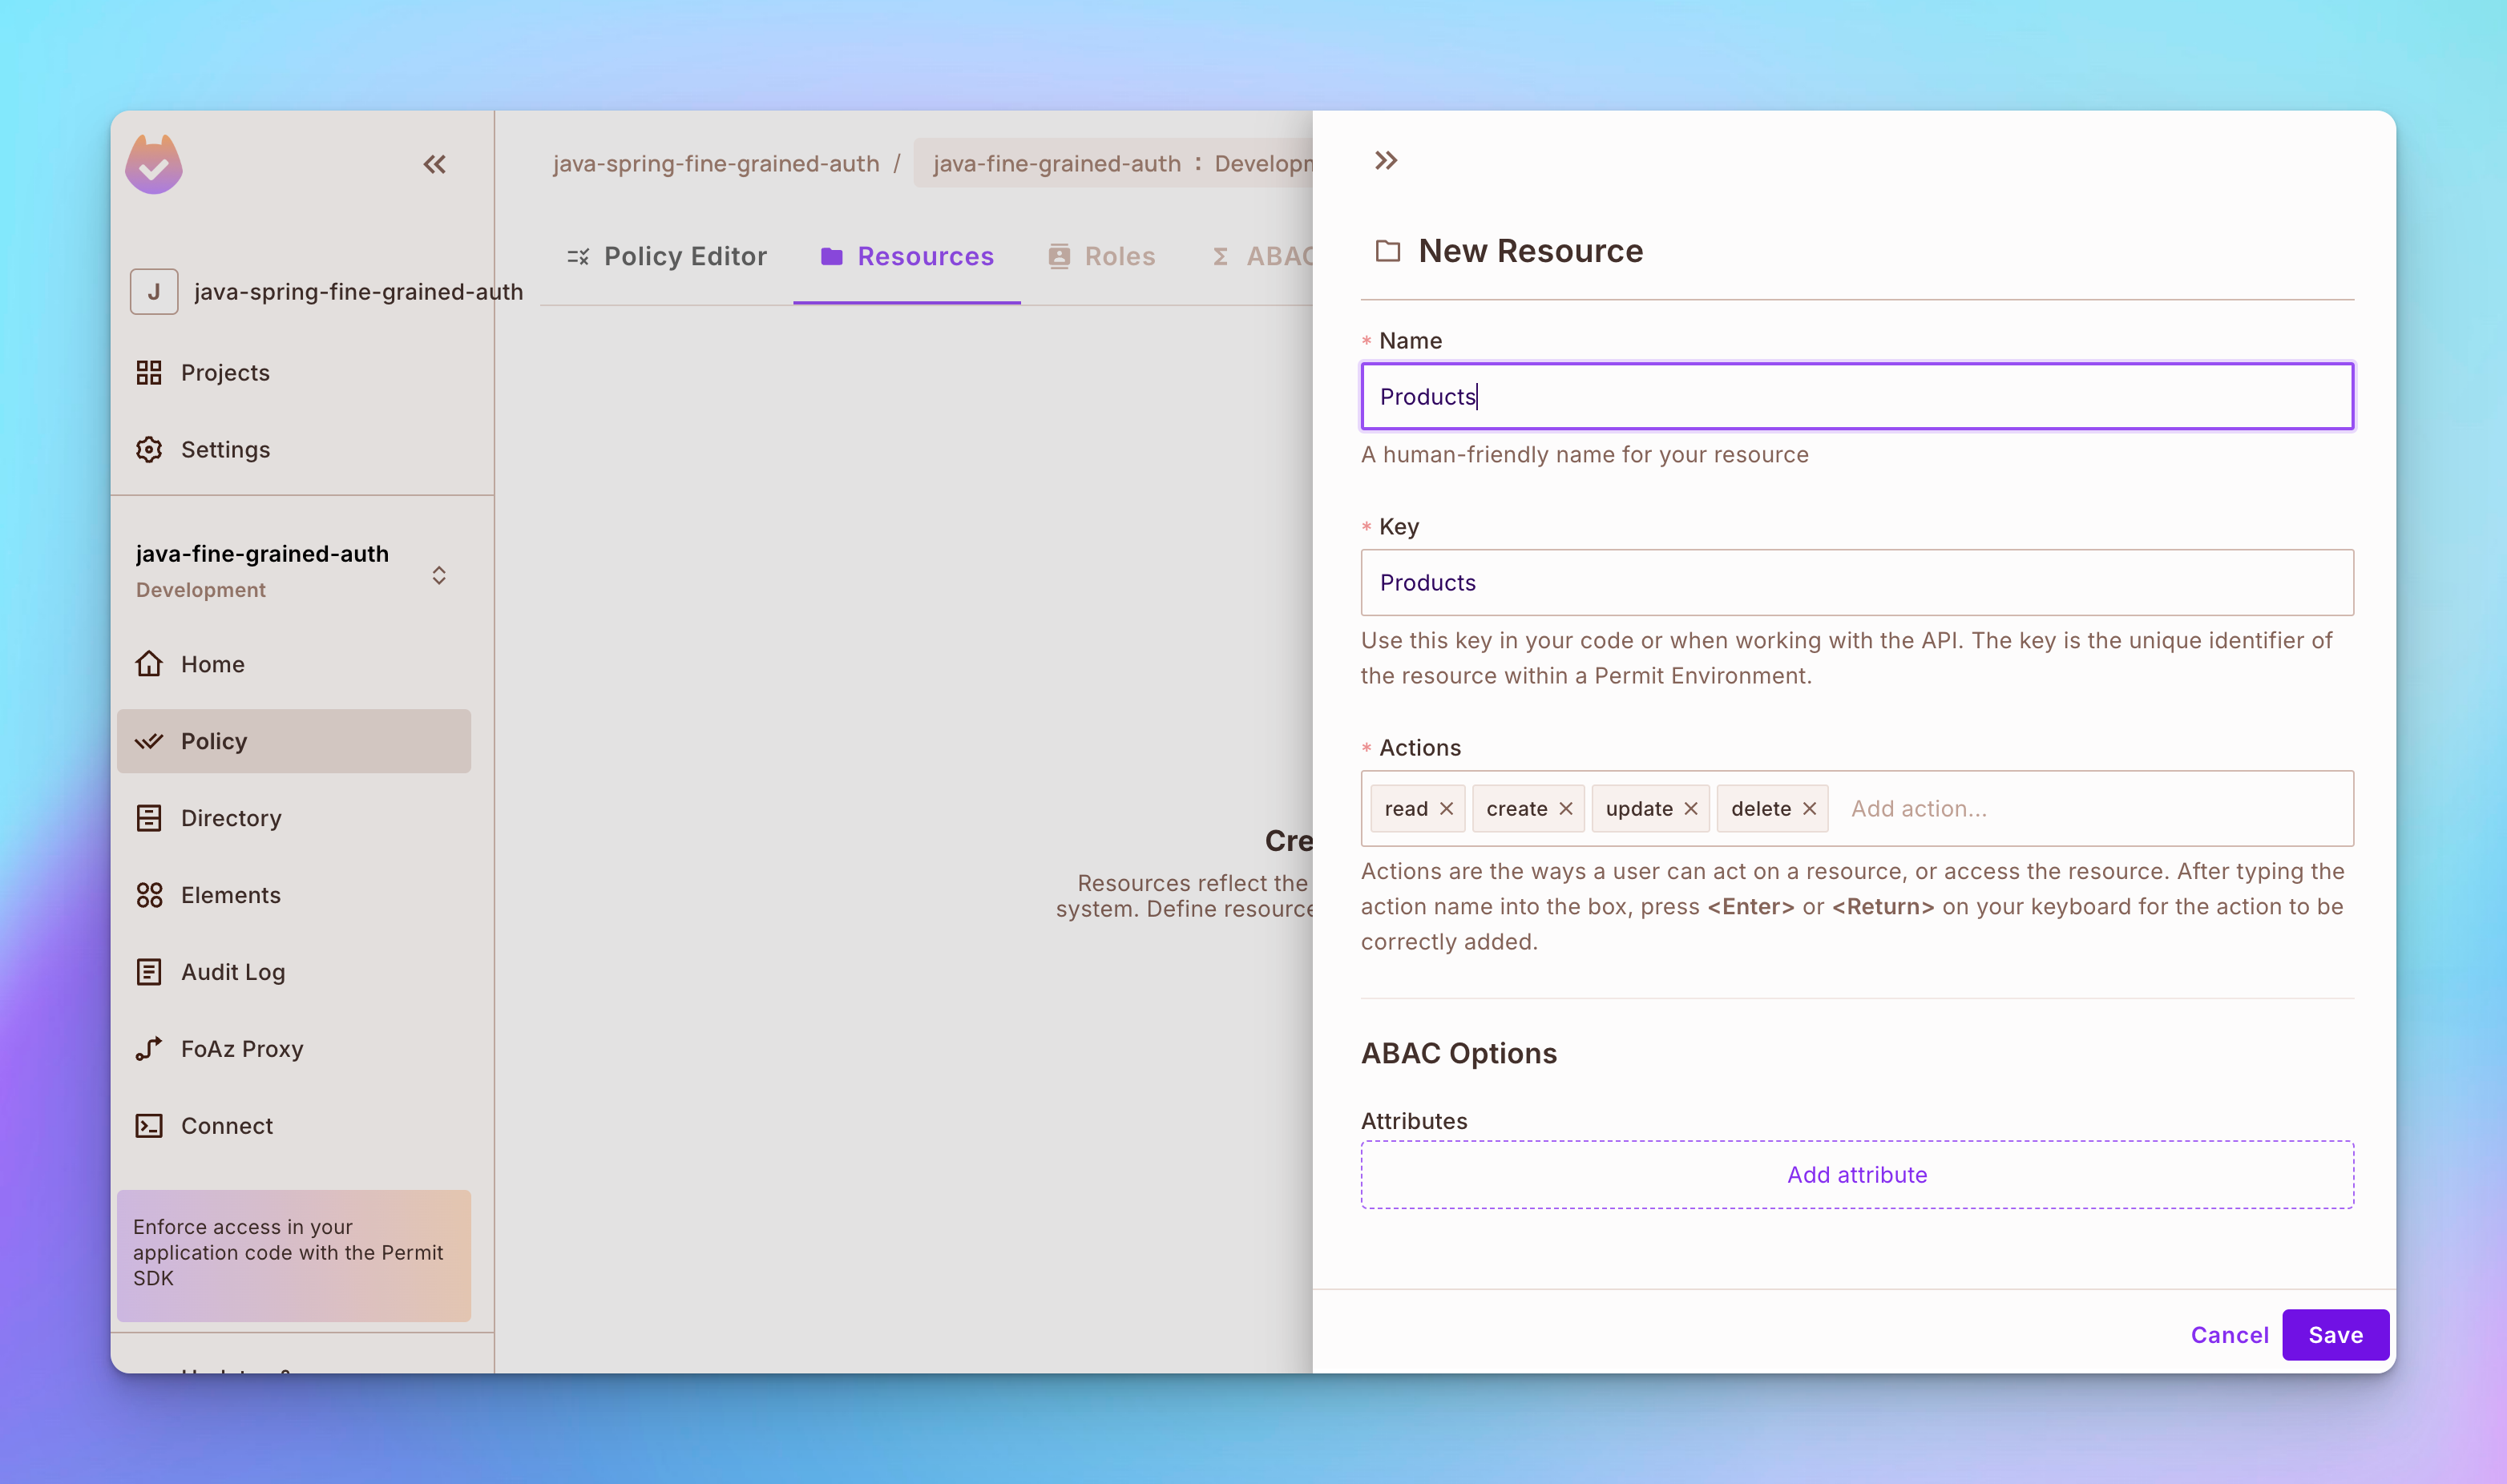
步骤 3: 创建另一个名为 评论 的资源,具有 read、create、update 和 delete 操作。
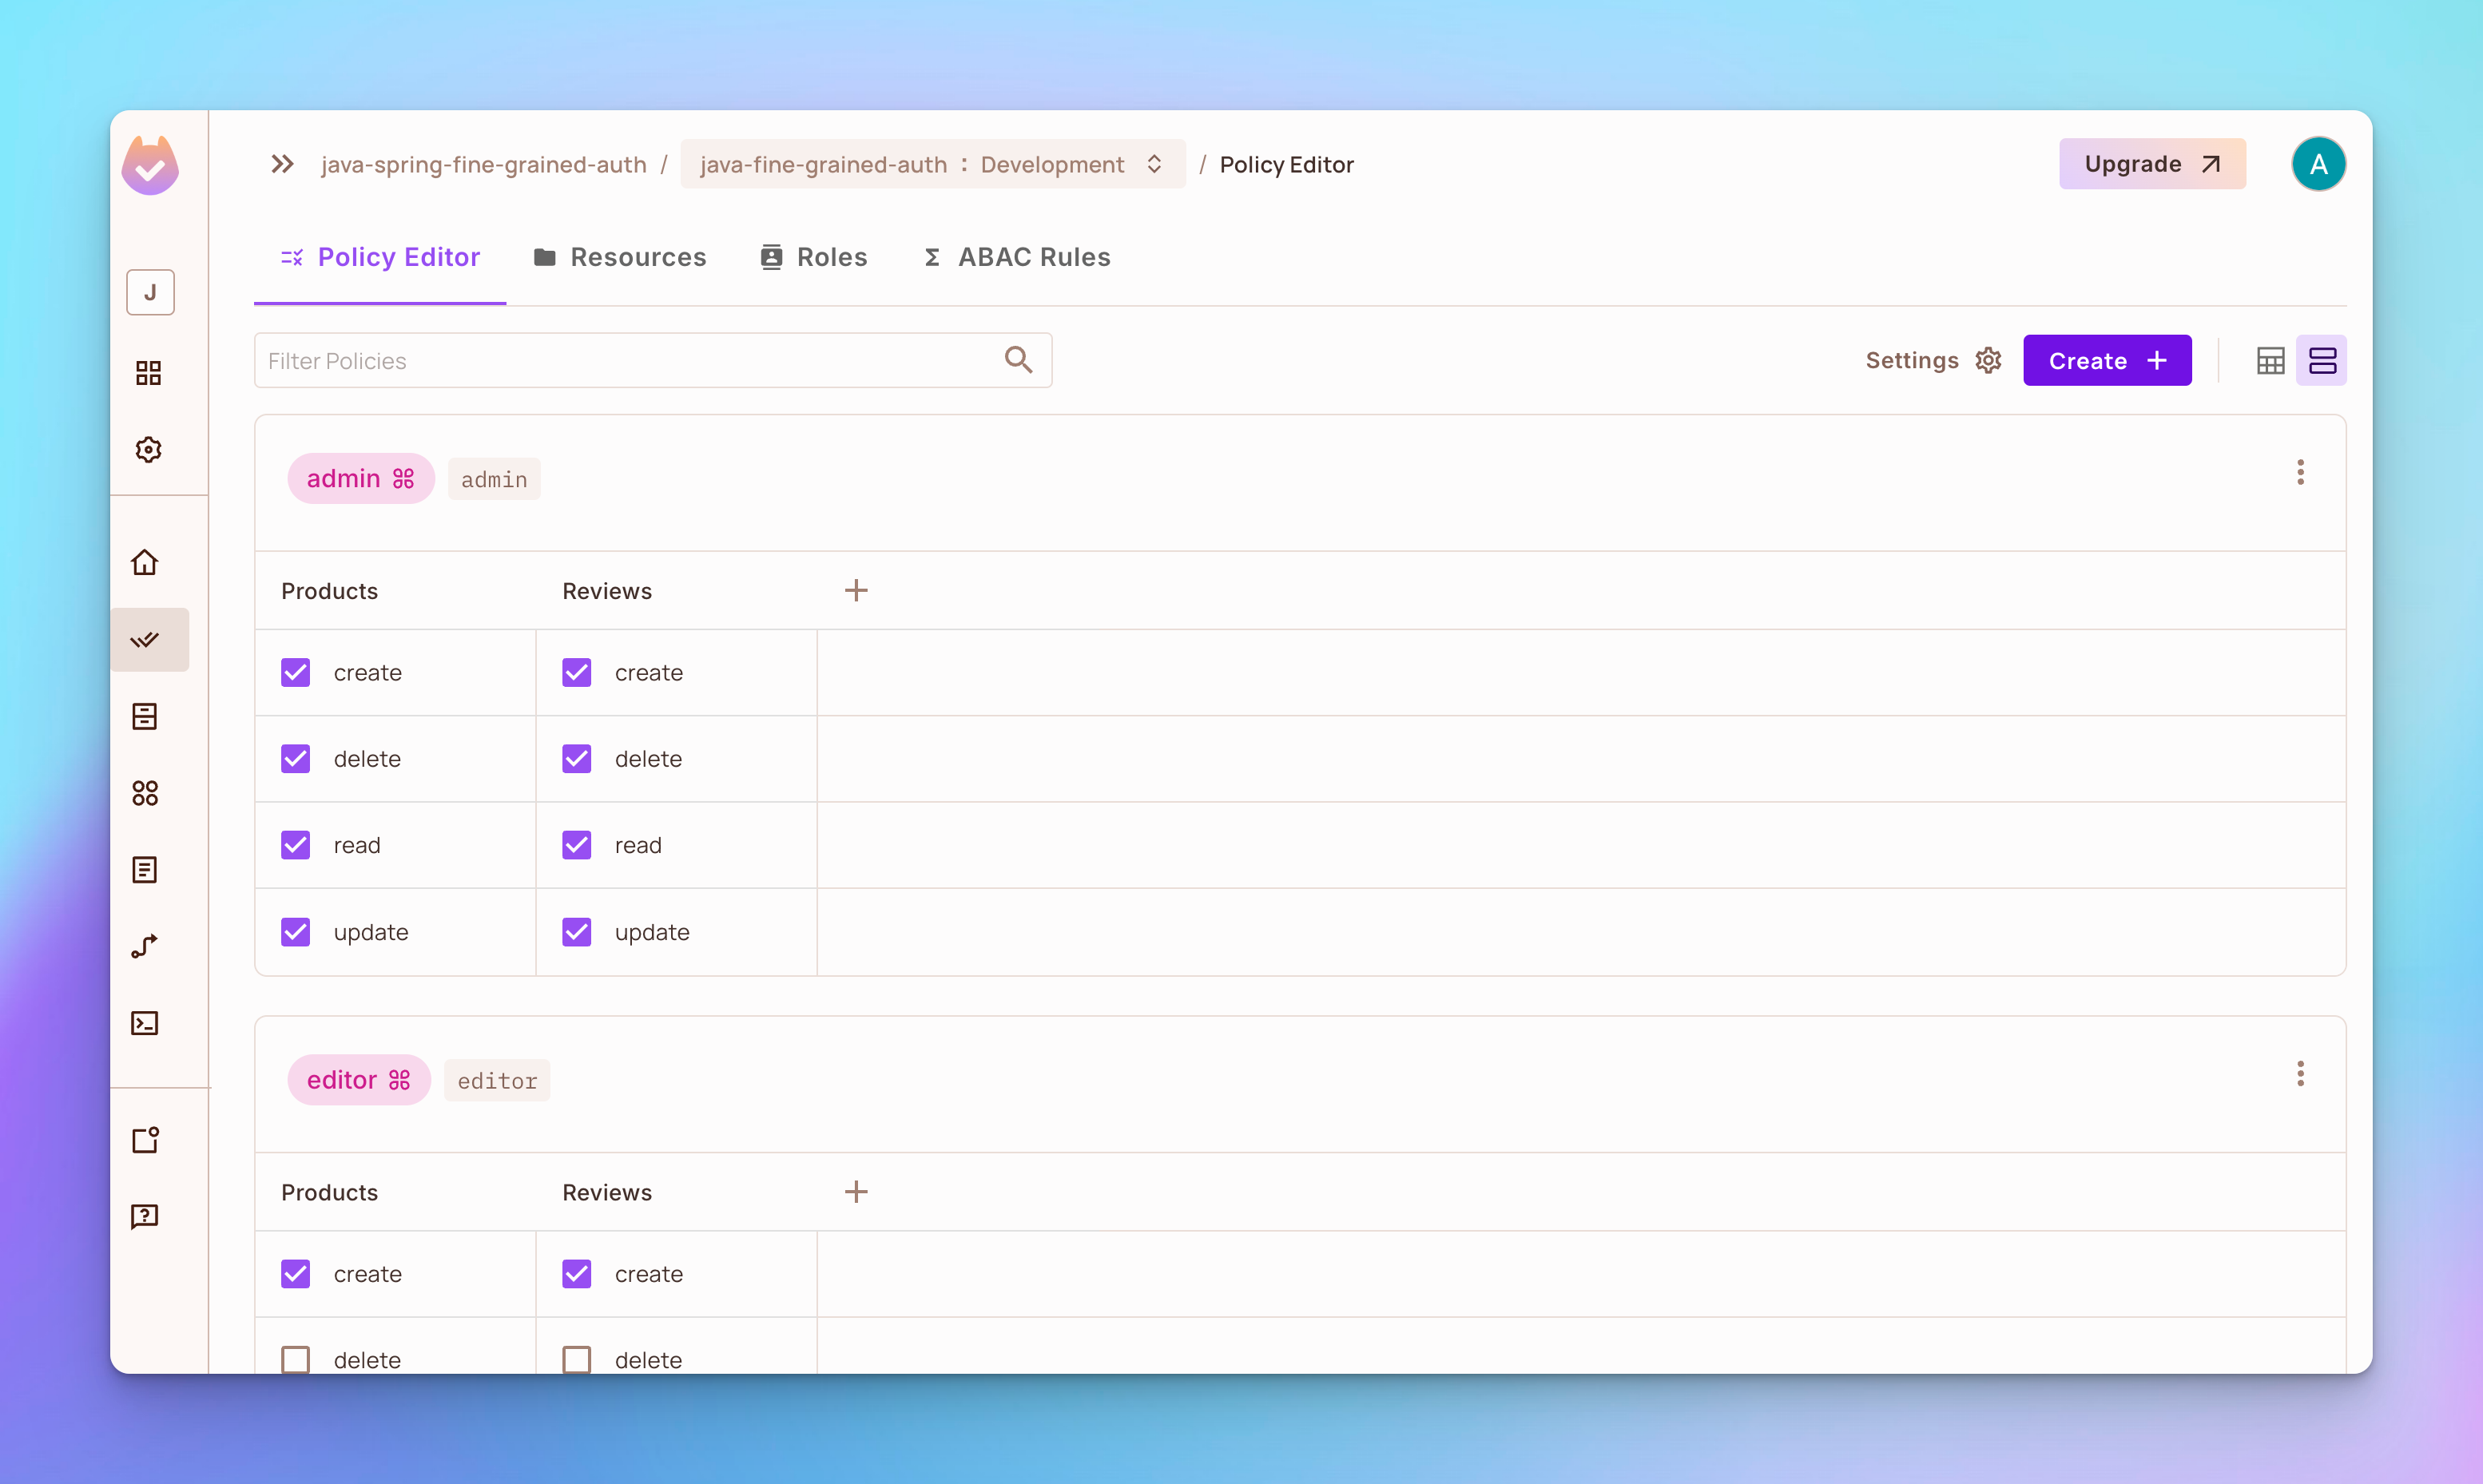
步骤 4: 打开 策略编辑器 标签。您会看到已经创建了 3 个角色,分别是 admin、editor 和 viewer。
-
管理员角色具有创建、删除、读取或更新产品或评论的权限。
-
编辑角色具有创建、读取或更新产品或评论的权限,但不能删除任何内容。
-
角色
viewer拥有创建和读取产品或评论的权限,但没有删除或更新任何内容的权限。
实施基于属性的访问控制
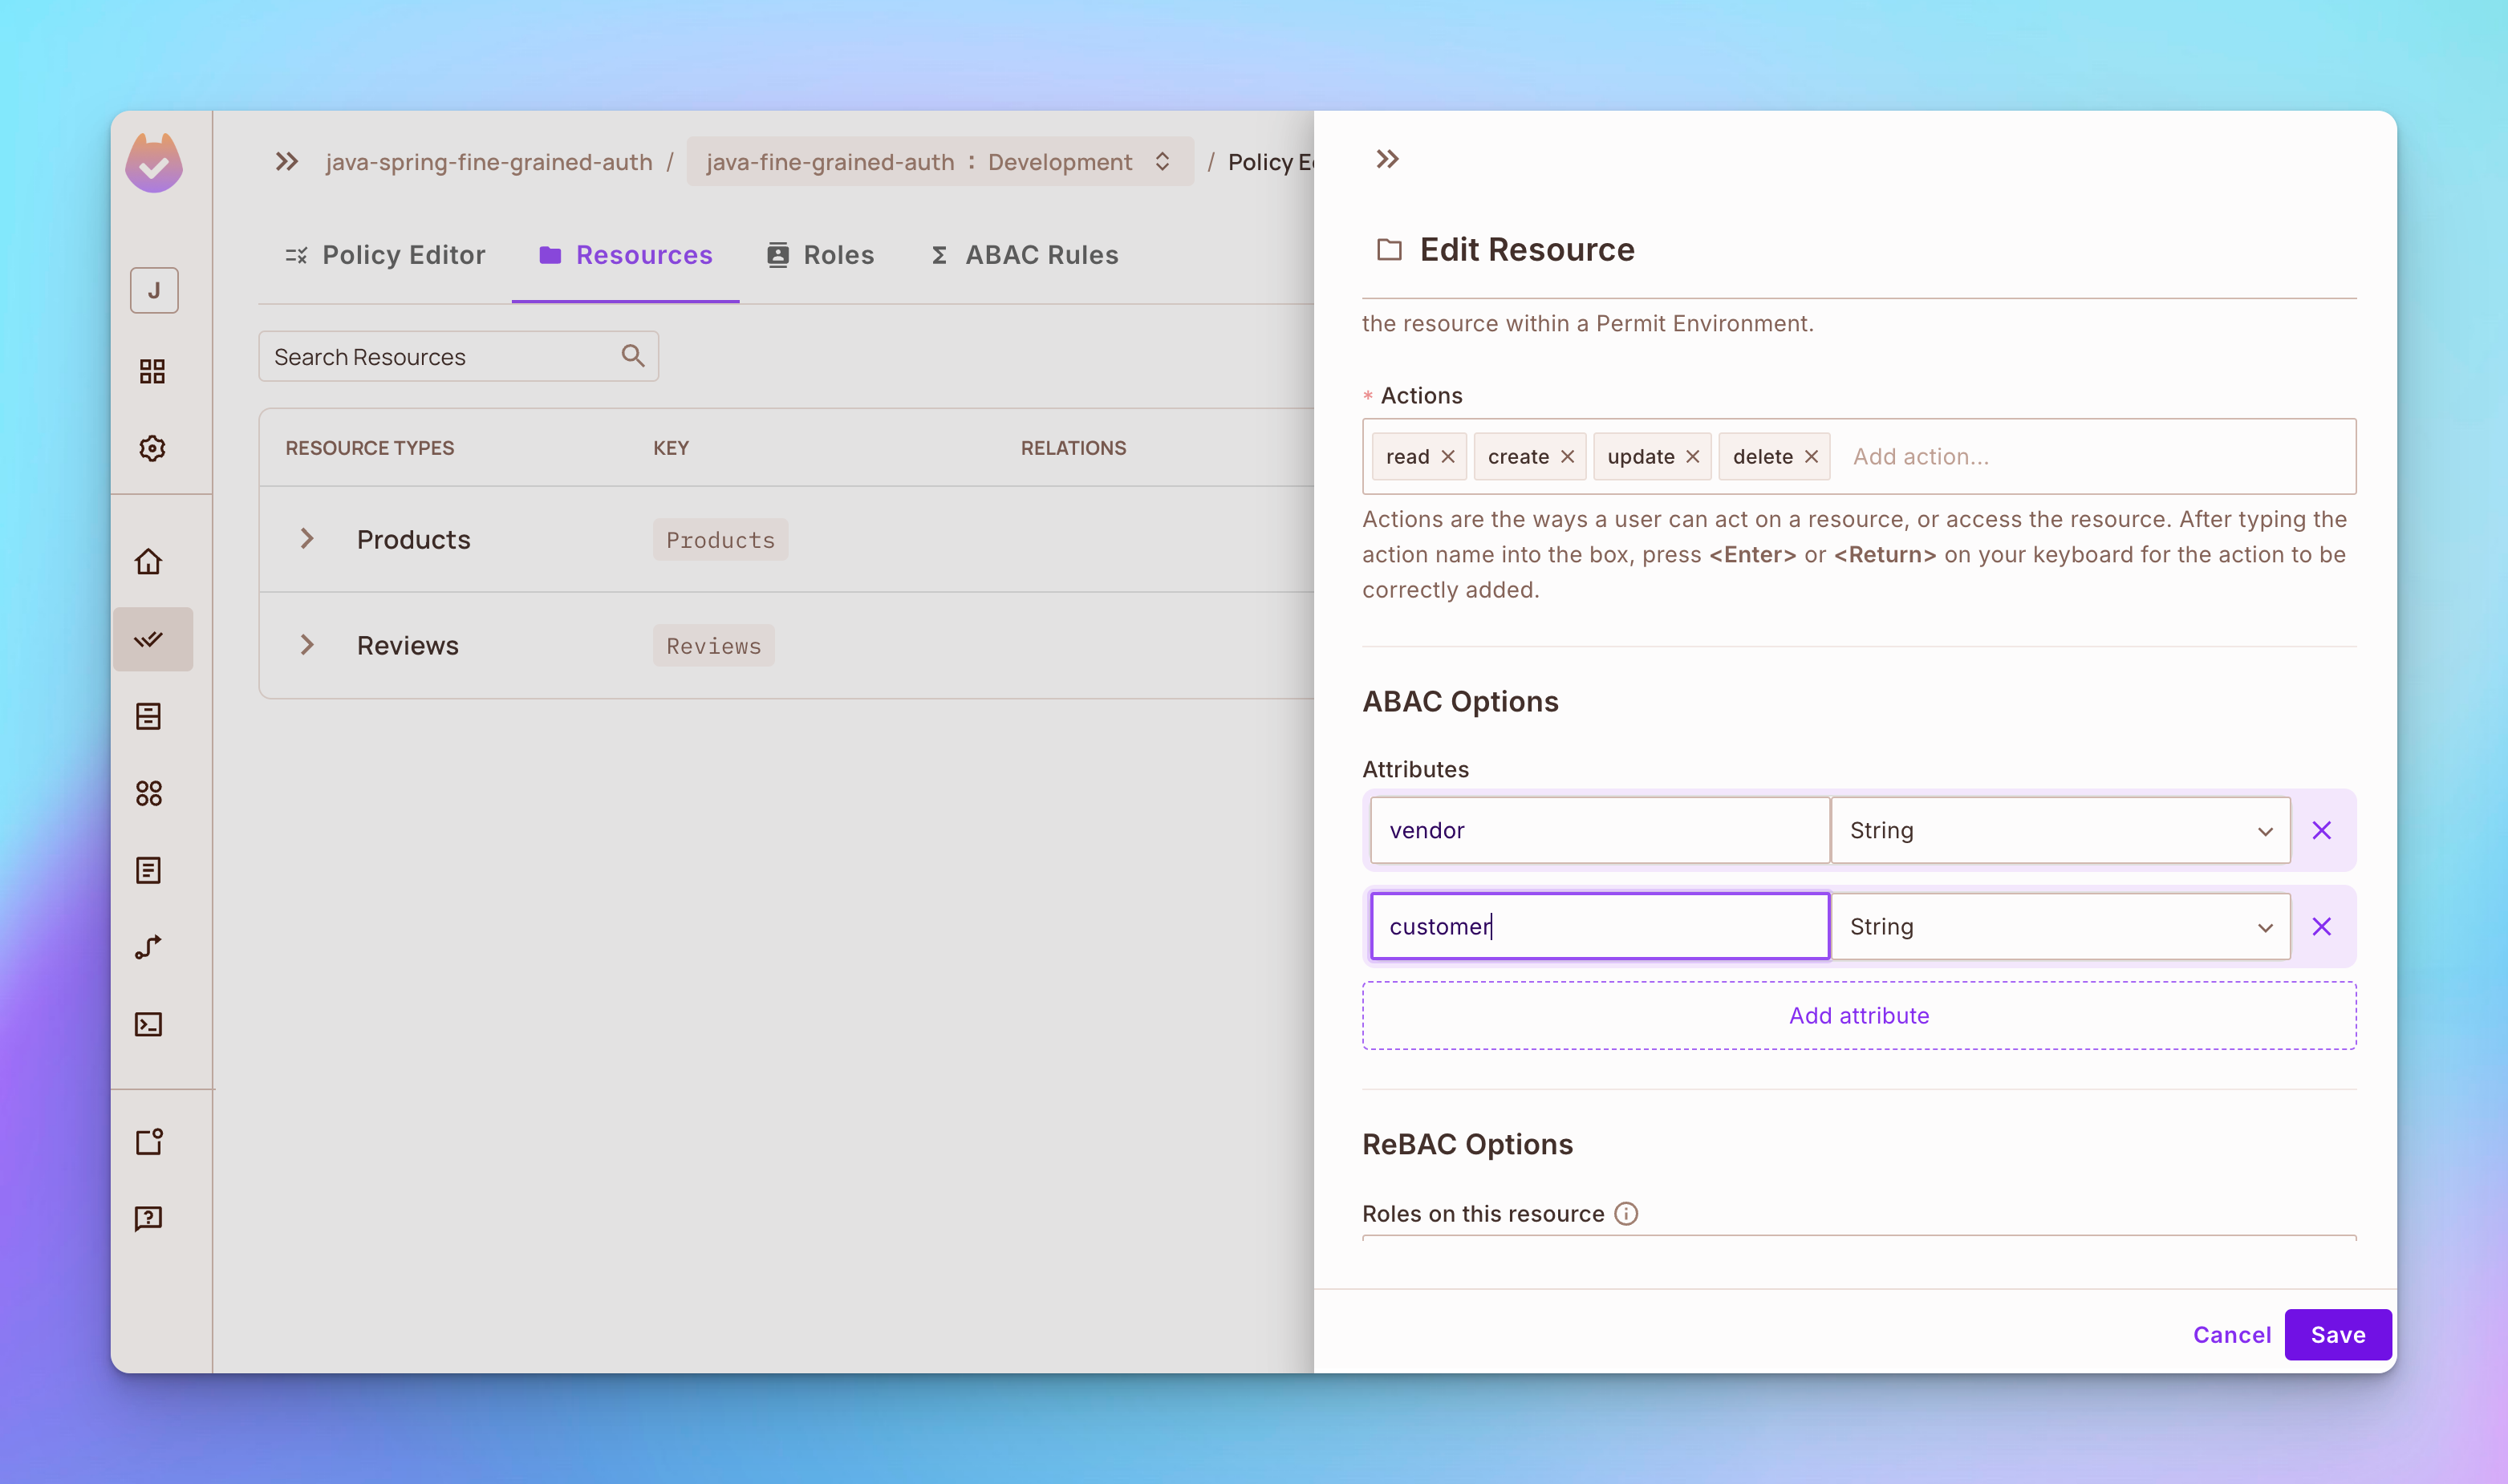
步骤1:打开资源标签,然后点击添加属性按钮。
-
添加一个名为供应商的属性。
-
添加一个名为客户的属性。
步骤2:打开ABAC规则标签,然后创建一个名为自有产品的新ABAC资源集,该资源集依赖于产品资源。之后,添加一个条件,仅授予基于供应商属性创建产品的用户的权限。
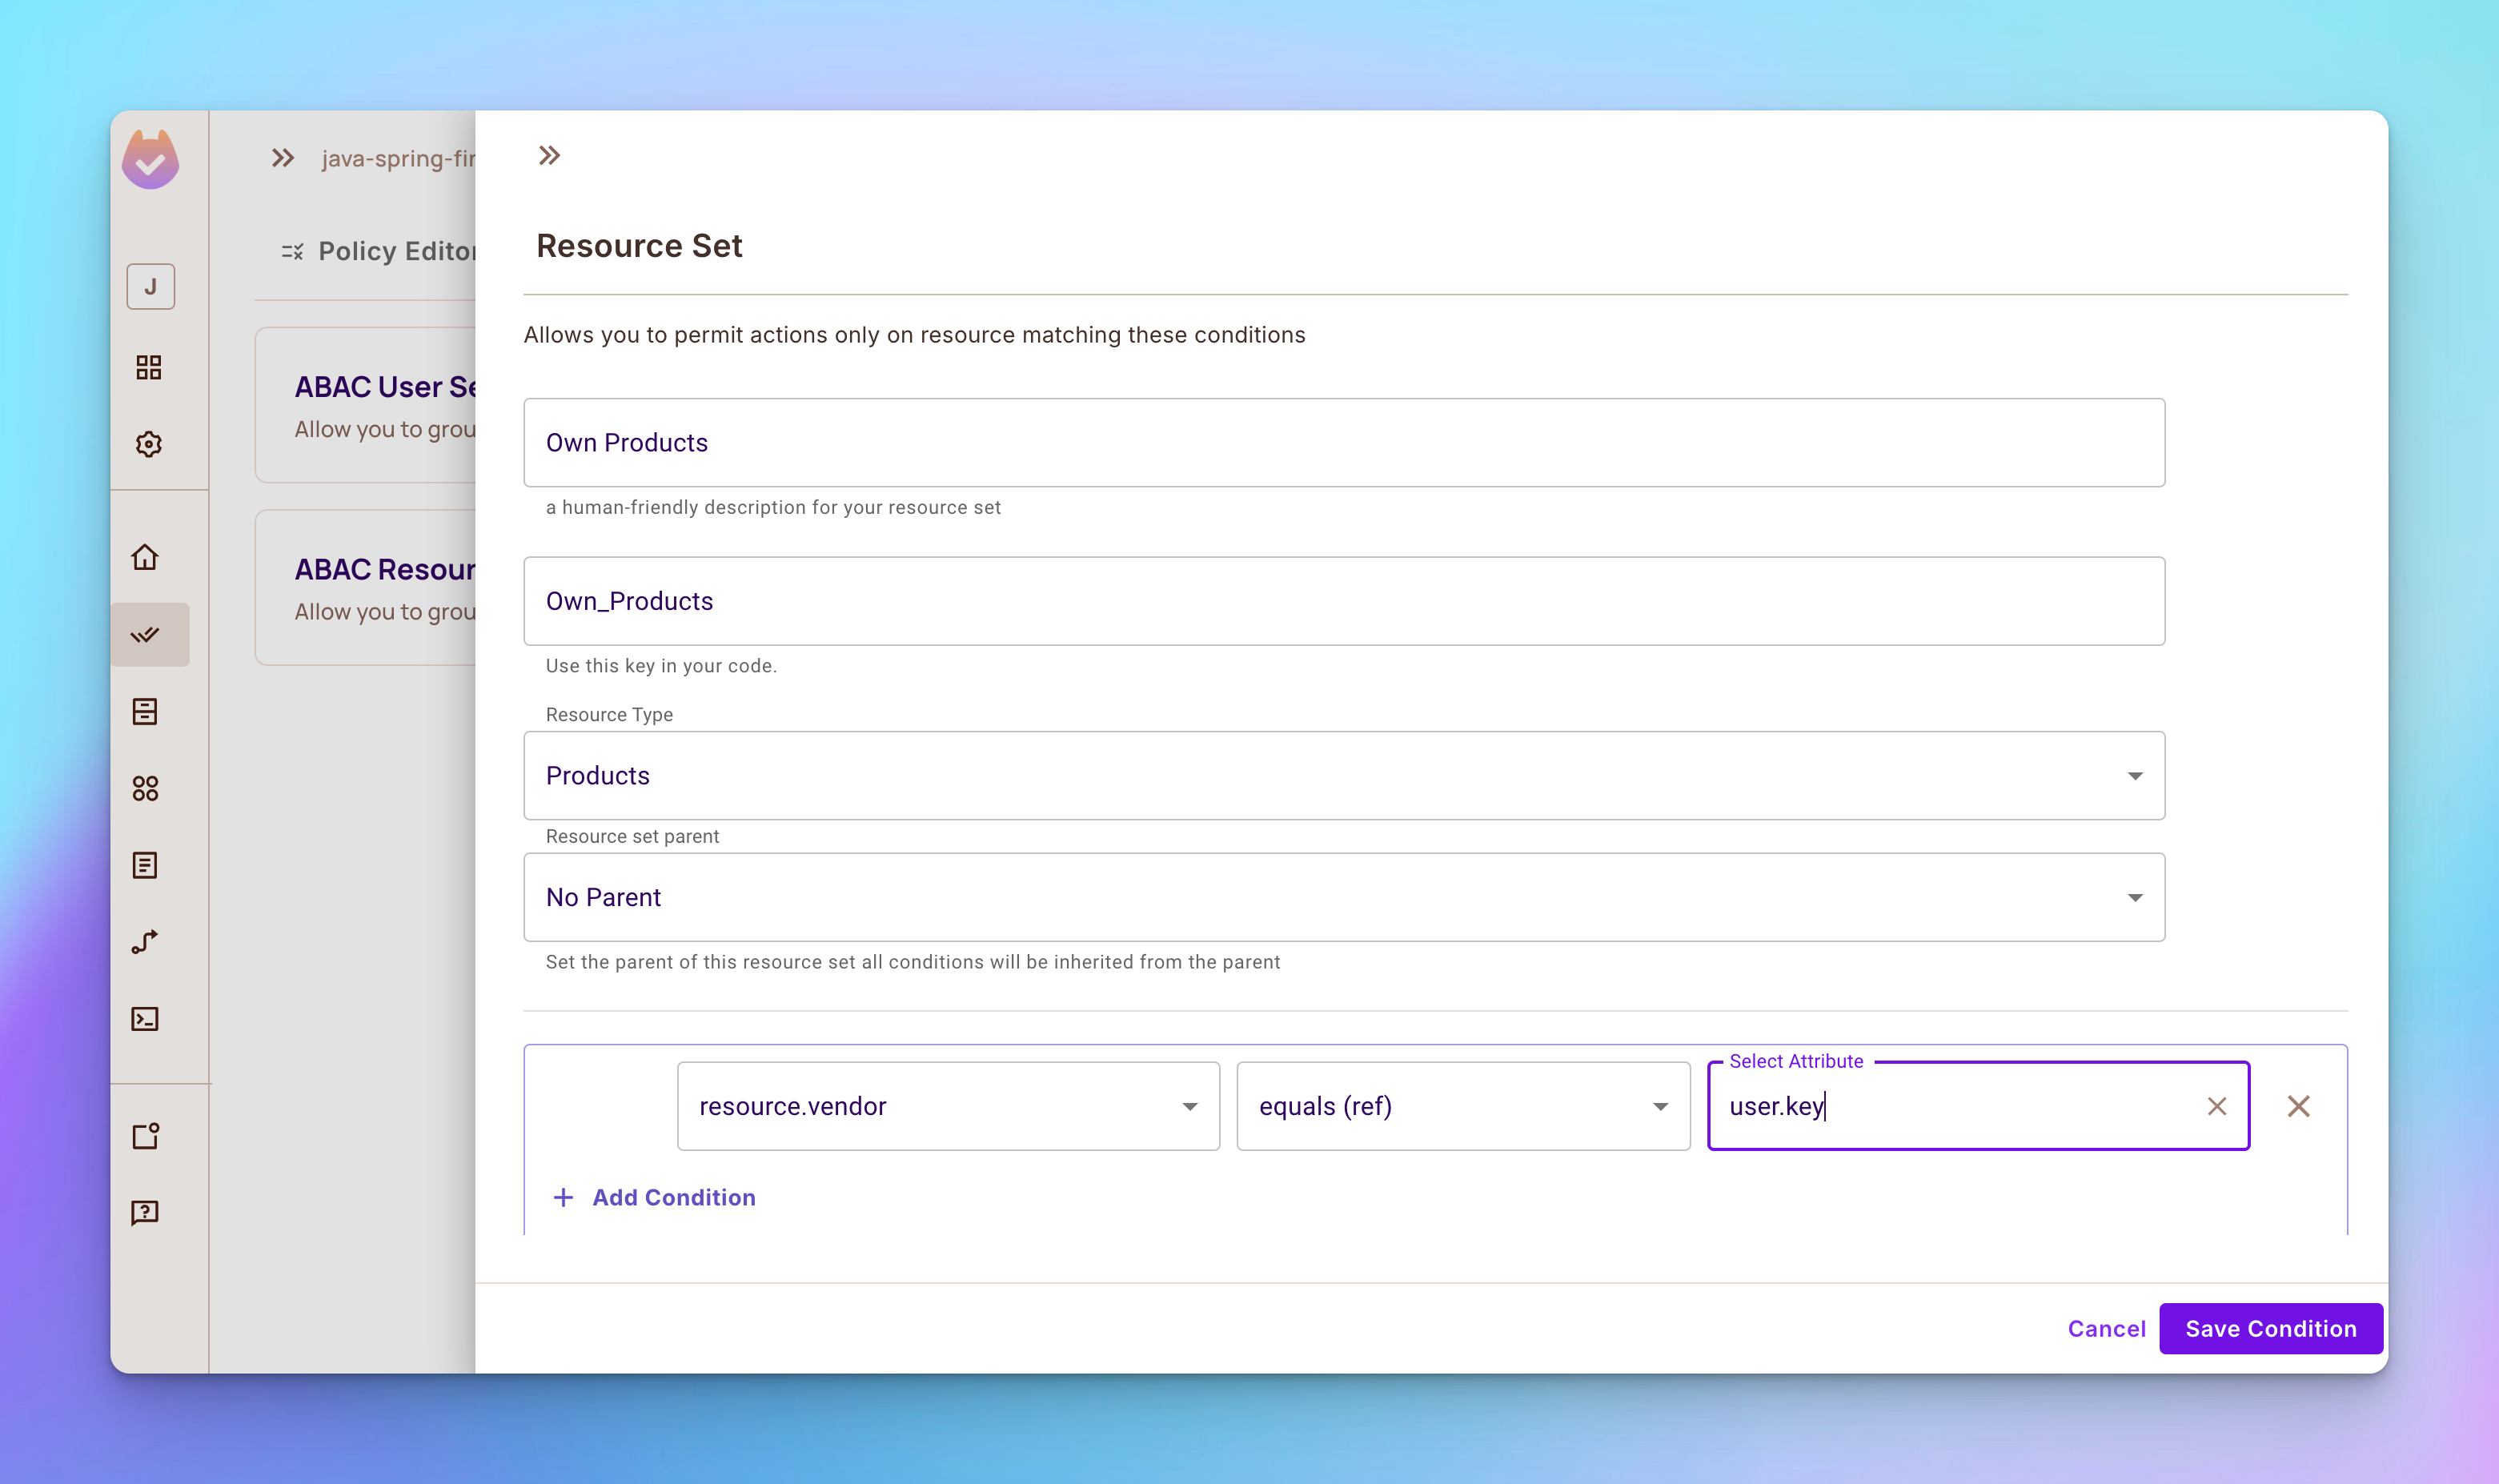
步骤3:创建另一个名为自有评论的ABAC资源集,该资源集依赖于评论资源。
实施基于关系的访问控制
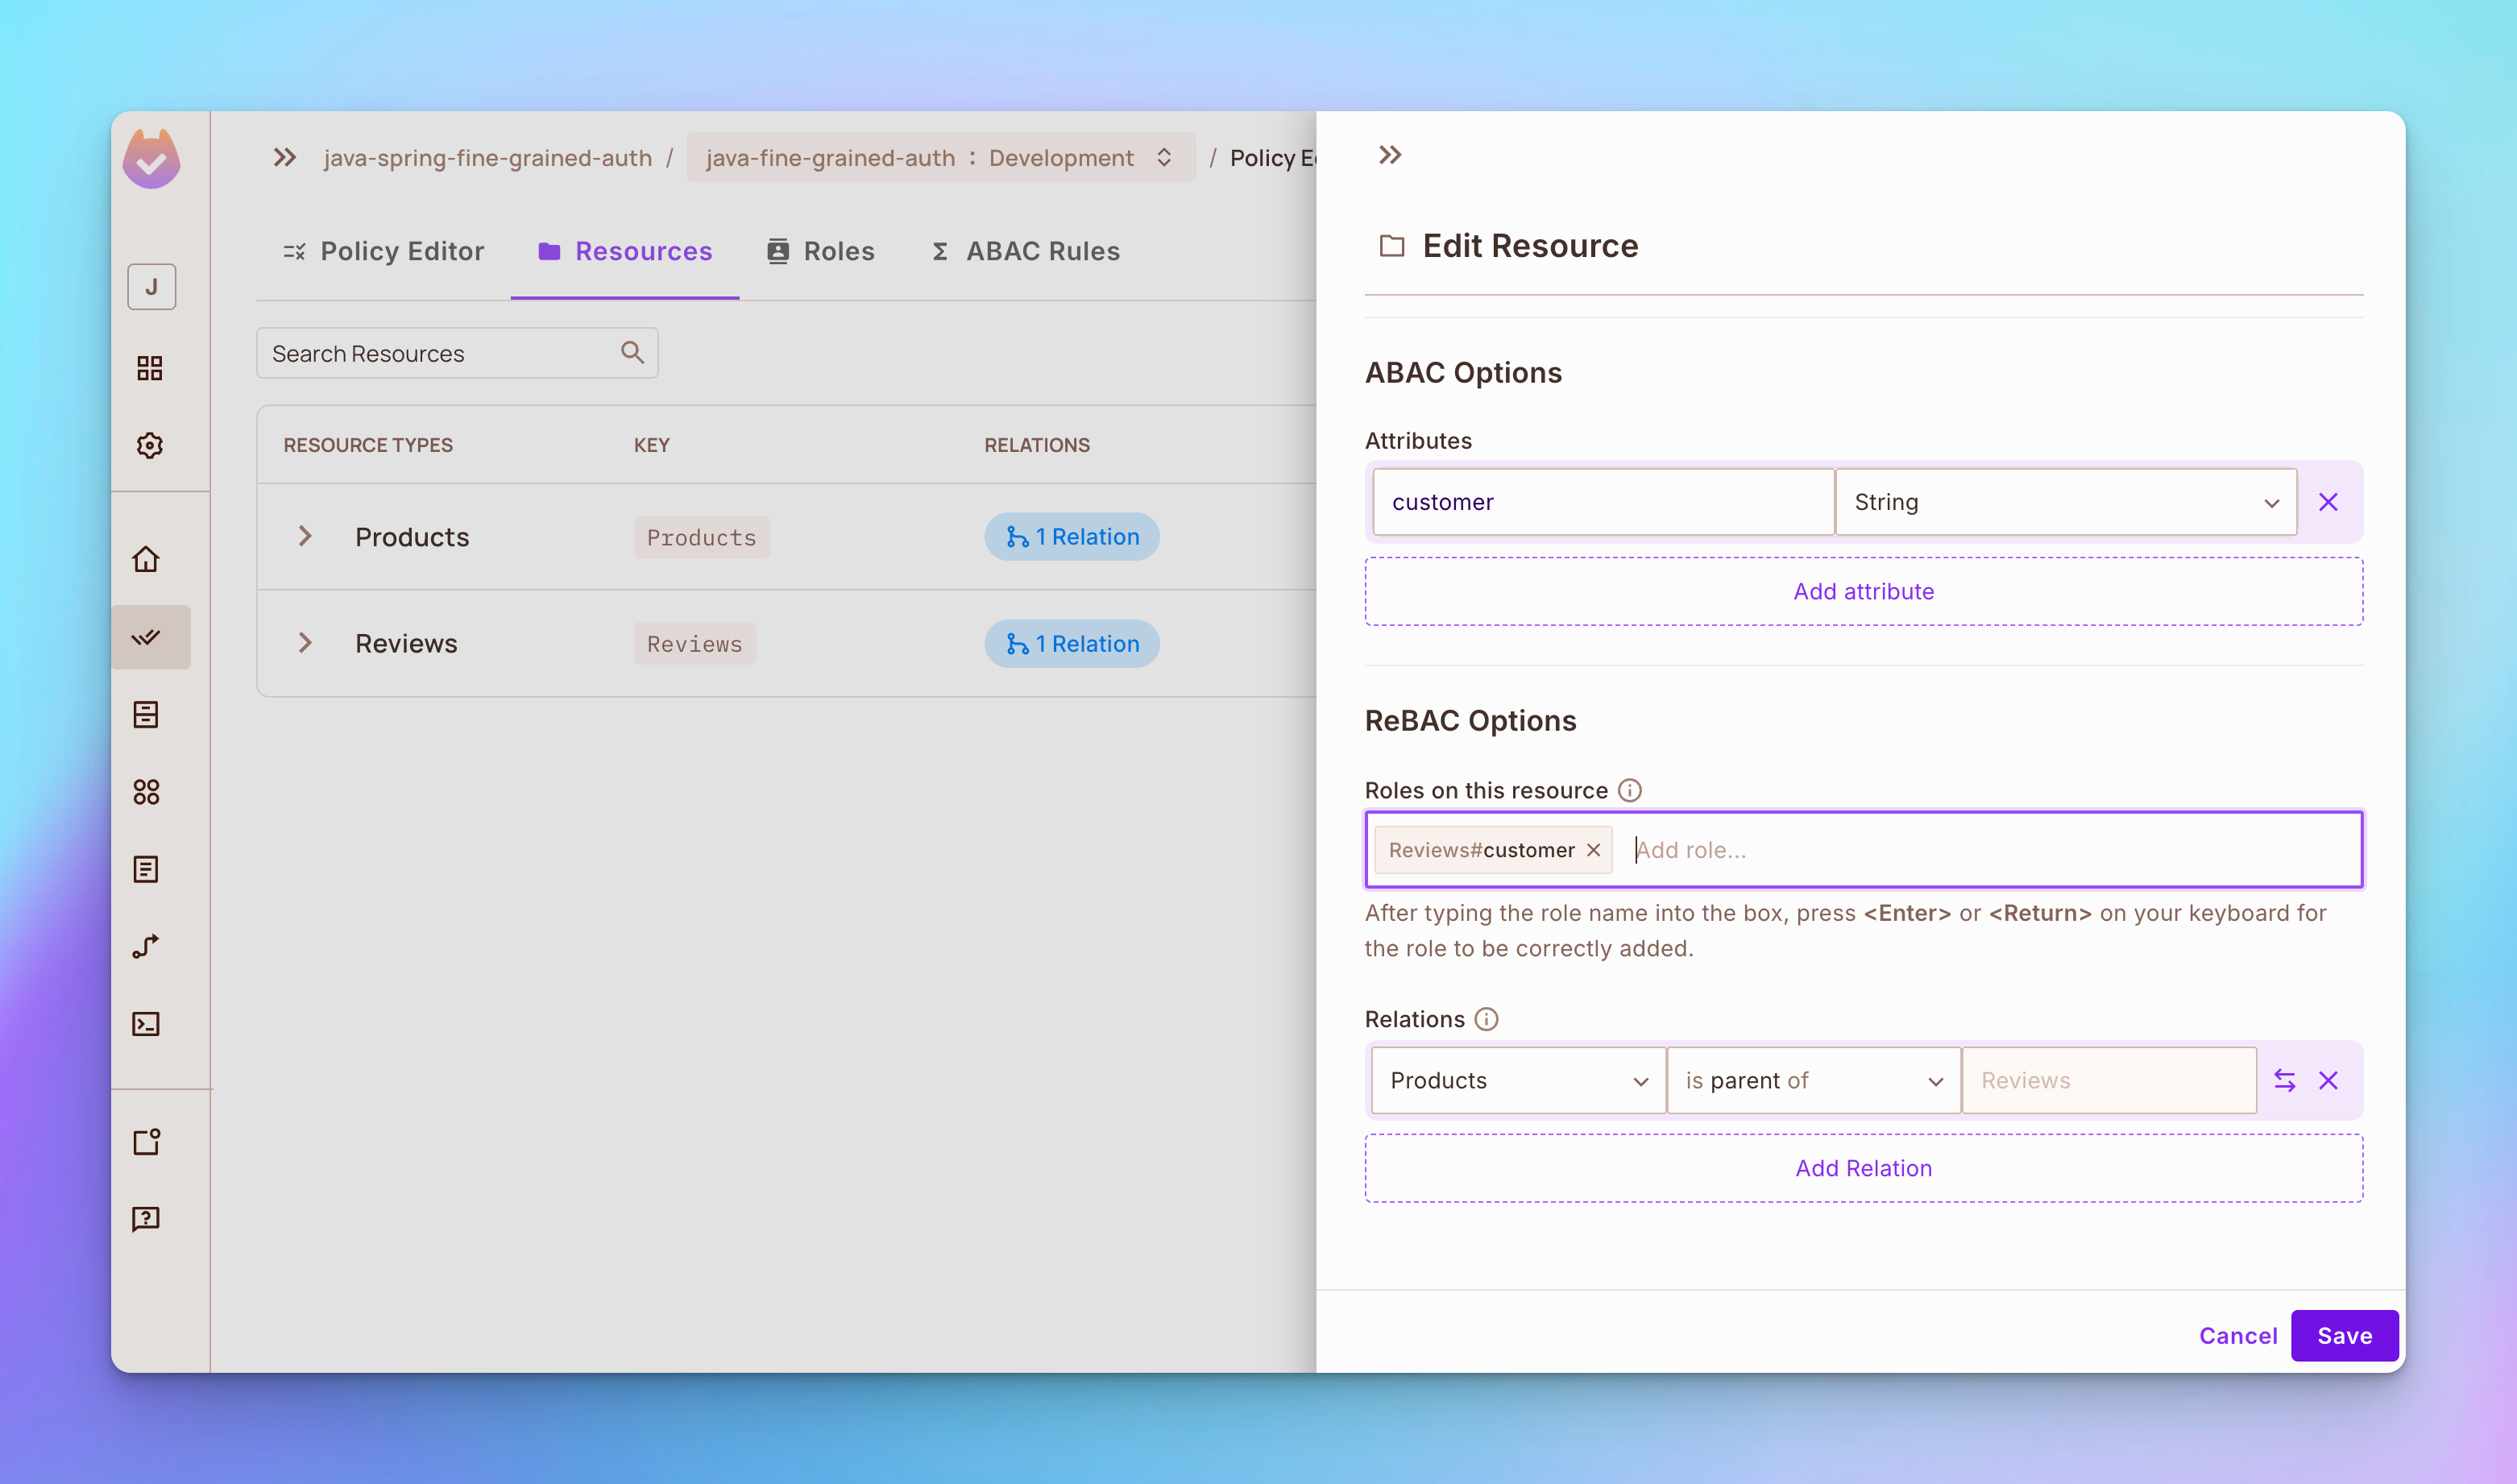
步骤1:打开资源标签并编辑产品资源。在ReBAC选项部分添加角色供应商。然后在关系部分将产品设置为评论的父级。
步骤2:在ReBAC选项部分添加角色customer,编辑Reviews资源,如下所示:
步骤3:单击策略 编辑器标签,并添加:
-
角色
供应商更新和删除自己产品的权限。 -
角色
客户更新和删除对产品自己的评论的权限。

如何在Java和SpringBoot中实现FGA
既然我们已经在上面的Permit.io网页界面中定义了RBAC、ABAC和ReBAC策略,接下来我们来学习如何使用Permit.io API在电子商务管理系统应用程序中实施它们。
接下来的代码量很大,所以请确保你阅读了我在每个代码块中留下的详细注释。这将帮助你更全面地理解这段代码的运作方式。
步骤1:设置电子商务应用程序
设置电子商务应用程序并克隆源代码。
git clone https://github.com/tyaga001/java-spring-fine-grained-auth.git
安装Permit包SDK
要安装Permit包SDK,你需要在build.gradle文件的依赖项块中添加SDK。
## Dependencies

To set up the necessary dependencies for your Spring Boot project, include the following in your `build.gradle` file:

```groovy
dependencies {
    implementation 'org.springframework.boot:spring-boot-starter-web'
    implementation 'org.springdoc:springdoc-openapi-starter-webmvc-ui:2.3.0'
    developmentOnly 'org.springframework.boot:spring-boot-devtools'
    testImplementation 'org.springframework.boot:spring-boot-starter-test'
    testRuntimeOnly 'org.junit.platform:junit-platform-launcher'

    // 在你的项目中添加此行以安装Permit.io Java SDK
    implementation 'io.permit:permit-sdk-java:2.0.0'
}
初始化许可SDK
您可以使用下面的代码初始化许可SDK客户端:
package com.boostmytool.store.config;

import io.permit.sdk.Permit;
import io.permit.sdk.PermitConfig;
import org.springframework.beans.factory.annotation.Value;
import org.springframework.context.annotation.Bean;
import org.springframework.context.annotation.Configuration;

@Configuration  // 标记此类为Spring IoC的配置类
public class PermitClientConfig {

    @Value("${permit.api-key}")  // 从应用程序属性中注入许可API密钥
    private String apiKey;

    @Value("${permit.pdp-url}")  // 从应用程序属性中注入许可PDP (策略决策点) URL
    private String pdpUrl;

    /**
     * 使用自定义配置创建许可客户端bean
     * @return 许可客户端实例
     */
    @Bean
    public Permit permit() {
        return new Permit(
                new PermitConfig.Builder(apiKey)  // 使用API密钥初始化PermitConfig
                        .withPdpAddress(pdpUrl)   // 设置PDP地址
                        .withDebugMode(true)      // 启用调试模式以获取详细日志
                        .build()                  // 构建PermitConfig对象
        );
    }
}
使用SDK同步用户
要开始执行权限,您首先应该将用户同步到许可,然后为他们分配一个角色。
在下面的代码中,UserService类提供用户登录、注册、角色分配和授权的方法,并在与许可API交互时处理可能的错误异常。
package com.boostmytool.store.service;

import com.boostmytool.store.exception.ForbiddenAccessException;
import com.boostmytool.store.exception.UnauthorizedException;
import io.permit.sdk.Permit;
import io.permit.sdk.api.PermitApiError;
import io.permit.sdk.api.PermitContextError;
import io.permit.sdk.enforcement.Resource;
import io.permit.sdk.enforcement.User;
import org.springframework.stereotype.Service;

import java.io.IOException;

@Service  // 将此类标记为 Spring 服务,使其成为组件扫描的候选对象
public class UserService {
    private final Permit permit;

    // 通过构造函数注入 Permit SDK
    public UserService(Permit permit) {
        this.permit = permit;
    }

    /**
     * 通过创建并返回一个 Permit 用户对象来模拟用户登录。
     *
     * @param key 用户的唯一标识
     * @return 用户对象
     */
    public Object login(String key) {
        return new User.Builder(key).build();
    }

    /**
     * 处理用户注册,通过创建并同步一个新的 Permit 用户。
     *
     * @param key 用户的唯一标识
     * @return 创建并同步的用户对象
     */
    public User signup(String key) {
        var user = new User.Builder(key).build();
        try {
            permit.api.users.sync(user);  // 将新用户与 Permit 服务同步
        } catch (PermitContextError | PermitApiError | IOException e) {
            throw new RuntimeException("Failed to create user", e);  // 处理用户创建过程中的异常
        }
        return user;
    }

    /**
     * 在 "default" 环境中分配角色给用户。
     *
     * @param user 要分配角色的用户对象
     * @param role 要分配的角色
     */
    public void assignRole(User user, String role) {
        try {
            permit.api.users.assignRole(user.getKey(), role, "default");  // 在 "default" 环境中分配角色
        } catch (PermitApiError | PermitContextError | IOException e) {
            throw new RuntimeException("Failed to assign role to user", e);  // 处理角色分配过程中的异常
        }
    }

    /**
     * 检查用户是否有权对某资源执行特定操作。
     *
     * @param user 请求授权的用户对象
     * @param action 要授权的操作
     * @param resource 将执行操作的资源
     * @throws UnauthorizedException 如果用户未登录
     * @throws ForbiddenAccessException 如果用户被拒绝访问
     */
    public void authorize(User user, String action, Resource resource) {
        if (user == null) {
            throw new UnauthorizedException("Not logged in");  // 如果用户未登录则抛出异常
        }
        try {
            var permitted = permit.check(user, action, resource);  // 执行授权检查
            if (!permitted) {
                throw new ForbiddenAccessException("Access denied");  // 如果访问被拒绝则抛出异常
            }
        } catch (PermitApiError | IOException e) {
            throw new RuntimeException("Failed to authorize user", e);  // 处理授权过程中的异常
        }
    }
}
UserController 类暴露了用户注册和角色分配的 REST API 端点。它与 UserService 类交互,以处理与用户相关的业务逻辑,并提供适当的 HTTP 响应。
package com.boostmytool.store.controllers;

import com.boostmytool.store.exception.UnauthorizedException;
import com.boostmytool.store.service.UserService;
import io.permit.sdk.enforcement.User;
import jakarta.servlet.http.HttpServletRequest;
import org.springframework.web.bind.annotation.PostMapping;
import org.springframework.web.bind.annotation.RequestBody;
import org.springframework.web.bind.annotation.RequestMapping;
import org.springframework.web.bind.annotation.RestController;

@RestController  // 表示该类处理 HTTP 请求并返回 JSON 响应
@RequestMapping("/api/users")  // 所有用户相关操作的基本 URL 路径
public class UserController {
    private final UserService userService;

    // UserService 的构造函数注入,包含用户操作的业务逻辑
    public UserController(UserService userService) {
        this.userService = userService;
    }

    /**
     * 处理用户注册请求。
     * 端点:POST /api/users/signup
     *
     * @param key 新用户的唯一键
     * @return 创建的 User 对象
     */
    @PostMapping("/signup")
    public User signup(@RequestBody String key) {
        return userService.signup(key);  // 调用 UserService 中的 signup 方法创建新用户
    }

    /**
     * 处理为登录用户分配角色。
     * 端点:POST /api/users/assign-role
     *
     * @param request HTTP 请求,用于检索当前用户
     * @param role 要分配给当前用户的角色
     */
    @PostMapping("/assign-role")
    public void assignRole(HttpServletRequest request, @RequestBody String role) {
        // 从请求属性中检索当前用户
        User currentUser = (User) request.getAttribute("user");

        // 如果用户未登录,则抛出异常
        if (currentUser == null) {
            throw new UnauthorizedException("Not logged in");
        }

        // 将指定角色分配给当前用户
        userService.assignRole(currentUser, role);
    }
}
创建 RBAC、ABAC 和 ReBAC 策略执行点
在下面的代码中,ProductService类负责产品和评论的CRUD操作,通过Permit API处理权限和角色。
每个操作都包括用户授权检查,并对Permit API错误和未找到资源的情况进行了适当的异常处理。
package com.boostmytool.store.service;

import com.boostmytool.store.exception.ResourceNotFoundException;
import com.boostmytool.store.model.Product;
import com.boostmytool.store.model.Review;
import io.permit.sdk.Permit;
import io.permit.sdk.api.PermitApiError;
import io.permit.sdk.api.PermitContextError;
import io.permit.sdk.enforcement.Resource;
import io.permit.sdk.enforcement.User;
import io.permit.sdk.openapi.models.RelationshipTupleCreate;
import io.permit.sdk.openapi.models.ResourceInstanceCreate;
import io.permit.sdk.openapi.models.RoleAssignmentCreate;
import org.springframework.stereotype.Service;

import java.io.IOException;
import java.util.ArrayList;
import java.util.HashMap;
import java.util.List;
import java.util.concurrent.atomic.AtomicInteger;

@Service  // 将此类标记为Spring服务
public class ProductService {

    private final List<Product> products = new ArrayList<>();  // 用于存储产品的内存列表
    private final AtomicInteger productIdCounter = new AtomicInteger();  // 用于生成唯一产品ID的计数器
    private final AtomicInteger reviewIdCounter = new AtomicInteger();   // 用于生成唯一评论ID的计数器

    // 用于构建Permit资源实例(产品和评论)的生成器
    private final Resource.Builder productResourceBuilder = new Resource.Builder("product");
    private final Resource.Builder reviewResourceBuilder = new Resource.Builder("review");

    private final UserService userService;  // 用于处理用户相关操作的服务
    private final Permit permit;  // Permit SDK实例,用于处理授权和资源管理

    // 用于注入依赖项的构造函数
    public ProductService(UserService userService, Permit permit) {
        this.userService = userService;
        this.permit = permit;
    }

    // 用于授权用户对资源执行特定操作的方法
    private void authorize(User user, String action, Resource resource) {
        userService.authorize(user, action, resource);
    }

    // 授权用户对特定产品执行操作
    private void authorize(User user, String action, Product product) {
        var attributes = new HashMap<String, Object>();
        attributes.put("vendor", product.getVendor());  // 向产品添加供应商属性
        userService.authorize(user, action, productResourceBuilder.withKey(product.getId().toString()).withAttributes(attributes).build());
    }

    // 授权用户对特定评论执行操作
    private void authorize(User user, String action, Review review) {
        var attributes = new HashMap<String, Object>();
        attributes.put("customer", review.getCustomer());  // 向评论添加客户属性
        userService.authorize(user, action, reviewResourceBuilder.withKey(review.getId().toString()).withAttributes(attributes).build());
    }

    // 根据ID检索产品,如果未找到则抛出异常
    private Product getProductById(int id) {
        return products.stream().filter(product -> product.getId().equals(id))
                .findFirst().orElseThrow(() -> new ResourceNotFoundException("Product with id " + id + " not found"));
    }

    // 检索所有产品,检查用户是否有"读取"产品的权限
    public List<Product> getAllProducts(User user) {
        authorize(user, "read", productResourceBuilder.build());  // 用户必须有"读取"权限
        return new ArrayList<>(products);  // 返回产品列表的副本
    }

    // 根据ID检索产品,检查用户是否有"读取"该产品的权限
    public Product getProduct(User user, int id) {
        authorize(user, "read", productResourceBuilder.build());
        return getProductById(id);
    }

    // 添加新产品,授权用户并在Permit中创建资源实例和角色分配
    public Product addProduct(User user, String content) {
        authorize(user, "create", productResourceBuilder.build());  // 检查用户是否可以创建产品
        Product product = new Product(productIdCounter.incrementAndGet(), user.getKey(), content);  // 创建新产品

        try {
            // 在Permit中创建资源实例,并为该产品分配"供应商"角色给用户
            permit.api.resourceInstances.create(new ResourceInstanceCreate(product.getId().toString(), "product").withTenant("default"));
            permit.api.roleAssignments.assign(new RoleAssignmentCreate("vendor", user.getKey()).withResourceInstance("product:" + product.getId()).withTenant("default"));
        } catch (IOException | PermitApiError | PermitContextError e) {
            throw new RuntimeException("Failed to create resource instance or role assignment: " + e.getMessage());
        }

        products.add(product);  // 将产品添加到内存列表中
        return product;
    }

    // 更新产品内容,检查用户是否有"更新"该产品的权限
    public Product updateProduct(User user, int id, String content) {
        Product product = getProductById(id);  // 根据ID获取产品
        authorize(user, "update", product);  // 检查用户是否可以更新产品
        product.setContent(content);  // 更新产品内容
        return product;
    }

    // 删除产品,检查用户是否有"删除"该产品的权限
    public void deleteProduct(User user, int id) {
        boolean isDeleted = products.removeIf(product -> {
            if (product.getId().equals(id)) {
                authorize(user, "delete", product);  // 检查用户是否可以删除该产品
                return true;
            } else {
                return false;
            }
        });

        if (!isDeleted) {
            throw new ResourceNotFoundException("Product with id " + id + " not found");
        }

        try {
            permit.api.resourceInstances.delete("product:" + id);  // 从Permit中删除产品资源实例
        } catch (IOException | PermitApiError | PermitContextError e) {
            throw new RuntimeException(e);
        }
    }

    // 向产品添加评论,在Permit中创建资源实例和关系
    public Review addReview(User user, int productId, String content) {
        authorize(user, "create", reviewResourceBuilder.build());  // 检查用户是否可以创建评论
        Product product = getProductById(productId);  // 根据ID获取产品
        Review review = new Review(reviewIdCounter.incrementAndGet(), user.getKey(), content);  // 创建新评论

        try {
            // 为评论创建资源实例,并与产品建立关系
            permit.api.resourceInstances.create(new ResourceInstanceCreate(review.getId().toString(), "review").withTenant("default"));
            permit.api.relationshipTuples.create(new RelationshipTupleCreate("product:" + productId, "parent", "review:" + review.getId()));
        } catch (IOException | PermitApiError | PermitContextError e) {
            throw new RuntimeException(e);
        }

        product.addReview(review);  // 将评论添加到产品中
        return review;
    }

    // 更新评论内容,检查用户是否有"更新"该评论的权限
    public Review updateReview(User user, int productId, int reviewId, String content) {
        Product product = getProductById(productId);  // 根据ID获取产品
        Review review = product.getReviews().stream().filter(c -> c.getId().equals(reviewId))
                .findFirst().orElseThrow(() -> new ResourceNotFoundException("Review with id " + reviewId + " not found"));

        authorize(user, "update", review);  // 检查用户是否可以更新评论
        review.setContent(content);  // 更新评论内容
        return review;
    }

    // 删除评论,检查用户是否有"删除"该评论的权限
    public void deleteReview(User user, int productId, int reviewId) {
        Product product = getProductById(productId);  // 根据ID获取产品
        boolean isDeleted = product.getReviews().removeIf(review -> {
            if (review.getId().equals(reviewId)) {
                authorize(user, "delete", review);  // 检查用户是否可以删除该评论
                return true;
            } else {
                return false;
            }
        });

        if (!isDeleted) {
            throw new ResourceNotFoundException("Review with id " + reviewId + " not found");
        }

        try {
            permit.api.resourceInstances.delete("review:" + reviewId);  // 从Permit中删除评论资源实例
        } catch (IOException | PermitApiError | PermitContextError e) {
            throw new RuntimeException(e);
        }
    }
}
在下面的代码中,ProductController 类处理与产品和它们的评论相关的 HTTP 请求。它暴露了用于管理产品(如创建、更新、删除和检索)以及用于管理产品评论的端点。
package com.boostmytool.store.controllers;

import com.boostmytool.store.model.Product;
import com.boostmytool.store.model.Review;
import com.boostmytool.store.service.ProductService;
import io.permit.sdk.enforcement.User;
import jakarta.servlet.http.HttpServletRequest;
import org.springframework.beans.factory.annotation.Autowired;
import org.springframework.http.HttpStatus;
import org.springframework.web.bind.annotation.*;

import java.util.List;

@RestController  // 表示这是一个Spring REST控制器
@RequestMapping("/api/products")  // 本控制器中所有端点的基URL
public class ProductController {

    private final ProductService productService;  // 用于处理产品相关操作的ProductService实例

    @Autowired  // 自动注入ProductService Bean
    public ProductController(ProductService productService) {
        this.productService = productService;
    }

    // 获取所有产品的GET请求
    @GetMapping
    public List<Product> getAllProducts(HttpServletRequest request) {
        User currentUser = (User) request.getAttribute("user");  // 从请求中获取认证用户
        return productService.getAllProducts(currentUser);  // 调用ProductService获取用户的所有产品
    }

    // 通过产品ID获取产品的GET请求
    @GetMapping("/{id}")
    public Product getProductById(HttpServletRequest request, @PathVariable("id") int id) {
        User currentUser = (User) request.getAttribute("user");  // 从请求中获取认证用户
        return productService.getProduct(currentUser, id);  // 调用ProductService获取用户指定ID的产品
    }

    // 添加新产品的POST请求
    @PostMapping
    @ResponseStatus(HttpStatus.CREATED)  // 设置响应状态为201 (Created)
    public Product addProduct(HttpServletRequest request, @RequestBody String content) {
        User currentUser = (User) request.getAttribute("user");  // 从请求中获取认证用户
        return productService.addProduct(currentUser, content);  // 调用ProductService添加新产品
    }

    // 通过产品ID更新的PUT请求
    @PutMapping("/{id}")
    public Product updateProduct(HttpServletRequest request, @PathVariable("id") int id, @RequestBody String content) {
        User currentUser = (User) request.getAttribute("user");  // 从请求中获取认证用户
        return productService.updateProduct(currentUser, id, content);  // 调用ProductService更新指定ID的产品
    }

    // 通过产品ID删除的DELETE请求
    @DeleteMapping("/{id}")
    public String deleteProduct(HttpServletRequest request, @PathVariable("id") int id) {
        User currentUser = (User) request.getAttribute("user");  // 从请求中获取认证用户
        productService.deleteProduct(currentUser, id);  // 调用ProductService通过ID删除产品
        return "Deleted product with id " + id;  // 删除后返回成功消息
    }

    // 通过产品ID添加新评论的POST请求
    @PostMapping("/{id}/review")
    public Review addReview(HttpServletRequest request, @PathVariable("id") int id, @RequestBody String content) {
        User currentUser = (User) request.getAttribute("user");  // 从请求中获取认证用户
        return productService.addReview(currentUser, id, content);  // 调用ProductService给产品添加评论
    }

    // 通过产品和评论ID更新的PUT请求
    @PutMapping("/{id}/review/{reviewId}")
    public Review updateReview(HttpServletRequest request, @PathVariable("id") int id, @PathVariable("reviewId") int reviewId, @RequestBody String content) {
        User currentUser = (User) request.getAttribute("user");  // 从请求中获取认证用户
        return productService.updateReview(currentUser, id, reviewId, content);  // 调用ProductService更新评论
    }

    // 通过产品和评论ID删除的DELETE请求
    @DeleteMapping("/{id}/review/{reviewId}")
    public String deleteReview(HttpServletRequest request, @PathVariable("id") int id, @PathVariable("reviewId") int reviewId) {
        User currentUser = (User) request.getAttribute("user");  // 从请求中获取认证用户
        productService.deleteReview(currentUser, id, reviewId);  // 调用ProductService删除评论
        return "Deleted review with id " + reviewId + " from product " + id;  // 删除后返回成功消息
    }
}
第2步:获取您的环境API密钥
在UI仪表板上,复制活动环境的API密钥。
然后在第application.yaml文件中添加API密钥和PDP URL环境。
permit:
  pdpUrl: 'http://localhost:7766'
  apiKey: "Your Permit environment API Key"
第3步:部署策略决策点(PDP)
策略决策点(PDP)部署在您的VPC中,负责评估您的授权请求。PDP将确保零延迟、高性能、高可用性和改进的安全性。
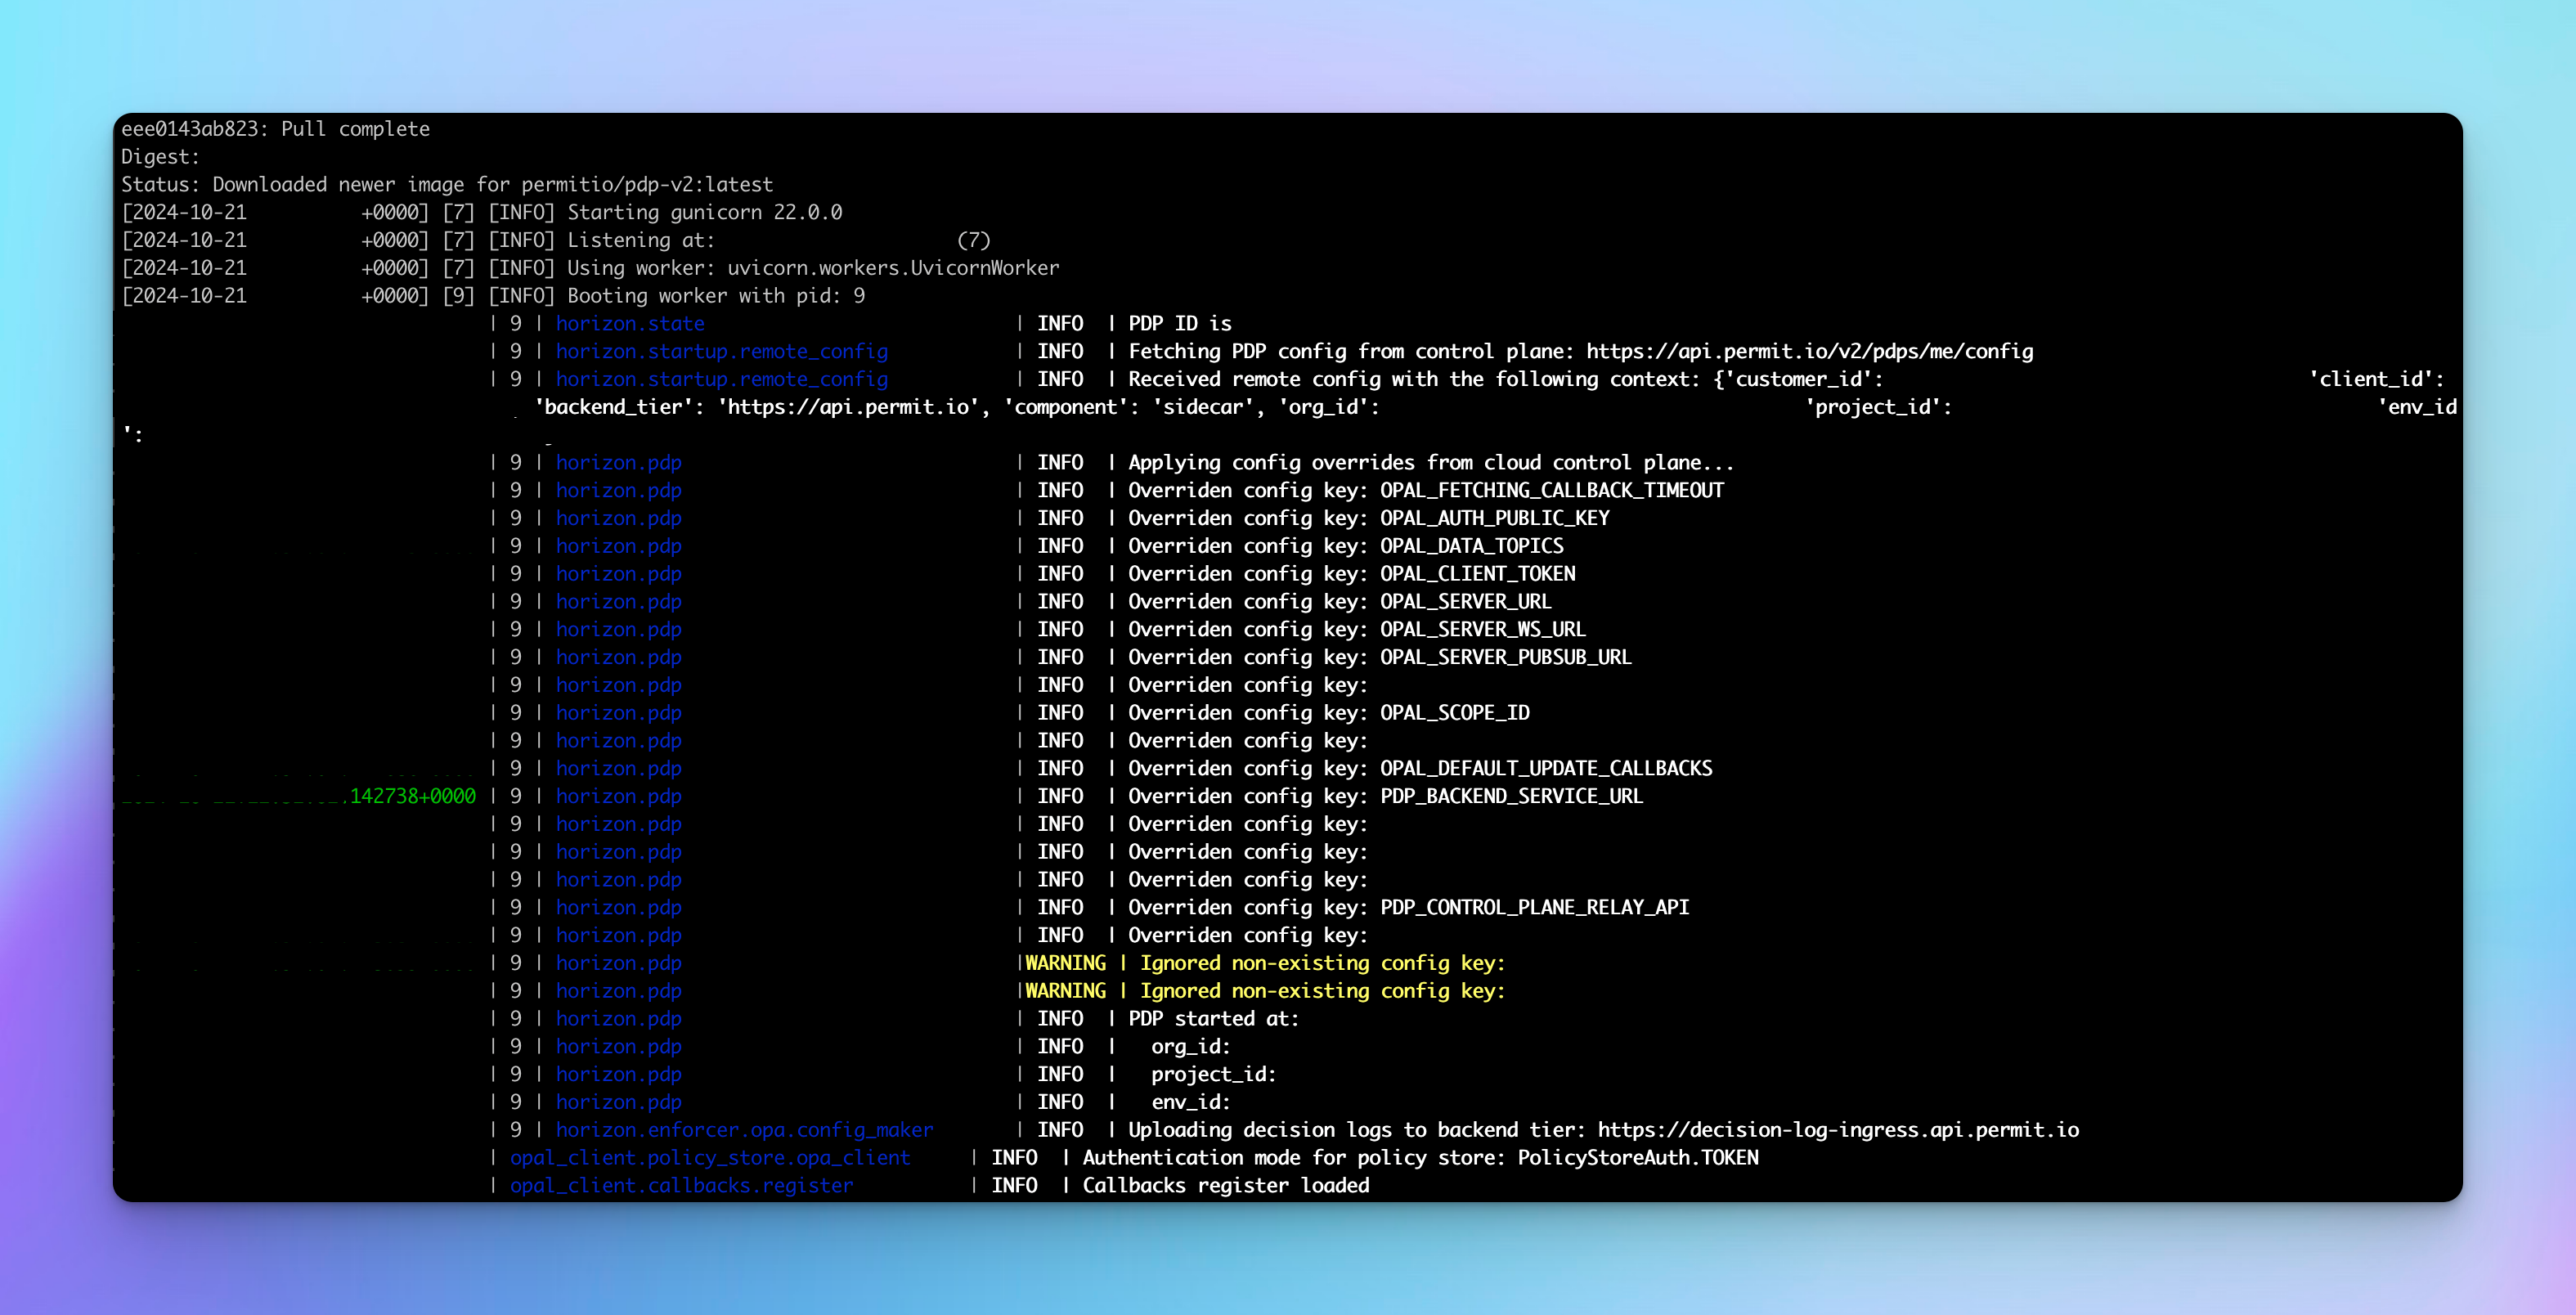
使用以下命令从Docker Hub拉取Permit.io PDP容器。
docker pull permitio/pdp-v2:latest
然后运行该容器。
docker run -it -p 7766:7000 --env PDP_DEBUG=True --env PDP_API_KEY=<YOUR_API_KEY> permitio/pdp-v2:latest
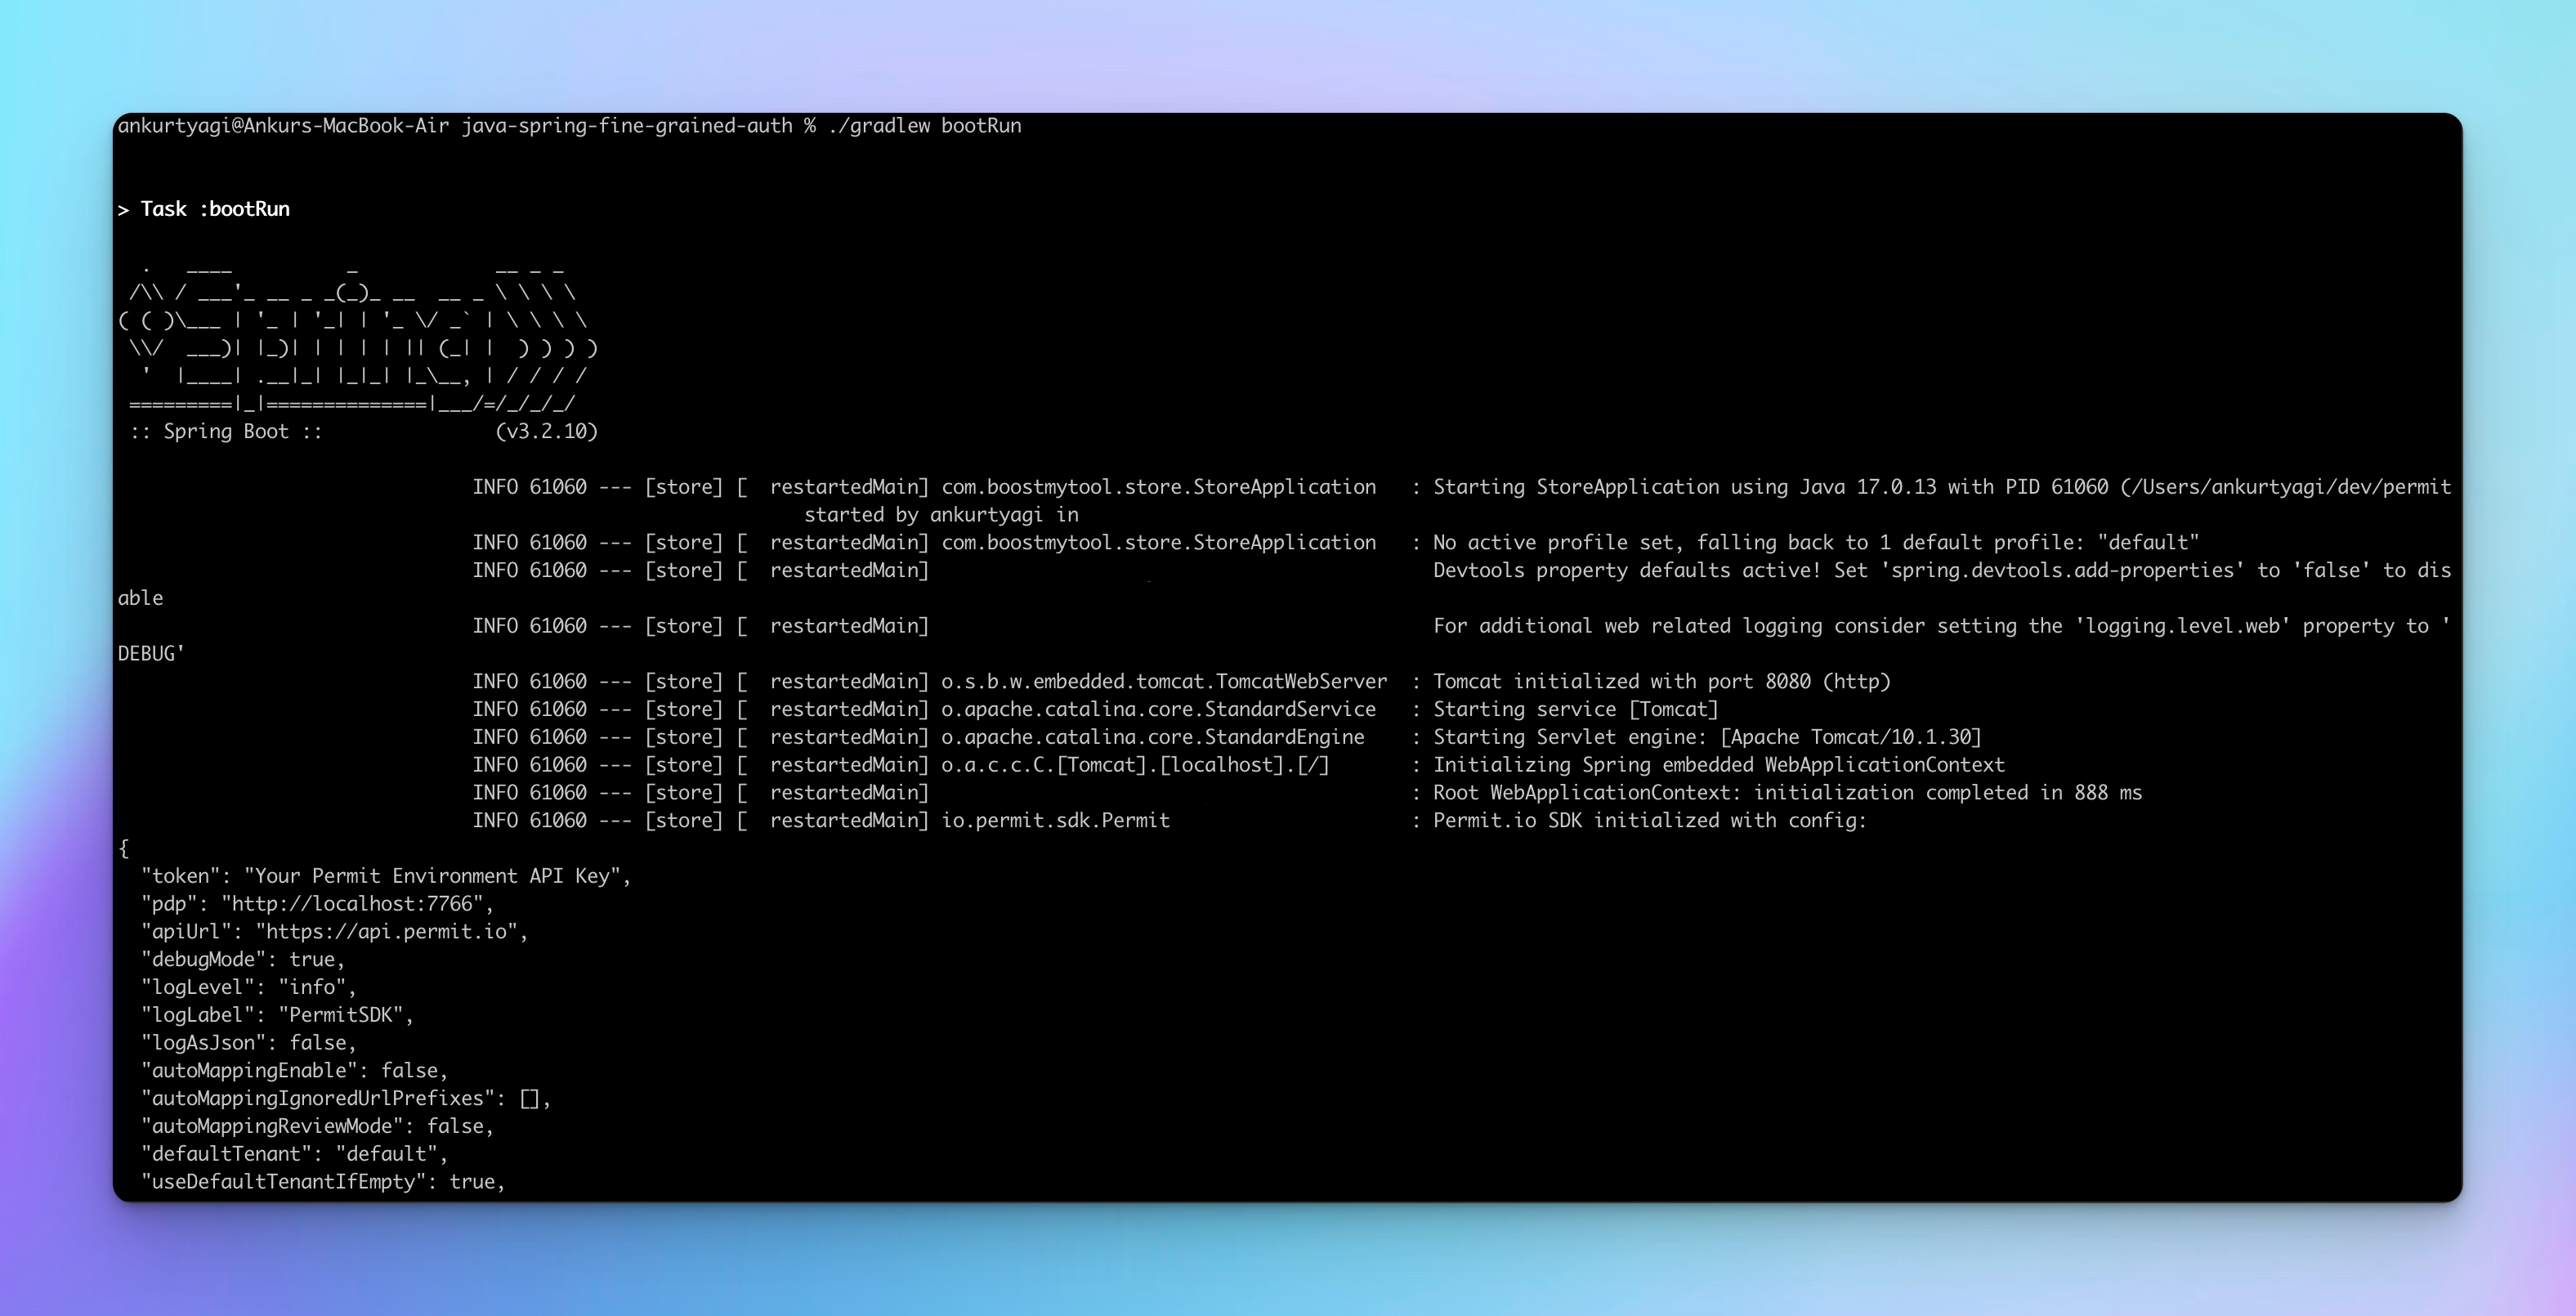
第4步:运行应用程序
您可以使用以下Gradle命令运行应用程序:
./gradlew bootRun
查看和创建产品
现在让我们使用REQBIN与应用程序端点进行交互。
首先,使用/api/users/signup端点创建新用户。
curl -X POST "http://localhost:8080/api/users/signup" -H "Content-Type: application/json" -d 'johndoe'
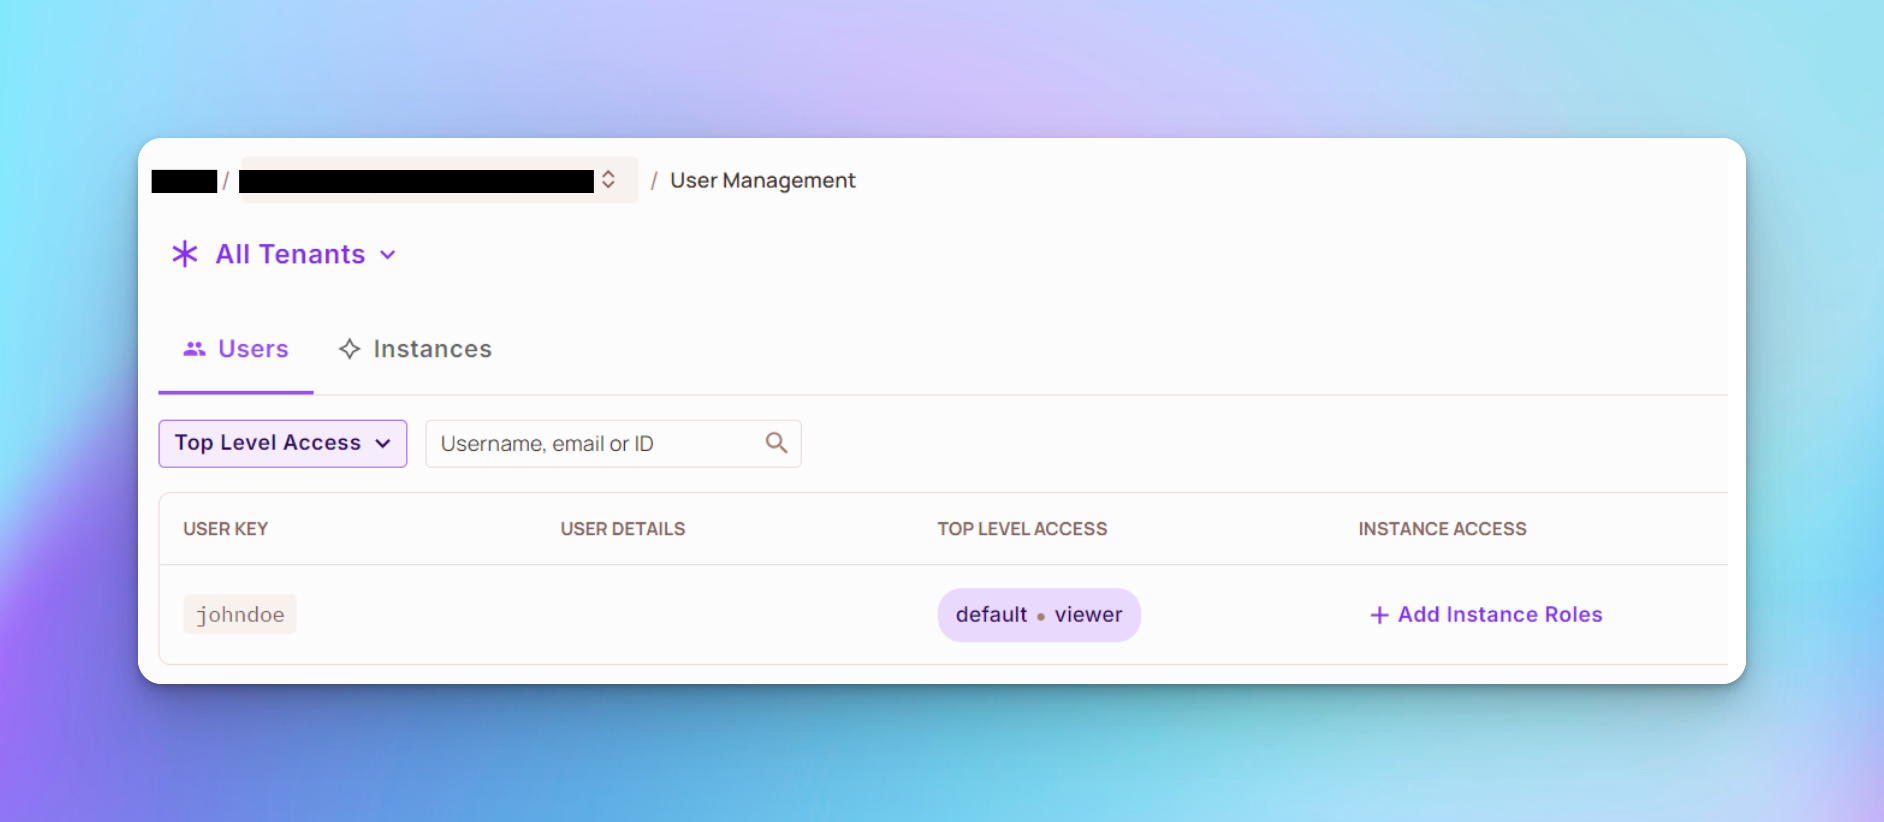
您应该能够在您的Permit项目中,在“Directory > All Tenants”下查看该用户。
最初,用户没有角色,因此无法做很多事情。例如,尝试列出产品将导致403禁止响应,如下所示。403错误代码意味着用户没有权限访问请求的资源,即本例中的产品。您可以在这里了解401和403错误代码之间的区别。

要使用户查看产品列表,请使用以下命令为他们分配查看器角色:
curl -X POST "http://localhost:8080/api/users/assign-role" \
-H "Authorization: Bearer johndoe" \
-H "Content-Type: application/json" \
-d 'viewer'
您应该看到用户johndoe被分配了查看器角色,如下所示:
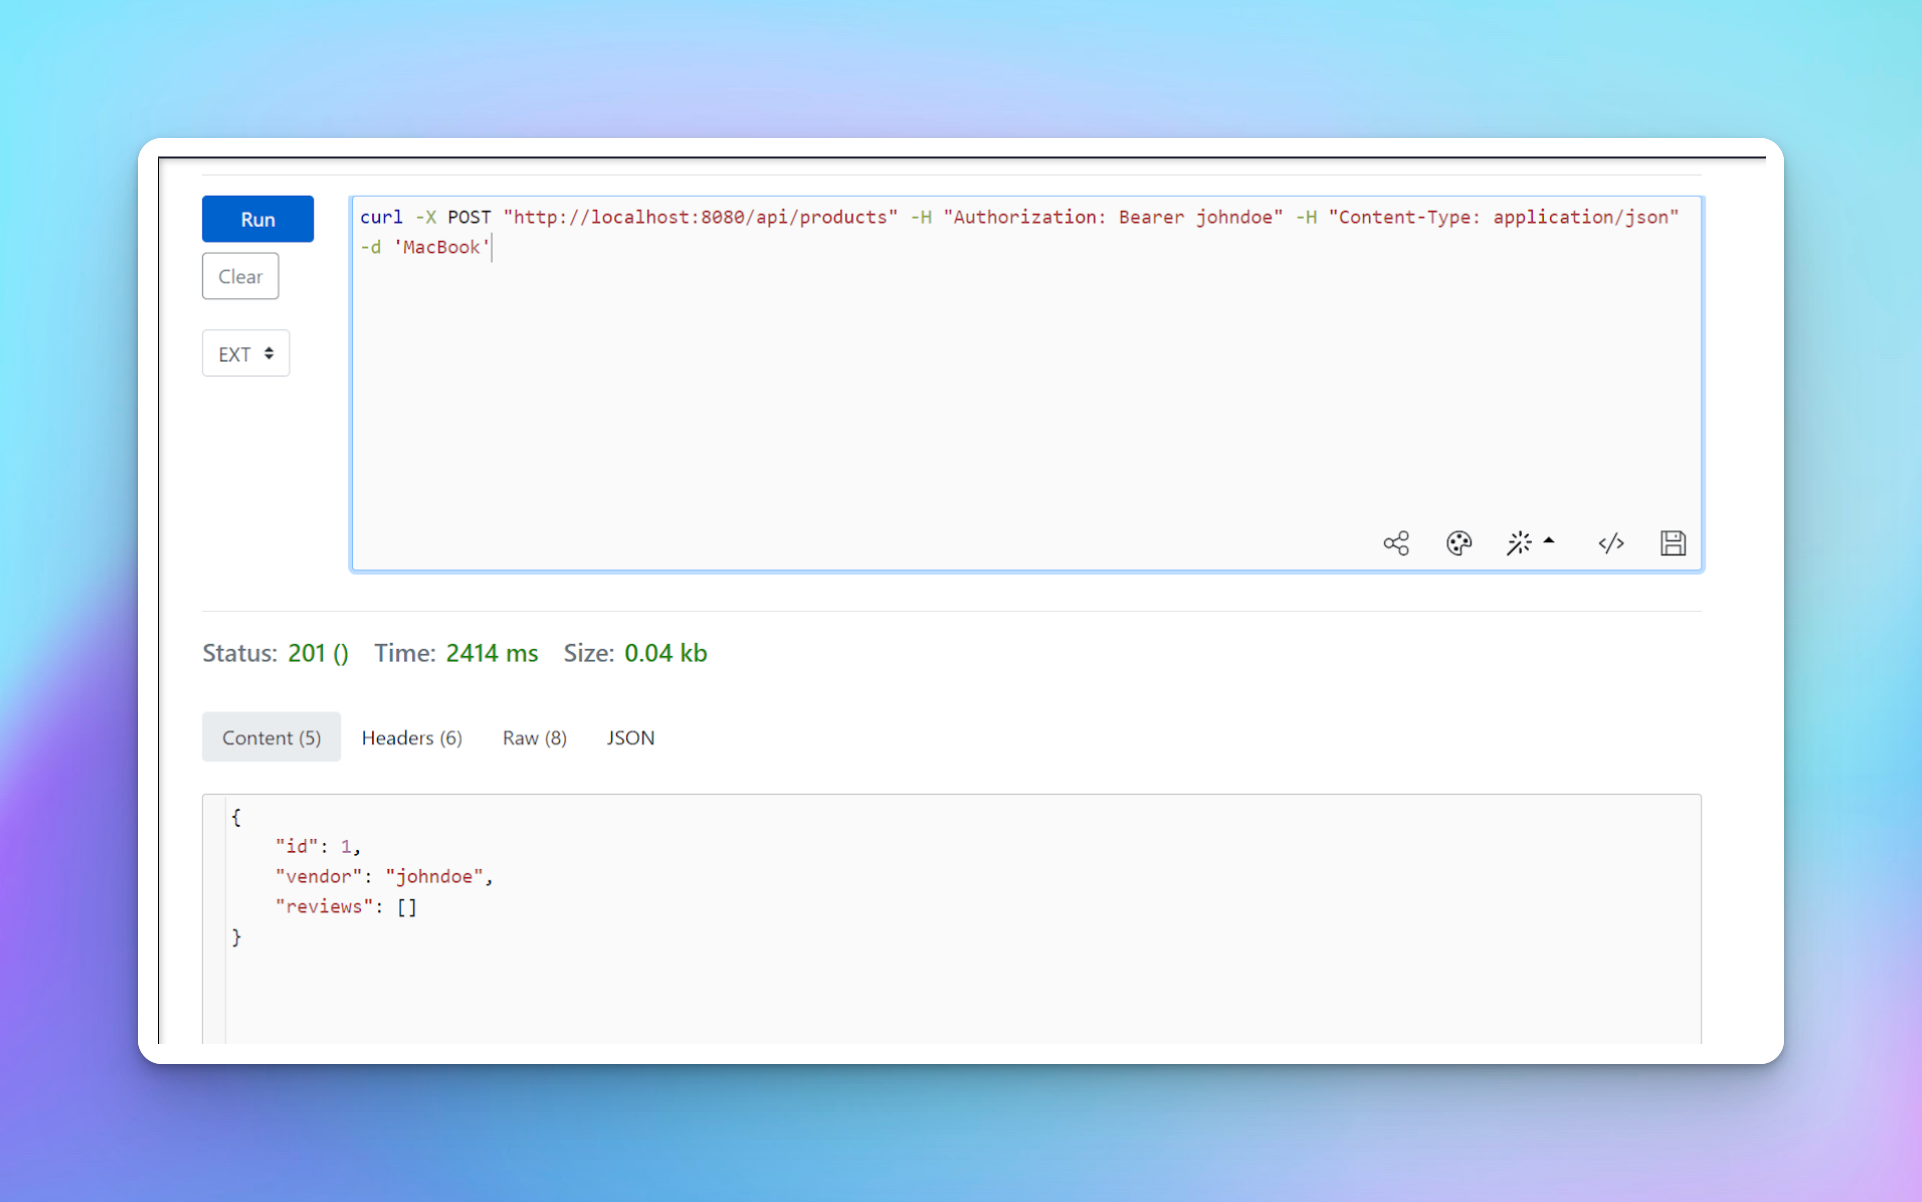
由于查看器可以创建产品,请使用以下命令使用用户johndoe创建一个产品。
curl -X POST "http://localhost:8080/api/products" -H "Authorization: Bearer johndoe" -H "Content-Type: application/json" -d 'MacBook'
您应该看到已创建一个新产品,ID为1,并且用户johndoe已被添加为供应商。
为产品添加评论
要为产品添加评论,请创建另一个名为jane的用户。
curl -X POST "http://localhost:8080/api/users/signup" -H "Content-Type: application/json" -d 'jane'
为了使用户可以向产品添加评论,请使用以下命令为他们分配查看器角色:
curl -X POST "http://localhost:8080/api/users/assign-role" \
-H "Authorization: Bearer jane" \
-H "Content-Type: application/json" \
-d 'viewer'
然后,您可以使用以下命令向由johndoe添加的产品添加评论:
curl -X POST "http://localhost:8080/api/products/1/review" -H "Authorization: Bearer jane" -H "Content-Type: application/json" -d 'The product was in good quality'
恭喜您!您已完成本教程的项目。
下一步
现在您已经学会了如何使用Permit.io在您的Java和Spring Boot应用程序中实现细粒度的授权,您可能想要进一步探索。
以下是一些有价值的资源:
在结束之前
我希望您觉得这个教程很有启发性。
以下是我最近写的其他一些博客文章,您可能会喜欢:
想了解更多关于神奇开发工具的教程,一定要查看我的博客DTA。
关注我 on Twitter 以获取我其他项目的实时更新。
编码愉快。
Source:
https://www.freecodecamp.org/news/fine-grained-authorization-in-java-and-springboot/