


自动化重复性任务可以改变您的日常工作方式,特别是当您需要处理多项职责时。进入AutoHotkey(AHK),这是一个多功能工具,旨在通过自动化简化您的工作流程。
本全面指南将向您介绍使用AutoHotkey创建和执行脚本的基础知识。您还将深入了解诸如热键和变量之类的高级概念,使您能够编写符合您需求的自定义AHK脚本。
您准备好通过AutoHotkey改变您的工作日了吗?让我们开始解锁自动化的力量吧!
开始使用AutoHotkey
在我们深入脚本编写之前,让我们确保您拥有本实践教程所需的一切:
- A computer running Windows 10.
- 已安装并准备就绪的AutoHotkey。
了解AutoHotkey:简要概述
AutoHotkey不仅仅是一个脚本工具;它是一个免费的、功能强大的Windows脚本语言,让您能够自动执行各种任务。从重新映射键盘按键到创建复杂的宏,AutoHotkey都能实现。
自2003年由Chris Mallett创建以来,AutoHotkey已经发生了很大变化,得到了一个活跃的社区的支持,并为初学者提供了许多资源。AutoHotkey的多功能性使其受到各种用户的欢迎,包括:
- 创建自定义宏以增强游戏体验的玩家。
- 开发人员自动化常规任务或制作快捷方式。
- 系统管理员简化其工作流程。
AutoHotkey还提供了便携性的便利。您可以将您的脚本与AutoHotkey可执行文件结合起来,创建一个独立的应用程序。这种便携式方法非常方便,可以在多台计算机上使用,而无需单独安装。
携带AutoHotkey在闪存驱动器上,并随时随地使用您的自定义脚本。
AutoHotkey值得信赖吗?
在安全性方面,AutoHotkey是一种可靠的工具。但是,一些防病毒程序将AHK脚本误识为潜在有害物可能并不少见。这通常是由于自动化脚本的性质及其功能。
如果您的防病毒软件标记AutoHotkey脚本,请将您的脚本添加到白名单中以防止此问题。此外,向您的防病毒供应商报告任何误报有助于改进他们的检测算法。
创建您的第一个AutoHotkey脚本
现在您已经熟悉了AutoHotkey,让我们创建您的第一个脚本。我们将从一个简单的“Hello World”脚本开始,这是了解AutoHotkey脚本语言的完美起点。
1. 首先,在您的桌面上创建一个项目文件夹。在本指南中,文件夹的名称为/ATA。
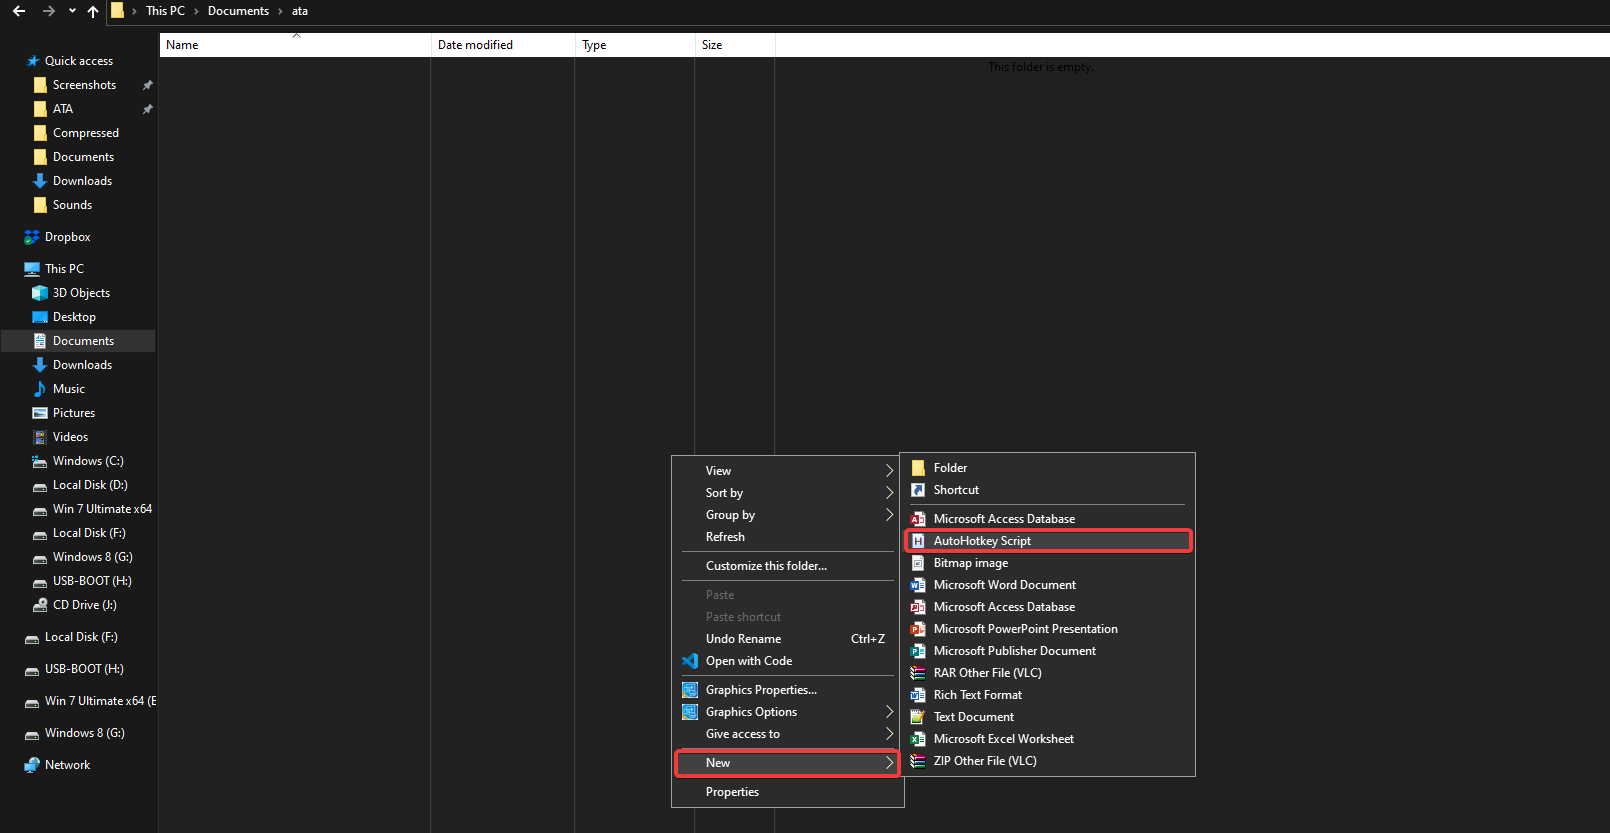
2. 在文件资源管理器中导航到该文件夹。右键单击空白区域,选择新建 -> AutoHotkey脚本,并命名您的脚本,例如HelloWorld.ahk。
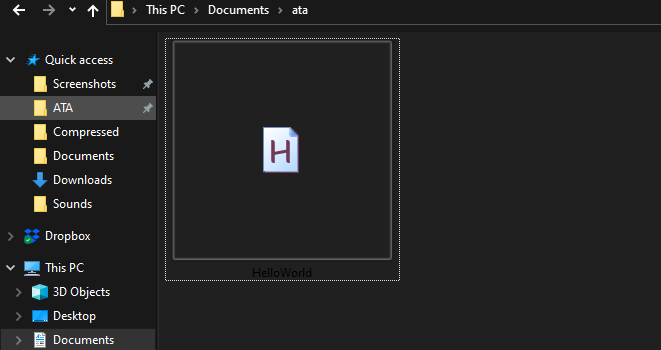
您新创建的AutoHotkey脚本,HelloWorld.ahk,现在应该出现在您的文件夹中,准备好进行脚本编写了!
3. 打开您选择的文本编辑器中的HelloWorld.ahk文件。最初,它是一张空白的纸,可以开始使用AutoHotkey进行脚本编写。
随着您在本教程中的进展,继续在同一个脚本(HelloWorld.ahk)上进行工作,而不要删除其基本结构。

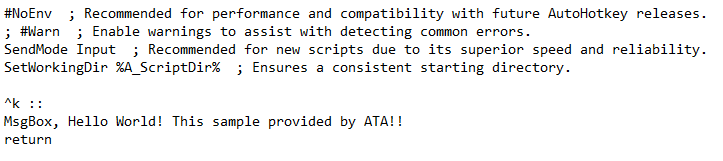
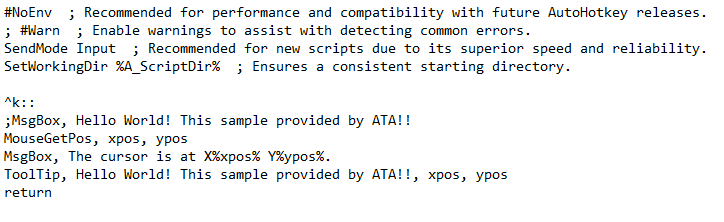
4. 在HelloWorld.ahk文件的底部添加以下AutoHotkey代码。此脚本将简单的消息框绑定到Ctrl+K热键组合。添加完成后,保存并关闭文件。
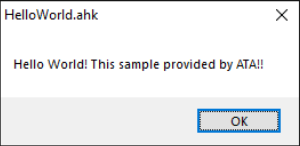
此代码在您按下键盘上的Ctrl+K(^k::)时创建一个显示“Hello World!This sample provided by ATA!!”的消息框。
选择一个不会与现有快捷键冲突的按键组合。例如,Alt+Tab通常被Windows用于在应用程序之间切换,因此不建议使用。
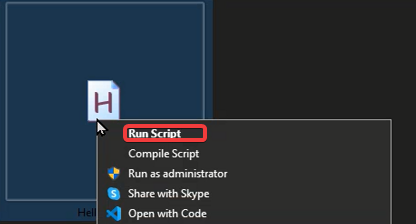
5. 在HelloWorld.ahk文件上右键单击,并从上下文菜单中选择运行脚本以执行您的AutoHotkey脚本。
确保将AHK脚本的默认应用程序(如记事本)用于编辑而不是执行脚本,否则上下文菜单中将不会出现“运行脚本”选项。
一旦脚本开始运行,您会注意到系统托盘中出现了AutoHotkey图标(一个绿色的正方形,上面有字母’H’)。这表示您的脚本正在运行并且正常工作。

6. 通过按下Ctrl+K热键来测试您的脚本功能。应该会弹出一个包含您自定义消息的消息框。
7. 现在,让我们修改HelloWorld.ahk脚本。用以下代码替换先前的代码,该代码捕获鼠标光标的位置并在消息框中显示。此外,它还在光标附近显示具有自定义文本的ToolTip。
添加完这个新脚本后保存并关闭文件。
在AutoHotkey中,ToolTip是一个多功能的功能,可以在鼠标光标附近显示简短的消息,增强基于GUI的脚本中的用户交互。
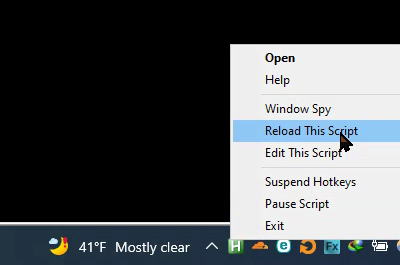
8. 要应用更改,请右键单击系统托盘中的AutoHotkey图标,然后选择Reload This Script。此步骤对确保更新后的脚本生效至关重要。
始终记得在更改后重新加载您的脚本,以确保您使用的是最新版本。
9. 现在,通过按下Ctrl+K热键来激活您的脚本。您应该会看到ToolTip显示光标旁边的消息,并且消息框显示光标的位置。

AutoHotkey脚本中注释的有效使用
创建您的第一个AutoHotkey脚本是令人兴奋的,但使您的代码清晰易懂是至关重要的。AutoHotkey脚本中的注释对于添加上下文和解释至关重要,使您的脚本更易阅读和维护。
评论被脚本解释器忽略,但对协作和将来的参考非常宝贵。在AutoHotkey中,评论以分号(;)开头,并延伸到行尾。它们可以放置在命令和函数上方或内联。
在将评论内联到命令时,请记得在分号前加一个空格。这样可以防止AutoHotkey解释器错误地将您的评论视为命令的一部分,从而避免错误。
为了在AutoHotkey脚本中练习添加描述性评论:
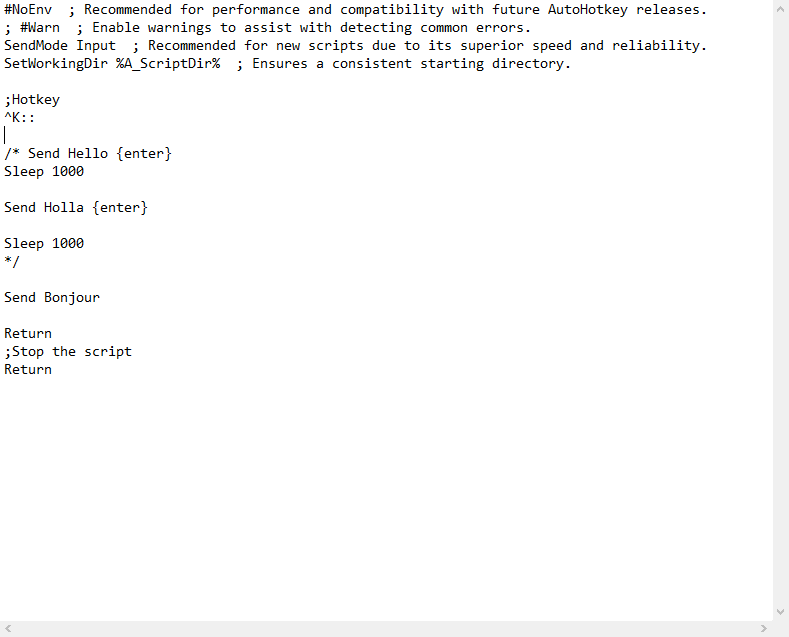
1. 再次编辑您的HelloWorld.ahk文件。将现有代码替换为包含注释行的下面脚本,保存更改并关闭文件。
2. 要实施脚本更新,请重新加载HelloWorld.ahk脚本。
3. 通过按下Ctrl+K来执行更新后的脚本。脚本现在将顺序打印“Holla”和“Bonjour”,并带有一秒的延迟,演示了您的评论的效果。

在AutoHotkey脚本中临时禁用代码
在使用AutoHotkey进行脚本编写时,有时您需要临时禁用代码的某些部分。这可以用于测试脚本的特定部分,而无需运行整个脚本。
与在每一行添加分号不同,AutoHotkey提供了一种更有效的方法。/**/注释样式允许您轻松地禁用整个代码块。这种样式会注释掉/*和*/之间的所有内容,使其被解释器忽略。
1. 打开HelloWorld.ahk文件,并使用/**/注释来禁用特定的代码块。在进行这些更改后保存文件。
2. 重新加载HelloWorld.ahk脚本以使更改生效。
3. 通过按下Ctrl+K键来测试脚本。脚本将仅执行“Bonjour”命令,确认被禁用的代码块被忽略。
掌握AutoHotkey脚本中的Sleep命令
2. 在更新您的脚本后,请确保重新加载HelloWorld.ahk文件以应用新的更改。
3. 通过按下Ctrl+K键来测试您的脚本。脚本将按顺序输入“Holla”和“Bonjour”,它们之间带有延迟,演示了AutoHotkey命令和注释的实际用途。
在AutoHotkey脚本中利用Sleep命令
AutoHotkey脚本中的Sleep命令是控制脚本时间和执行的基本工具。它允许您引入以毫秒为单位测量的延迟,使您的脚本能够在继续之前等待某些操作或进程完成。
以下是有效实现Sleep命令的方法:
Sleep命令的时间值范围从1到2147483647毫秒,为脚本暂停提供了广泛的范围。
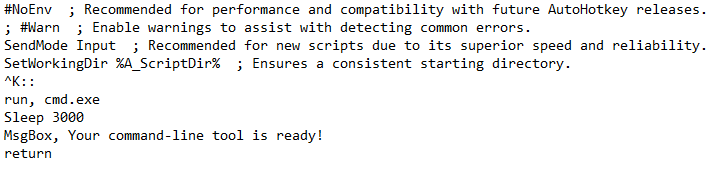
1. 在文本编辑器中打开您的HelloWorld.ahk脚本。将您以前的代码替换为以下内容,然后保存并关闭文件。更新后的脚本演示了如何使用Sleep命令来延迟脚本操作。
这个示例展示了如何使用 Ctrl+K 打开命令提示符,并在三秒延迟后显示一条消息,展示了实际场景中 Sleep 命令的实际用法。
2. 保存更改后,重新加载脚本以查看新功能的效果。
3. 通过按下 Ctrl+K 来测试脚本。命令提示符将会打开,随后延迟三秒钟,然后消息框将出现,确认了 Sleep 命令的成功实现。

使用 AutoHotkey 的 Random 命令生成随机数
AutoHotkey 中的 Random 命令非常适合需要在特定范围内生成随机数的情况。无论是用于游戏、决策还是其他任何应用,这个命令都为你的脚本增添了一层不可预测性和乐趣。
这里有一个实际的例子:
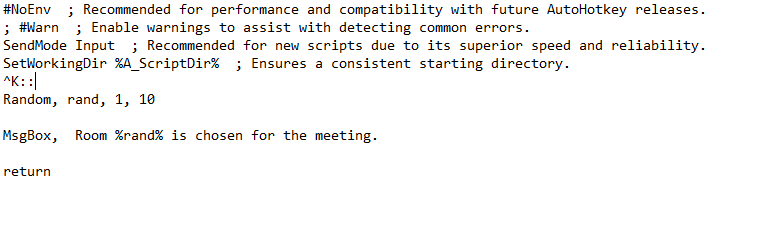
假设你有十个会议室,想要随机选择一个进行会议。 Random 命令可以轻松地为你做出选择。
Random 命令的语法简单灵活:
要看 Random 命令的实际效果:
1. 打开 HelloWorld.ahk 文件,并用下面的脚本替换现有代码。该脚本将在按下 Ctrl+K 时随机选择一个介于 1 和 10 之间的数字(代表你的会议室),并在显示出来后保存并关闭文件。
2. 保存脚本后,请记得重新加载 HelloWorld.ahk 文件以应用这些更改。
3. 按下Ctrl+K执行您更新的AutoHotkey脚本。将会弹出一个消息框,显示随机选择的房间号,以验证Random命令的功能。

在AutoHotkey中使用PixelSearch命令
AutoHotkey中的PixelSearch命令是搜索屏幕上特定像素或颜色的强大工具。它在自动化游戏操作、查找应用程序中的特定元素或任何需要像素检测的场景中都非常有用。
让我们深入了解如何有效使用PixelSearch命令:
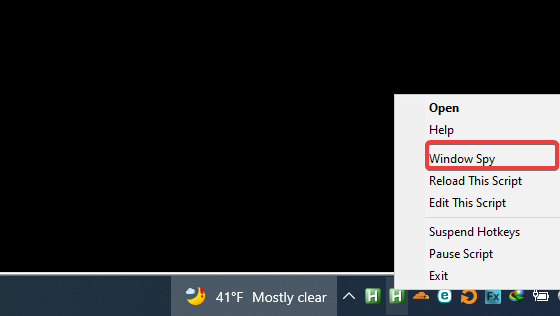
在使用PixelSearch之前,重要的是要识别您要定位的特定像素或颜色。诸如Window Spy之类的工具可以帮助您找到屏幕像素的RGB值。
1. 通过右键单击AutoHotkey图标并从上下文菜单中选择打开Window Spy来启动它。用它来识别目标像素的RGB值。
2. 将鼠标光标移动到目标像素上。Window Spy将显示RGB值,您将在AutoHotkey脚本中使用这些值。
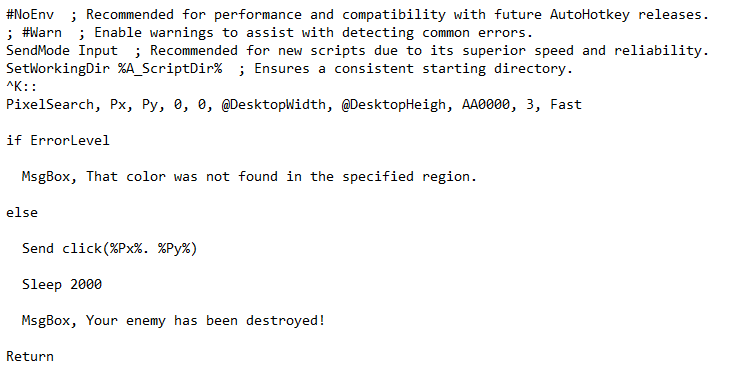
4. 重新加载HelloWorld.ahk脚本以激活新功能。
5. 按下Ctrl+K执行脚本。如果找到指定的像素,鼠标光标将移动到该位置,并显示一条消息。
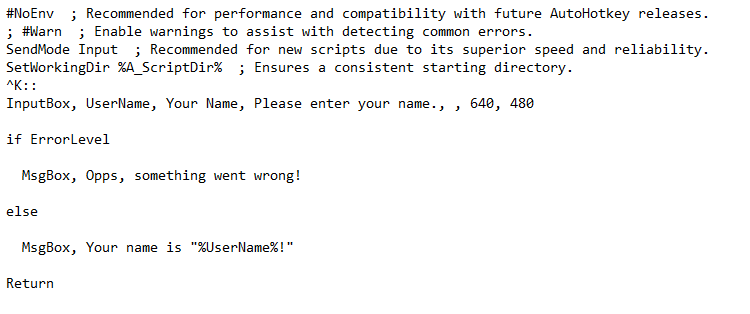
使用AutoHotkey的InputBox命令创建交互式脚本
AutoHotkey的InputBox命令为脚本引入了一种新的交互级别,允许您提示并使用用户输入。这个命令对于创建需要来自用户的信息的脚本至关重要,增强了您的AutoHotkey脚本的灵活性和实用性。
InputBox命令非常灵活,可用于从简单数据输入到更复杂用户交互的各种应用场景。
以下是您如何使用InputBox命令:
创建一个通过输入对话框与用户交互的脚本:
1. 将您的HelloWorld.ahk文件中的代码替换为下面的脚本,该脚本使用InputBox命令。在进行这些更改后保存并关闭文件。此脚本演示了如何捕获用户输入并在您的AutoHotkey脚本中使用它。
2. 重新加载HelloWorld.ahk脚本以应用新更改。
3. 按下Ctrl+K启动脚本。一个输入对话框将提示您输入您的姓名。输入您的姓名并单击确定后,将显示一个消息框确认输入,如下所示。

使用AutoHotkey的Send命令自动化按键输入
AutoHotkey中的Send命令是自动化按键输入的强大功能。无论您是填写表单、输入重复文本还是自动化其他基于按键的任务,Send命令都使这些任务变得轻松。
以下是如何利用Send命令:
此命令可以模拟各种按键,包括特殊按键如Windows键或Alt键。
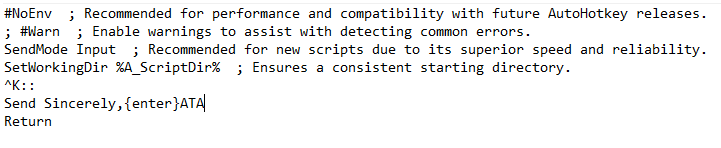
1. 使用下面的脚本更新您的HelloWorld.ahk文件。执行此脚本将发送特定的按键。更新脚本后保存文件。
该脚本发送文本“Sincerely”,然后是一个ENTER按键,接着是“ATA”文本。
2. 重新加载HelloWorld.ahk脚本以确保最新更改已生效。
3. 打开文本编辑器,按下Ctrl+K以查看Send命令的效果。脚本将输入“Sincerely”,按下ENTER,然后输入“ATA”文本。
使用AutoHotkey自动化鼠标点击和按键
AutoHotkey简化了重复任务的自动化,如按键和鼠标点击,提高了生产力和效率。
例如,如果您需要通过编程的按键序列在随机屏幕位置点击以保持应用程序活动,AutoHotkey可以自动化此过程。
1. 编辑HelloWorld脚本,用以下行替换代码,保存更改并关闭文件。此代码自动在随机屏幕位置进行左键点击。
2. 重新加载脚本以应用更改。
3. 按下Ctrl+K激活脚本。它将在您的应用程序上执行随机左键点击,如下所示。按下Shift+Ctrl+K暂停脚本。
提高交互性的AutoHotkey GUI开发
AutoHotkey的GUI功能允许创建用户友好界面,使脚本更具交互性和视觉吸引力。
以下是如何创建AutoHotkey GUI:
1. 使用Add子命令将不同控件(如文本标签、编辑字段和按钮)整合到GUI中。这样可以丰富用户体验和脚本功能。
Text– 为了清晰起见添加标签。Edit– 创建用户数据输入字段。Button– 插入按钮,点击时触发脚本操作。
2. 将HelloWorld.ahk文件替换为以下脚本,以演示带有文本、输入字段和按钮的基本GUI。在进行这些更改后保存并关闭文件。
3. 重新加载HelloWorld.ahk脚本。将会出现GUI窗口,允许您输入姓名,并在点击“提交”按钮后看到问候消息。
通过AutoHotkey提升工作流程:自动化鼠标点击和按键
AutoHotkey提供了一种无缝自动化按键和鼠标点击的方式,使您的日常任务更加高效。
想象一下需要通过定期鼠标点击保持应用程序处于活动状态。使用AutoHotkey,您可以轻松自动化此任务。
1. 使用以下代码更新您的HelloWorld.ahk脚本。此脚本模拟在随机屏幕位置进行鼠标点击,无需手动干预即可保持应用程序处于活动状态。更新后保存并关闭文件。
2. 通过重新加载 HelloWorld.ahk 脚本来应用更改。
3. 按下 Ctrl+K 开始自动点击过程。观察脚本每两秒在随机位置执行点击操作。使用 Shift+Ctrl+K 暂停脚本。
构建交互式 AutoHotkey GUI
AutoHotkey 的 GUI 功能允许创建交互式、用户友好的界面,提升用户体验并扩展脚本功能。
让我们探索创建一个基本的 AutoHotkey GUI:
1. 使用下面的代码编辑你的 HelloWorld.ahk 脚本以创建一个 GUI 窗口。该 GUI 将包括两个输入字段,用于用户的名字和姓氏,以及一个提交数据的按钮。保存更改并关闭文件。
2. 重新加载 HelloWorld.ahk 脚本以查看新的 GUI 功能。
3. 按下 Ctrl+K 打开 GUI。输入你的名字和姓氏,然后点击确定。一个消息框将显示输入的名字,展示 GUI 的功能。

结论
AutoHotkey 是一个多功能工具,通过自动化任务和增强用户界面来提高生产力。通过本指南,你已经学会创建自定义快捷键、自动化操作脚本和交互式 GUI。
有了这些基础,你就有了开始探索更复杂的 AutoHotkey 脚本的基础。尝试不同的功能,比如将用户输入保存到文件中或调整 GUI 尺寸,以满足你的需求。
拥抱 AutoHotkey 的力量,将您的日常计算任务转变为简单的自动化流程!