


Angularは、オープンソースで人気のある、高度に拡張可能なフロントエンドアプリケーション開発フレームワークであり、TypeScript/JavaScriptや他の一般的な言語を使用してモバイルおよびWebアプリケーションを構築するために使用されます。
Angularは、AngularJS(またはAngularバージョン1.0)の後に来るすべてのAngularバージョンを含む総称です。その中には、Angular 2やAngular 4も含まれます。
Angularは、小規模から大規模なアプリケーションをゼロから構築するのに適しています。アプリケーション開発を支援するAngularプラットフォームの主要なコンポーネントの1つは、Angular CLIユーティリティです。これは、Angularアプリケーションの作成、管理、ビルド、およびテストに使用されるシンプルで使いやすいコマンドラインツールです。
本記事では、AngularコマンドラインツールをLinuxシステムにインストールし、このツールの基本的な例を学ぶ方法について説明します。
LinuxにNode.jsをインストール
Angular CLIをインストールするには、Linuxシステムに最新バージョンのNode.jsとNPMがインストールされている必要があります。
UbuntuにNode.jsをインストール
------------- For Node.js v19.x -------------
$ curl -fsSL https://deb.nodesource.com/setup_19.x | sudo -E bash - &&\
$ sudo apt-get install -y nodejs

------------- For Node.js v18.x -------------
$ curl -fsSL https://deb.nodesource.com/setup_18.x | sudo -E bash - &&\
$ sudo apt-get install -y nodejs

------------- For Node.js v16.x -------------
$ curl -fsSL https://deb.nodesource.com/setup_16.x | sudo -E bash - &&\
$ sudo apt-get install -y nodejs

------------- For Node.js v14.x -------------
$ curl -fsSL https://deb.nodesource.com/setup_14.x | sudo -E bash - &&\
$ sudo apt-get install -y nodejs
DebianにNode.jsをインストール
------------- For Node.js v19.x -------------
$ curl -fsSL https://deb.nodesource.com/setup_19.x | bash - &&\
$ sudo apt-get install -y nodejs

------------- For Node.js v18.x -------------
$ curl -fsSL https://deb.nodesource.com/setup_18.x | bash - &&\
$ sudo apt-get install -y nodejs

------------- For Node.js v16.x -------------
$ curl -fsSL https://deb.nodesource.com/setup_16.x | bash - &&\
$ sudo apt-get install -y nodejs

------------- For Node.js v14.x -------------
$ curl -fsSL https://deb.nodesource.com/setup_14.x | bash - &&\
$ sudo apt-get install -y nodejs
RHEL、CentOS、Fedora、Rocky、およびAlma LinuxにNode.jsをインストールします。
------------- For Node.js v19.x -------------
$ curl -fsSL https://rpm.nodesource.com/setup_19.x | sudo bash -
$ sudo yum install -y nodejs

------------- For Node.js v18.x -------------
$ curl -fsSL https://rpm.nodesource.com/setup_18.x | sudo bash -
$ sudo yum install -y nodejs

------------- For Node.js v16.x -------------
$ curl -fsSL https://rpm.nodesource.com/setup_16.x | sudo bash -
$ sudo yum install -y nodejs

------------- For Node.js v14.x -------------
$ curl -fsSL https://rpm.nodesource.com/setup_14.x | sudo bash -
$ sudo yum install -y nodejs
また、NPMからネイティブアドオンをコンパイルしてインストールするには、次のようにシステムに開発ツールをインストールする必要があります。
$ sudo apt install -y build-essential  [On Debian/Ubuntu]
$ sudo yum install gcc-c++ make        [On RHEL Systems]
LinuxでAngular CLIをインストールする
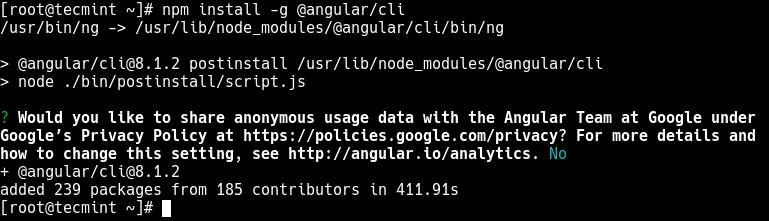
Node.jsとNPMを上記のようにインストールした後、次のようにAngular CLIをnpmパッケージマネージャーを使用してインストールできます(-gフラグは、ツールをシステム全体にインストールしてすべてのシステムユーザーが使用できるようにします)。
# npm install -g @angular/cli
OR
$ sudo npm install -g @angular/cli
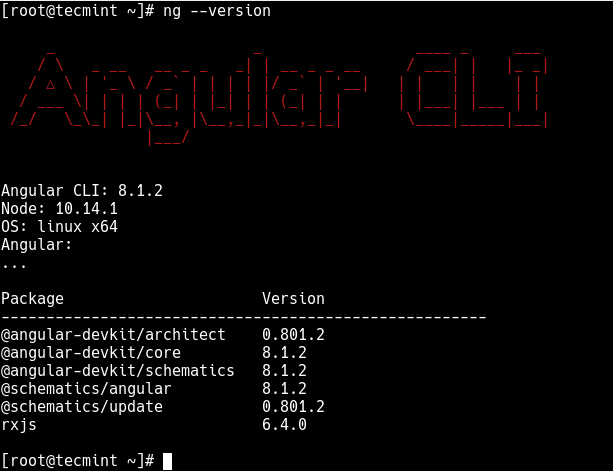
今やシステムにインストールされているはずのng実行可能ファイルを使用してAngular CLIを起動できます。次のコマンドを実行して、インストールされているAngular CLIのバージョンを確認します。
# ng version
OR
# ng --version
Angular CLIを使用してAngularプロジェクトを作成する
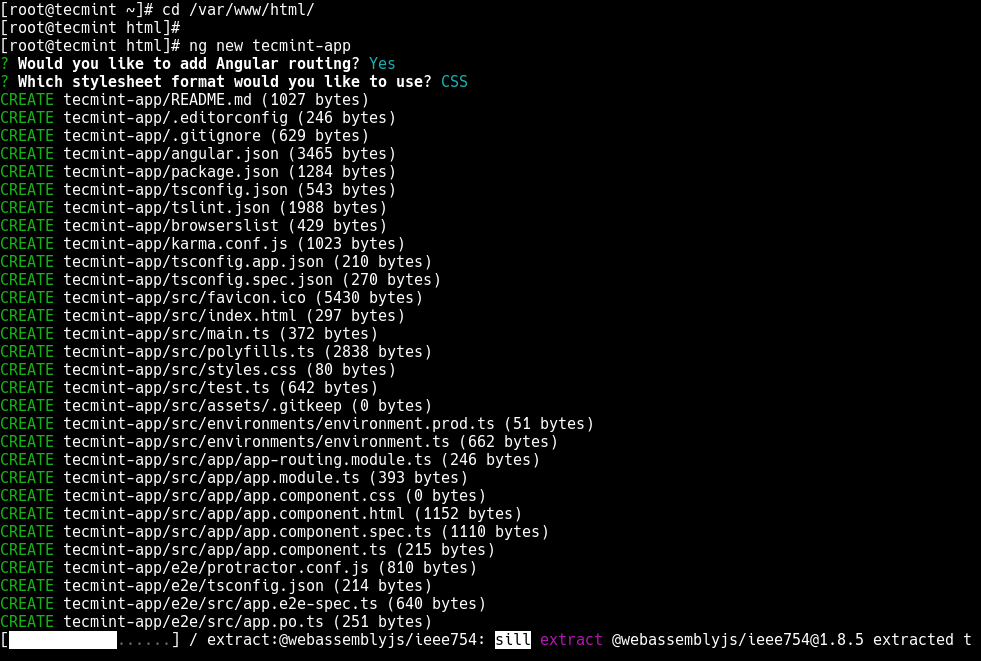
このセクションでは、新しい基本的なAngularプロジェクトを作成し、ビルドし、サーブする方法を示します。まず、サーバーのwebrootディレクトリに移動し、次のように新しいAngularアプリケーションを初期化します(プロンプトに従ってください)。
# cd /var/www/html/
# ng new tecmint-app			#as root
OR
$ sudo ng new tecmint-app		#non-root user
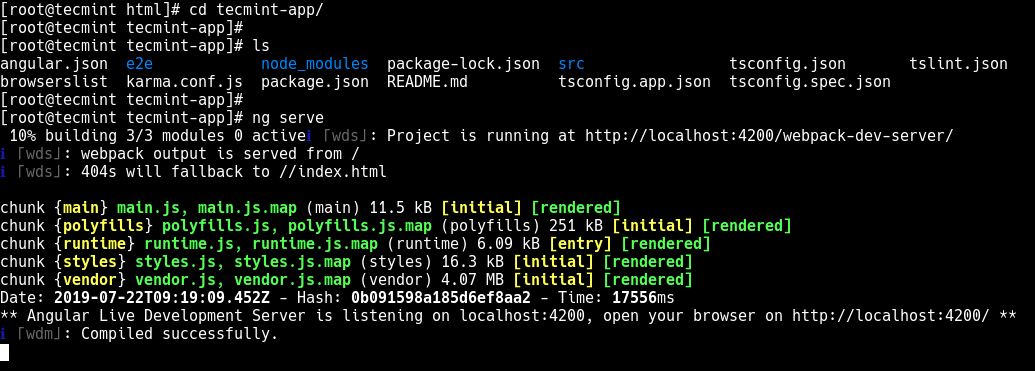
次に、作成されたばかりのアプリケーションディレクトリに移動し、次のようにアプリケーションをサーブします。
# cd tecmint-app
# ls 			#list project files
# ng serve
新しいアプリにウェブブラウザからアクセスできるようにする前に、ファイアウォールサービスが実行されている場合、ファイアウォール構成でポート4200を開く必要があります。
---------- On Firewalld ----------
# firewall-cmd --permanent --zone=public --add-port=4200/tcp
# firewall-cmd --reload

---------- On UFW ----------
$ sudo ufw allow 4200/tcp
$ sudo ufw reload
今、次のスクリーンショットに示すように、新しいアプリが実行されているのを見るために、Webブラウザを開いてください。
http://localhost:4200/
or
http://SERVER_IP:4200

注意: アプリケーションをビルドしてローカルに提供するためにng serveコマンドを使用する場合、上記のように、ソースファイルを変更するとサーバーが自動的にアプリを再構築し、Webページをリロードします。
ng toolに関する詳細情報については、次のコマンドを実行してください。
# ng help
Angular CLI ホームページ: https://angular.io/cli
この記事では、異なるLinuxディストリビューションにAngular CLIをインストールする方法を示しました。また、開発サーバーで基本的なAngularアプリケーションをビルド、コンパイル、および提供する方法も説明しました。何かご質問やご意見がありましたら、以下のフィードバックフォームをご利用ください。
Source:
https://www.tecmint.com/install-angular-cli-on-linux/