


הבטיחות של הנתונים היא עדיפות עליונה עבור כל ארגון, וההצפנה היא אחת מהדרכים היעילות ביותר להגן על הנתונים. אבל איך בדיוק? פלטפורמת Google Cloud (GCP) מספקת שירות לניהול מפתחות בשם שירות מנהל מפתחות של Google (KMS), המאפשר לך ליצור ולנהל מהר מפתחות להצפנה.
במדריך זה, תלמד כיצד ליצור ולהשתמש במפתח ב-KMS של GCP. תעבור גם דרך מספר מושגים חשובים הקשורים לניהול מפתחות, כמו מפתחות, טבעות מפתחות וגרסאות של מפתחות.
מוכן? המשך לקרוא ולהעלות את אבטחת הנתונים שלך לרמה הבאה!
דרישות מוקדמות
מדריך זה יהיה הדגמה פרקטית. כדי לעקוב, וודא שיש לך חשבון GCP עם חיוב פעיל, אך ניתן יהיה להשתמש גם בניסיון חינם.
A Google Cloud Project is a collection of resources you create and manage in GCP. Note that you should create separate projects for each of your applications. Doing so lets you efficiently manage the resources for each application. In the end, you can delete all the resources associated with a project, which is helpful for clean-up.
כדי ליצור פרויקט חדש ב-Google Cloud:
1. פתח את הדפדפן האינטרנט המועדף עליך והתחבר לקונסולת GCP. כמו בקונסולת AWS, קונסולת GCP היא ממשק מבוסס רשת לניהול המשאבים שלך ב-Google Cloud.
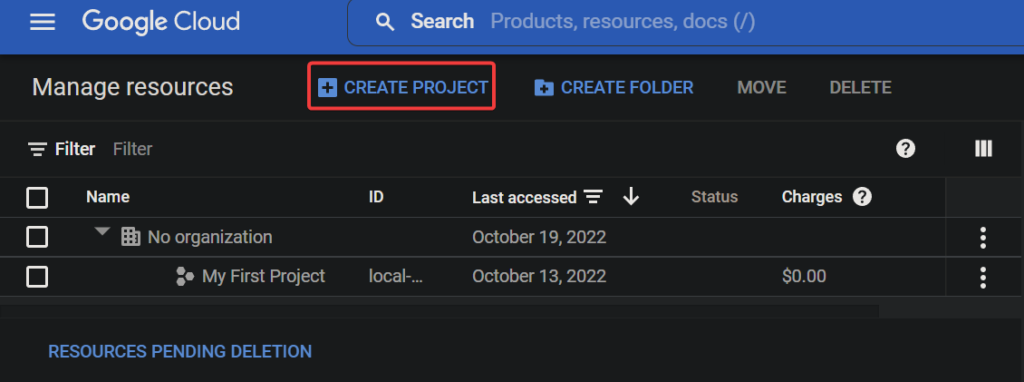
2. בקונסולת ה-GCP שלך, נווט לדף "ניהול משאבים", בו תוכל לראות ולנהל את כל הפרויקטים הקיימים שלך.
3. בסופו של דבר, לחץ על הכפתור "יצירת פרויקט" כדי ליצור פרויקט חדש.
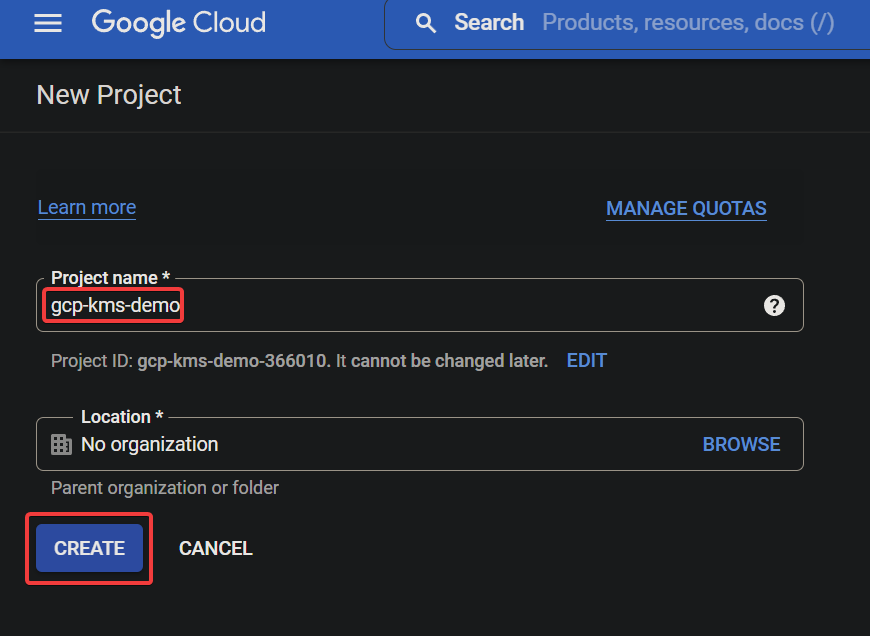
לבסוף, הגדר את ההגדרות הבאות עבור הפרויקט החדש שלך ולחץ על "צור" כדי ליצור את הפרויקט שלך.
- שם הפרויקט – הזן שם לפרויקט שלך, שאינו חייב להיות ייחודי וניתן לשנות אותו מאוחר יותר. בחומר הלימוד הזה, הבחירה לשם הפרויקט היא gcp-kms-demo.
- מיקום – בחר בארגון האם תרצה שהפרויקט יוצר בו. הפרויקט שתיצור יהיה הארך העליון. אפשר לדלג על שדה זה אם אין לך ארגון.
שדה המיקום עשוי לא להופיע אם תשתמש בחשבון ניסיון.
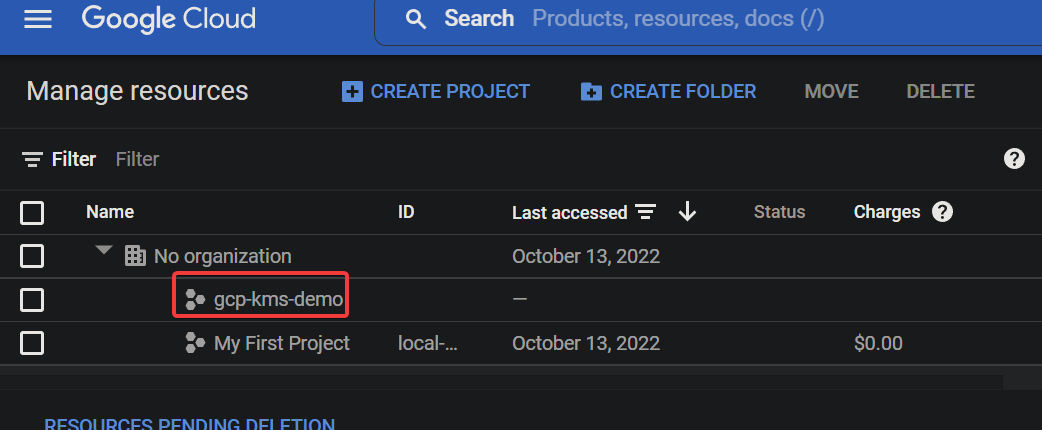
אם הצלחת, תראה את הפרויקט של Google Cloud שיצרת מופיע ברשימה, כפי שמוצג למטה.
הפעלת חיבור ה-Cloud KMS API לפרויקט של Google Cloud
כעת יש לך פרויקט Google Cloud ראשון. כללית, לא ניתן להשאיר אותו ללא הגנה. אל תדאג! ה-Cloud KMS API הוא סט של APIs להצפנה שסופקו על ידי Google שתוכל להשתמש בהם להגן על הנתונים שלך.
כדי להשתמש ב-Cloud KMS API, עליך להפעיל אותו עבור הפרויקט שלך:
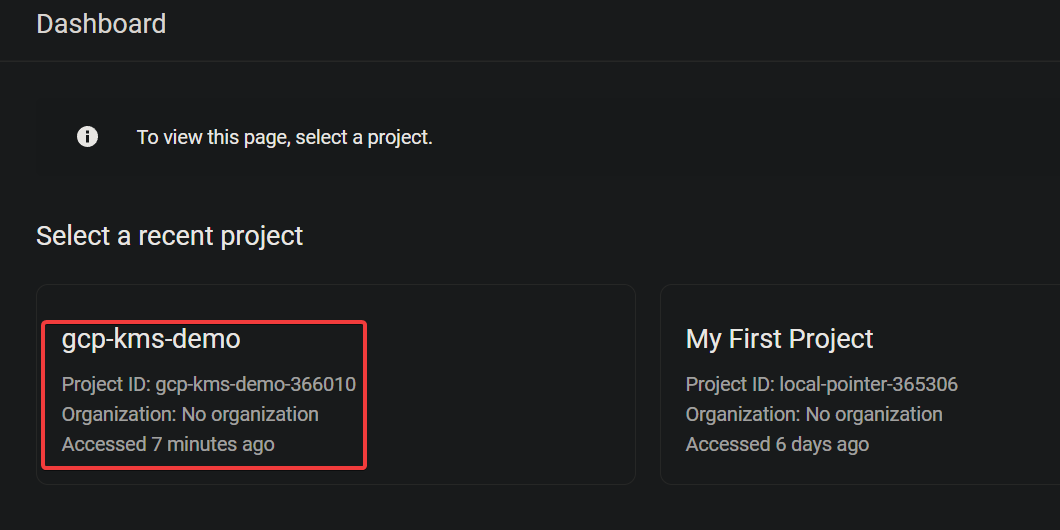
1. נווט לדף בחירת פרויקט Google, ובחר את הפרויקט שלך ב-Google Cloud (gcp-kms-demo).
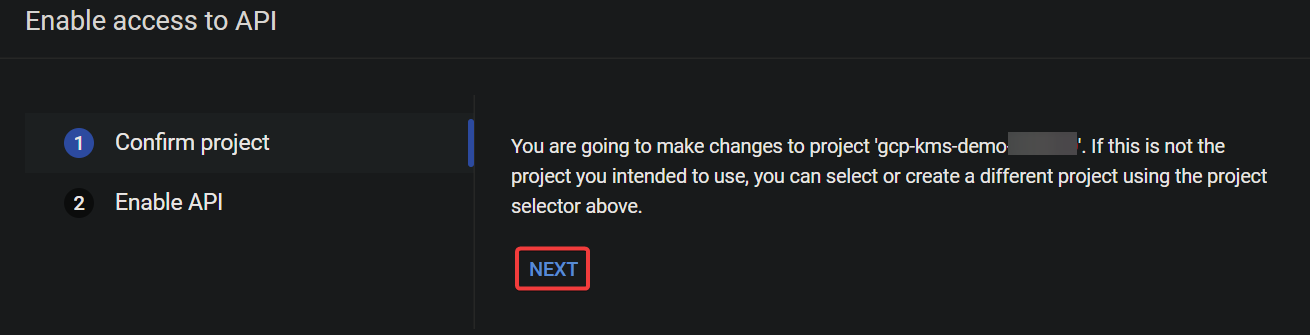
2. לאחר מכן, נווט לדף הפעלת גישה ל-API, ולחץ על NEXT לאישור הפעלת ה-API עבור הפרויקט שנבחר.
3. כעת, לחץ על ENABLE כדי להפעיל את חיבור ה-Cloud KMS API.

בנקודה זו, API של Cloud KMS מופעל עבור הפרויקט שלך. כעת תוכל להתחיל להשתמש ב-Cloud KSM API כדי ליצור ולנהל מפתחות הצפנה.

התחלת ה-Cloud Shell כדי ליצור מפתחות ו-Keyrings
הפעלת ה-Cloud KMS API מכינה אותך ליצירת מפתחות ו-Keyrings להצפנה ופענוח נתונים שלך. מפתחות ו-Keyrings הם המושגים הבסיסיים ב-Cloud KMS.
| Key | A key is an encryption key stored in a keyring that you can use to encrypt and decrypt your data. Each key has a name, and the name must be unique within the keyring. You can use IAM ( Identity and Access Management) policies to control who has access to keys. |
| Keyring | A keyring is a container in Cloud KMS that holds a set of keys. You can think of the keyring as a folder on your computer that contains many files. But in essence, a keyring holds a set of keys in a specific Cloud KMS location. |
אך לפני שתיצור מפתחות ו-Keyrings, עליך להתחיל עם Cloud Shell. ה-Cloud Shell הוא shell אינטראקטיבי וחינמי שניתן להשתמש בו כדי להריץ פקודות ב-Google Cloud Platform מבלי להתקין כל כלי על המחשב שלך.
1. ב- GCP Console, לחץ על הכפתור Activate Cloud Shell (בפינה הימנית למעלה), כפי שמוצג למטה, כדי להתחיל את ה-Cloud Shell.

A Cloud Shell session initializes, as shown below (at the bottom of the page), where you can run commands.

2. לאחר מכן, הפעל את ה-gcloud הבא. הופכת ראשונה שתפעיל את פקודת ה-gcloud ב-Cloud Shell, היא תבקש ממך לאשר לכלי ה-gcloud לגשת אל API ה-KSM.
–location "global"
כאשר מתבקש, לחץ על האישור כדי להמשיך להפעיל את הפקודה.
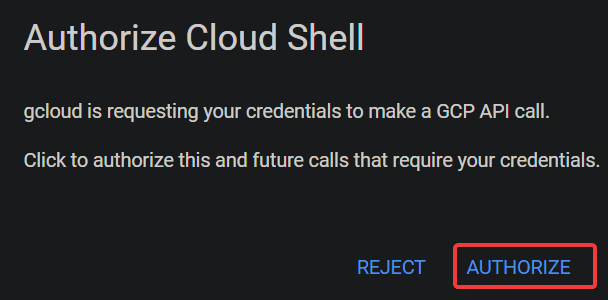
הודעה זו מופיעה בפעם הראשונה שאתה מפעיל את פקודת gcloud ב-Cloud Shell, ומבקשת ממך לאשר לכלי gcloud לגשת ל- API של KSM.

כפי שמוצג למטה, אין הודעות פלט כאשר ה-Keyring נוצר בהצלחה.
שימוש מתקדם במפתחי הצפנה עם AWS Key Management
שים לב שהמיקום (גלובלי) חייב להיות זהה למה שקבעת ל-Keyring.
–location "global" \
–keyring "kms-demo-keyring" \

–purpose "encryption"
בכל פעם שאתה יוצר או מגריל מפתח, Cloud KMS יוצר גרסה חדשה של המפתח. תכונה זו מאפשרת לך לחזור בקלות לגרסה קודמת אם נדרש.
| PURPOSE | ENCRYPT_DECRYPT | Indicates the purpose of the key (encryption and decryption). |
| ALGORITHM | GOOGLE_SYMMETRIC_ENCRYPTION | Indicates the key uses Google Symmetric Encryption, the default algorithm for Cloud KMS keys. |
| PROTECTION_LEVEL | SOFTWARE | Indicates the key is software-protected. |
| LABELS | You can add labels to keys to categorize them or to add additional information. | |
| PRIMARY ID | 1 | Indicates the key is the primary key for the keyring, which is what Cloud KMS uses by default when you do not specify a key.
Note that you can have only one primary key per keyring. |
| PRIMARY STATE | ENABLED | Shows the current status of the key. The ENABLED state indicates the key can be used for its specified purpose. |

כמו ביצירת Keyring, אין הודעות פלט כאשר המפתח נוצר בהצלחה.
אך בנקודה זו, יש לך Keyring ומפתח שאתה יכול להשתמש בו להצפנה ופיענוח של הנתונים שלך.
4. כעת, הפעל את הפקודה הבאה כדי לרשום את המפתחים ב-Keyring בשם kms-demo-keyring.
תראה פלט דומה לתמונה למטה עם מידע כזה:
הצפנת ופיענוח נתונים עם GCP KMS

1. הרץ את הפקודה למטה, שאינה מספקת פלט, אך יוצרת קובץ טקסט (gcp-kms-demo.txt) עם חלק מהטקסטים להצפנה.
2. לאחר מכן, הרץ כל פקודה למטה כדי לרשום (ls) את קובץ הטקסט (gcp-kms-demo.txt) ולהציג (cat) את התוכן שלו כדי לאמת את הנתונים.
# רשימת הקובץ הטקסט
# תצוגת תוכן הקובץ הטקסט
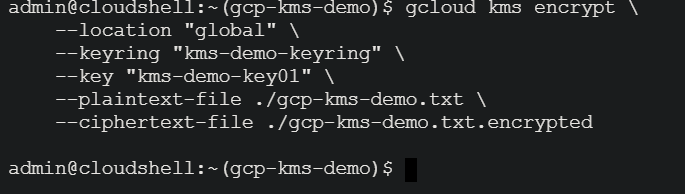
3. לאחר אימות, הרץ את הפקודה למטה כדי להצפין את הנתונים בקובץ שלך (gcp-kms-demo.txt) באמצעות המפתח שלך (kms-demo-key01). הנתונים המוצפנים יאוחסנו לאחר מכן בקובץ חדש בשם gcp-kms-demo.txt.encrypted.

–location "global" \
–keyring "kms-demo-keyring" \
–key "kms-demo-key01" \
–plaintext-file ./gcp-kms-demo.txt \

–ciphertext-file ./gcp-kms-demo.txt.encrypted
4. כעת, הריצו את הפקודה הבאה כדי לנסות ולהציג את נתוני הקובץ המוצפן (gcp-kms-demo.txt.encrypted).
תראו סמלים שבורים, תמוהים ולא קריאים, כפי שמוצג למטה. הפלט הזה מציין כי הקובץ הוצפן בהצלחה.
עליכם לאחסן את קובץ ההצפנה הזה במקום מאובטח. לדוגמה, תוכלו לאחסן עותקים מרובים ב־AWS S3, GCP Cloud Storage, או Azure Blob Storage. Google Cloud לא שומר גרסת טקסט פשוטה של הנתונים שלכם. לכן, אם תאבדו את קובץ ההצפנה, לא תוכלו לפענח את הקובץ ולשחזר את הנתונים המקוריים.

כיצד להעלות קובץ ל־S3 עם ה־AWS CLI
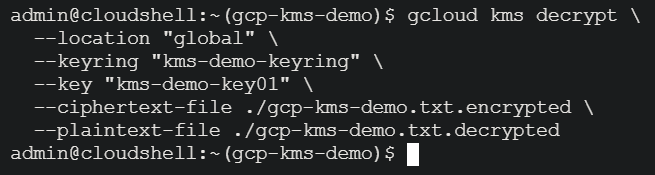
5. לאחר הצפנה, הריצו את הפקודה הבאה כדי לפענח את הנתונים שלכם (gcp-kms-demo.txt.encrypted) באמצעות אותו מפתח (kms-demo-key01). אך הפעם, הנתונים שפוענחו יאוחסנו בקובץ חדש בשם gcp-kms-demo.txt.decrypted.
כמו בפעולת ההצפנה, פקודה זו לא מספקת פלט, אך תאמתו את הפענוח בשלב הבא.
–location "global" \
–keyring "kms-demo-keyring" \

–key "kms-demo-key01" \
–ciphertext-file ./gcp-kms-demo.txt.encrypted \
–plaintext-file ./gcp-kms-demo.txt.decrypted
6. לבסוף, הפעל את הפקודה הבאה כדי לראות (cat) את הקובץ המשובט (gcp-kms-demo.txt.decrypted) ולוודא שהנתונים פועלו בהצלחה.
למטה, תוכל לראות את הנתונים המקוריים ששמרת על הקובץ הטקסט. מזל טוב! הצלחת להצפין ולפענח בהצלחה נתונים באמצעות Google Cloud KMS.
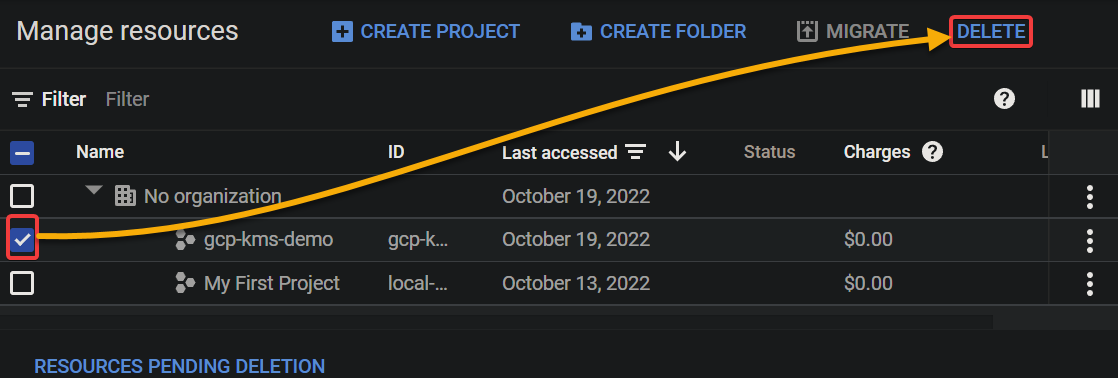
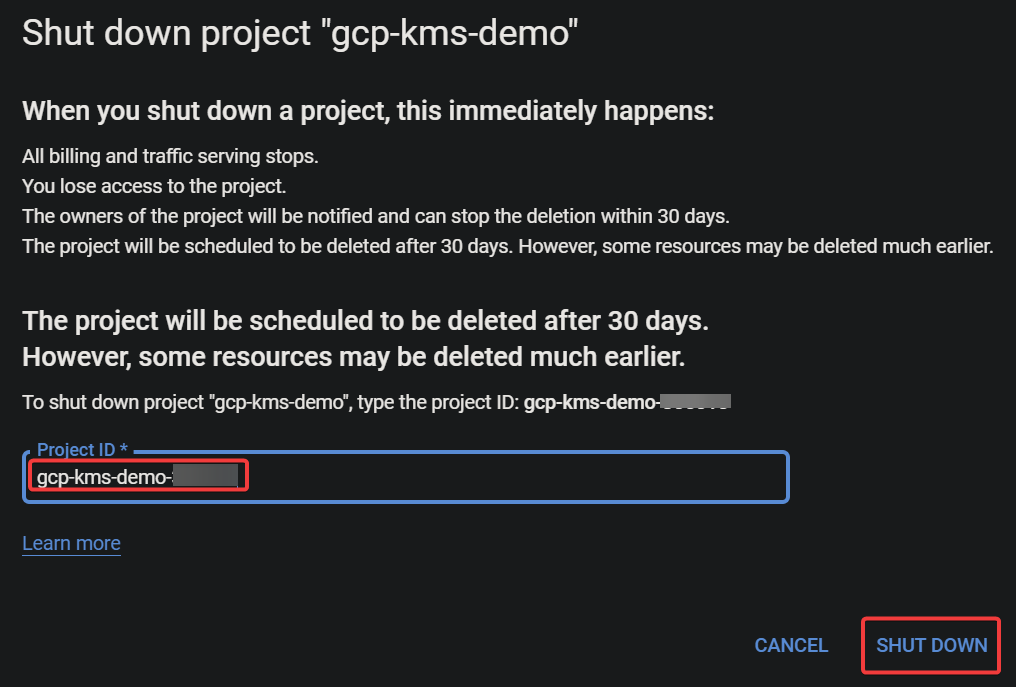
ניקוי משאבי Google Cloud