


If you work in a team or even if you’re working solo on an evolving project, you know how essential keeping your local repository current is key to smooth collaboration, and that’s where git pull comes into play because it integrates remote changes into your local branch. In essence, git pull fetches and integrates changes from a remote repository into your local branch. It’s a crucial command that ensures you’re always working with the most up-to-date code, especially in fast-paced, collaborative projects.
What’s cool about git pull is that it combines two steps: first, it performs a git fetch to download the latest changes, and then it automatically runs a git merge to integrate those updates into your branch. If you prefer a cleaner history without extra merge commits, you can use git pull --rebase instead.
If you’re looking to get a solid handle on these concepts, be sure to check out our brand-new GitHub Fundamentals skill track. By working through the course, you will learn about version history and working with branches, but also, by the end, you will even know about advanced merging strategies and repository management.
What Is Git Pull?
Let’s break it down. When you run git pull, you update your local branch with the latest commits from the remote repository. Here’s how it works:
-
Fetching Updates: Git starts by running
git fetchto retrieve all new commits from the remote. -
Merging Changes: Next, it automatically performs a
git mergeto integrate those fetched commits into your current branch.
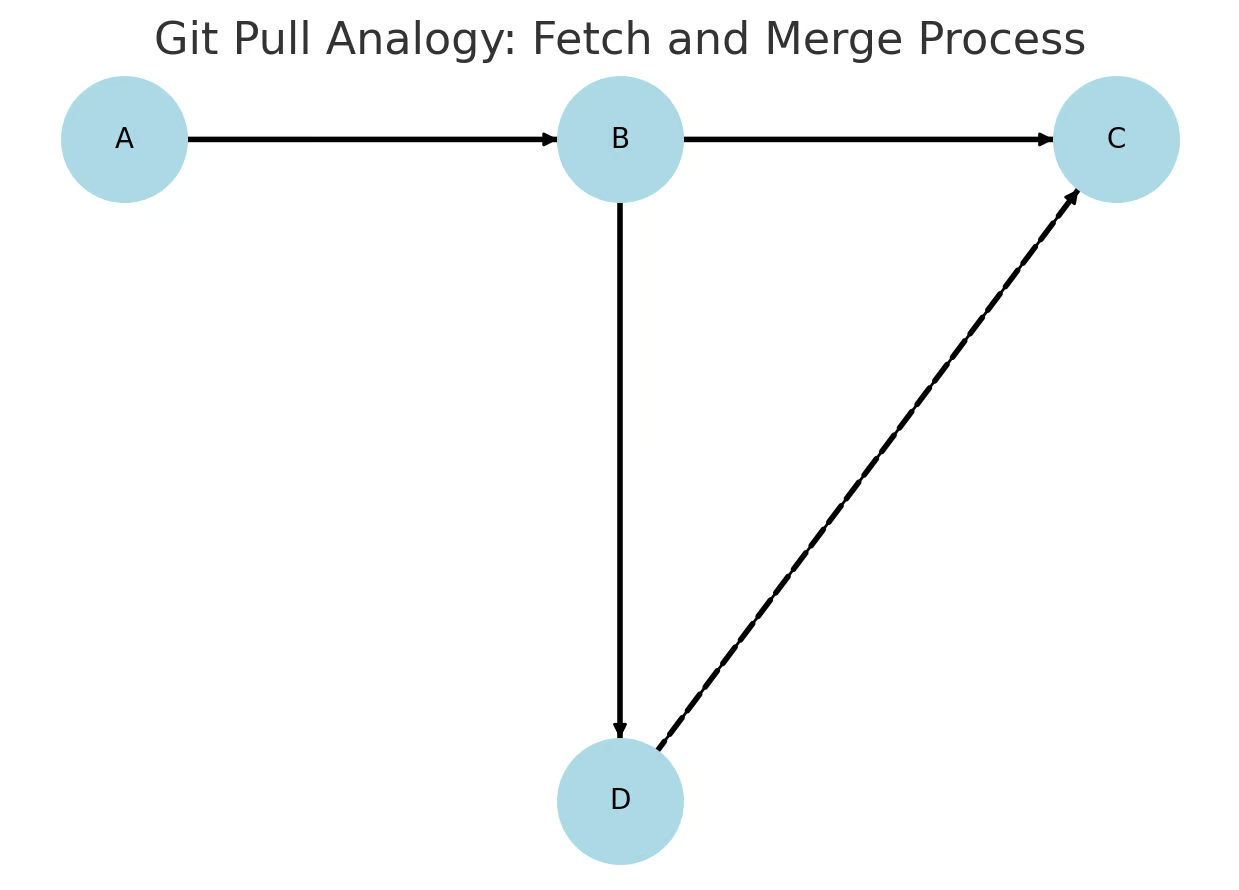
Here’s a visual representation of the Git Pull process. The chart shows how commits from the remote repository (A → B → C) get fetched and merged into the local branch (A → B → D). The dashed line represents the merge step, where commit C is integrated into the local repository. This illustrates how git pull keeps your local branch updated with the latest remote changes.
Git Pull and Related Commands
Let’s dive into some essential options available with git pull and see how they can make your workflow smoother. Whether you’re looking to clean up your commit history or need more insight into what’s happening during a pull, these commands have covered you. Here’s a handy reference:
| Command | Description |
|---|---|
git pull |
Fetches and merges remote changes into the current branch. |
git pull origin <branch> |
Pulls changes from a specific remote branch. |
git pull --rebase |
Uses rebase instead of merge to produce a cleaner, linear commit history. |
git pull --no-commit |
Fetches and merges remote changes but does not create an automatic commit, allowing you to inspect and modify the merged result before committing. |
git pull --verbose |
Provides detailed output during the pull process, helping you see exactly what changes are fetched. |
These options offer flexibility so you can tailor your update process to your project’s needs. For instance, if you prefer a tidier commit history, git pull --rebase might be your go-to. Or if you want to double-check changes before merging git pull --no-commit gives you that extra layer of control.
Avoiding Common Git Pull Issues
Let’s face it: git pull is a lifesaver but not without its quirks. Here’s how to navigate the most common pitfalls and keep your workflow smooth:
Merge conflicts
Merge conflicts happen when your local changes overlap with changes from the remote repository. For example, if you and a teammate edit the same line of code, Git won’t know which version to keep. When this happens, Git pauses the merge and asks you to resolve the conflict manually.
Here’s how to fix it:
-
Open the conflicted file(s) and look for conflict markers (
<<<<<<<,=======,>>>>>>>). -
Edit the file to keep the desired changes.
-
Save the file, stage it (
git add <file>), and complete the merge (git commit).
Pulling with uncommitted changes
If you have uncommitted changes in your working directory, git pull might fail because it needs a clean slate to merge remote changes.
Here’s the solution:
1. Stash your changes:
Since git pull requires a clean working directory, you’ll need to temporarily save your uncommitted changes using the stash command. This keeps your changes safe while you update your branch.
git stash
2. Pull the latest changes:
Now that your working directory is clean, you can safely fetch and merge the latest changes from the remote repository.
git pull
3. Reapply your stashed changes:
Once the update is complete, you can restore your saved changes back into your working directory using git stash pop. This will bring back everything you had before stashing.
git stash pop
By following these steps, you know your local changes are safely stored while you update your branch.
Pulling from the wrong branch
If you run git pull without specifying a branch, Git pulls from the upstream branch your local branch is tracking. If the upstream isn’t set correctly, you might pull changes from an unexpected branch, leading to confusion or errors.
Heres’ how to avoid it:
1. Check the upstream branch:
git branch -vv
2. If needed, set the correct upstream:
git branch --set-upstream-to=origin/<branch>
Always double-check which branch you’re pulling from, especially when working with multiple branches.
Best Practices for Using Git Pull
Building on what we discussed earlier about avoiding common issues, here are some best practices to help you make the most of git pull in your daily workflow:
-
Pull Frequently: Update your branch regularly to prevent large conflicts from piling up. Small, incremental changes are much easier to manage than massive merges later on.
-
Inspect Before Merging: Run
git fetchfirst to see what changes are waiting for you. This lets you review incoming commits without immediately merging them, giving you time to prepare for any adjustments. -
Maintain a Linear History: If you prefer a clean commit history, use
git pull --rebase. This command rebases your local changes on top of the latest remote commits, keeping your project history tidy. -
Review Merges: For extra caution, use
git pull—- no-committo inspect the merge results before finalizing them with a commit. This will catch any discrepancies early. -
Verify Branch Tracking: Always run
git remote show originto ensure your local branch is tracking the correct remote branch. This simple check helps prevent updates from being pulled into the wrong branch.
Why some developers avoid git pull
While git pull is convenient, some developers prefer splitting the process into two steps for more control:
1. Fetch First
git fetch
This retrieves remote changes without merging them.
2. Integrate Manually
Use git merge to combine changes:
git merge origin/<branch>
Or use git rebase for a cleaner history:
git rebase origin/<branch>
Looking at an Example of Git Pull in Action
Let’s walk through some practical examples of using git pull so you can see precisely how these commands work in real scenarios.
Basic git pull usage
The git pull command is the easiest way to update your local branch with the latest changes from the remote repository’s main branch. It automatically performs a git fetch followed by a git merge. Use this command to sync your local repository with the newest updates from the remote without additional steps. Running git pull fetches updates from the remote (typically named origin) and merges them into your current branch, ensuring your local code stays up to date.

Using git pull –rebase
If you prefer a cleaner, linear history without unnecessary merge commits, git pull --rebase is the way to go. This command fetches remote changes and then re-applies your local commits on top of them, maintaining a structured commit history. It’s beneficial in collaborative projects where a tidy commit log is essential. Running git pull --rebase ensures your local commits are replayed over the fetched changes, preventing redundant merge commits and keeping your repository history more readable.

Using git pull –no-commit
If you want to fetch and merge remote changes but prefer to review them before committing, git pull--no-commit is the perfect option. This command allows you to manually inspect the merge results and resolve any conflicts before finalizing the commit. It ensures you have complete control over the integration process, making it ideal for cautious updates where you need to verify changes before committing.

Pulling from a specific remote branch
When working on multiple branches, you may need to update your local branch with changes from a specific remote branch rather than the default main branch. The git pull origin feature branch lets you fetch and merge the latest commits from a designated branch, ensuring your local work stays updated with the latest remote changes. This is especially useful when collaborating on feature development or bug fixes across different branches.
Git Pull vs. Git Fetch
When working with Git, you’ll often encounter git pull and git fetch. While they may seem similar, they serve distinct purposes. Let’s break down the differences so you can decide when to use each.
Understanding the difference
-
git fetchretrieves changes from a remote repository but does not integrate them into your working branch. It simply updates your local copy of the remote branches. -
git pulldoes the same asgit fetchbut immediately merges the fetched changes into your current branch.
Comparison table
| Feature | git fetch | git pull |
|---|---|---|
| What it does | Downloads new changes from remote but does not merge them | Downloads and immediately merges changes into the current branch |
| Alters working directory? | No—updates remote-tracking branches | Yes—modifies the working branch |
| Best for | Checking for remote changes before merging | Quickly updating the local branch with the latest changes |
| Safe to use anytime? | Yes, since it doesn’t affect local work | No, as it may trigger merge conflicts |
| Common use case | Inspecting remote changes before deciding to merge | Keeping local branches up to date automatically |
| Command syntax | git fetch origin |
git pull origin main |
When to use each?
Use git fetch to review changes before updating your branch, manually merge or rebase later, or avoid pulling unstable changes while working on a feature branch. On the other hand, use git pull when you need the latest updates on a shared branch, like central or develop, are confident about merging remote changes without conflicts, or want to stay in sync with your team’s repository. Many developers who prefer more control over integrations use git fetch first, followed by git merge or rebase manually. If you’re interested in advanced Git workflows, exploring structured approaches can enhance your version control strategy.
Conclusion
By now, you should have a solid grasp of git pull—how it works, when to use it, and the best strategies to avoid common pitfalls. We’ve seen that git pull combines git fetch and git merge, making it a quick way to update your local repository. If you prefer a cleaner commit history, git pull --rebase is an excellent alternative.
We also explored key options like pulling from specific branches, avoiding immediate commits, and handling merge conflicts effectively. Plus, we discussed why some developers choose git fetch followed by git merge for more control over incoming changes.
At the end of the day, keeping your Git workflow smooth is all about understanding how changes move between local and remote repositories. Whether you’re collaborating on a team project or managing your repositories, knowing when to pull, fetch, merge, or rebase will save you from a lot of headaches. There’s a lot to learn with Git, but here at DataCamp we are here to help. I recommend our Foundations of Git course and the Introduction to GitHub Concepts course as two great options.