今天我們將學習關於 Android 浮動操作按鈕。我們將討論 FloatingActionButton,這是一個包含在 Material Design 指南中的新組件,以及 SnackBar,它是 Toast 的 Material Design 替代品。
Android 浮動操作按鈕
Android 浮動操作按鈕用於突出顯示屏幕上最重要的功能。這是一種吸引用戶注意力的酷炫且時尚的方式。
Android 浮動操作按鈕概述
要在我們的項目中使用 Material Design 小部件,我們需要在 build.gradle 文件中編譯以下依賴,如下所示。
compile 'com.android.support:design:23.1.1'
FloatingActionButton 小部件在 xml 布局中定義如下:
<android.support.design.widget.FloatingActionButton
      android:id="@+id/fab"
      android:layout_width="wrap_content"
      android:layout_height="wrap_content"
      android:src="@android:drawable/ic_dialog_email"
      android:layout_gravity="bottom|end"
      app:elevation="6dp"
      app:pressedTranslationZ="12dp"/>
從上述定義的 xml 布局中可以得出以下幾點觀察:
- FloatingActionButton 繼承自 ImageView 類。這可以從定義的
android:src屬性得出。 - 在上述xml布局中,elevation屬性用於在按鈕上投射陰影,而pressedTranslationZ則在按下時使陰影增長。
A FloatingActionButton is placed within a CoordinatorLayout. A CoordinatorLayout helps facilitate interactions between views contained within it, which will be useful later to describe how to animate the button depending on scroll changes. SnackBar is a more enhanced widget when compared to a Toast. A SnackBar is invoked as follows:
Snackbar.make(view, "Replace with your own action", Snackbar.LENGTH_LONG)
                        .setAction("Action", null).show();
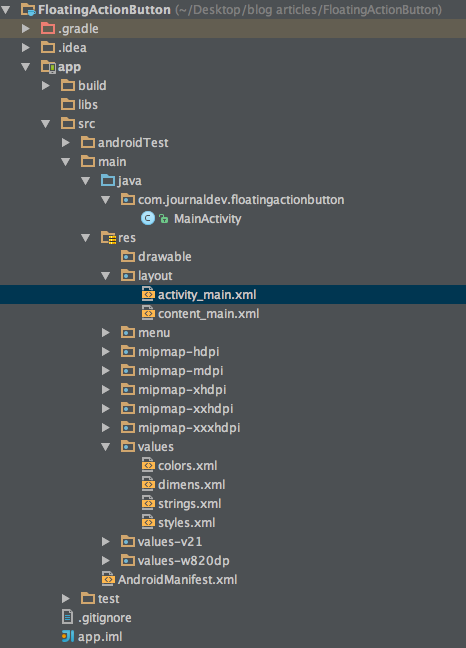
我們在另一個教程中詳細討論了SnackBar。重要提示:如果您一直在關注這些Android教程,您一定會注意到隨著新的23.1.1版本的構建工具更新,新空白項目的項目結構已更改,並且上述提及的小部件現在已經默認存在於新的Android Studio項目中。因此,我們不再實施上述提及的小部件,而是快速遊覽一下新的項目結構。
Android浮動操作按鈕示例項目結構
 如您所見,新增了一個名為
content_main.xml的新xml布局文件。它與以前的activity_main.xml相同。
Android浮動操作按鈕示例
新的 `activity_main.xml` 代码如下所示:
<?xml version="1.0" encoding="utf-8"?>
<android.support.design.widget.CoordinatorLayout xmlns:android="https://schemas.android.com/apk/res/android"
    xmlns:app="https://schemas.android.com/apk/res-auto"
    xmlns:tools="https://schemas.android.com/tools"
    android:layout_width="match_parent"
    android:layout_height="match_parent"
    android:fitsSystemWindows="true"
    tools:context="com.journaldev.floatingactionbutton.MainActivity">

    <android.support.design.widget.AppBarLayout
        android:layout_width="match_parent"
        android:layout_height="wrap_content"
        android:theme="@style/AppTheme.AppBarOverlay">

        <android.support.v7.widget.Toolbar
            android:id="@+id/toolbar"
            android:layout_width="match_parent"
            android:layout_height="?attr/actionBarSize"
            android:background="?attr/colorPrimary"
            app:popupTheme="@style/AppTheme.PopupOverlay" />

    </android.support.design.widget.AppBarLayout>

    <include layout="@layout/content_main" />

    <android.support.design.widget.FloatingActionButton
        android:id="@+id/fab"
        android:layout_width="wrap_content"
        android:layout_height="wrap_content"
        android:layout_gravity="bottom|end"
        android:layout_margin="@dimen/fab_margin"
        android:src="@android:drawable/ic_dialog_email" />

</android.support.design.widget.CoordinatorLayout>
A toolbar is added by default as a replacement of an ActionBar. It’s added inside an AppBarLayout which is a direct child of CoordinatorLayout The AppBarLayout is used to achieve various scrolling behaviours such as collapse, flex space, and quick return. The MainActivity.java is defined as given below:
package com.journaldev.floatingactionbutton;

import android.os.Bundle;
import android.support.design.widget.FloatingActionButton;
import android.support.design.widget.Snackbar;
import android.support.v7.app.AppCompatActivity;
import android.support.v7.widget.Toolbar;
import android.view.View;
import android.view.Menu;
import android.view.MenuItem;

public class MainActivity extends AppCompatActivity {

    @Override
    protected void onCreate(Bundle savedInstanceState) {
        super.onCreate(savedInstanceState);
        setContentView(R.layout.activity_main);
        Toolbar toolbar = (Toolbar) findViewById(R.id.toolbar);
        setSupportActionBar(toolbar);

        FloatingActionButton fab = (FloatingActionButton) findViewById(R.id.fab);
        fab.setOnClickListener(new View.OnClickListener() {
            @Override
            public void onClick(View view) {
                Snackbar.make(view, "Replace with your own action", Snackbar.LENGTH_LONG)
                        .setAction("Action", null).show();
            }
        });
    }

    @Override
    public boolean onCreateOptionsMenu(Menu menu) {
        // 膨胀菜单;如果动作条存在,这会将项添加到动作条上。
        getMenuInflater().inflate(R.menu.menu_main, menu);
        return true;
    }

    @Override
    public boolean onOptionsItemSelected(MenuItem item) {
        // 在这里处理动作条项点击事件。动作条将
        // 自动处理 Home/Up 按钮的点击事件,只要
        // 你在 AndroidManifest.xml 中指定了父活动。
        int id = item.getItemId();

        //noinspection SimplifiableIfStatement
        if (id == R.id.action_settings) {
            return true;
        }

        return super.onOptionsItemSelected(item);
    }
}
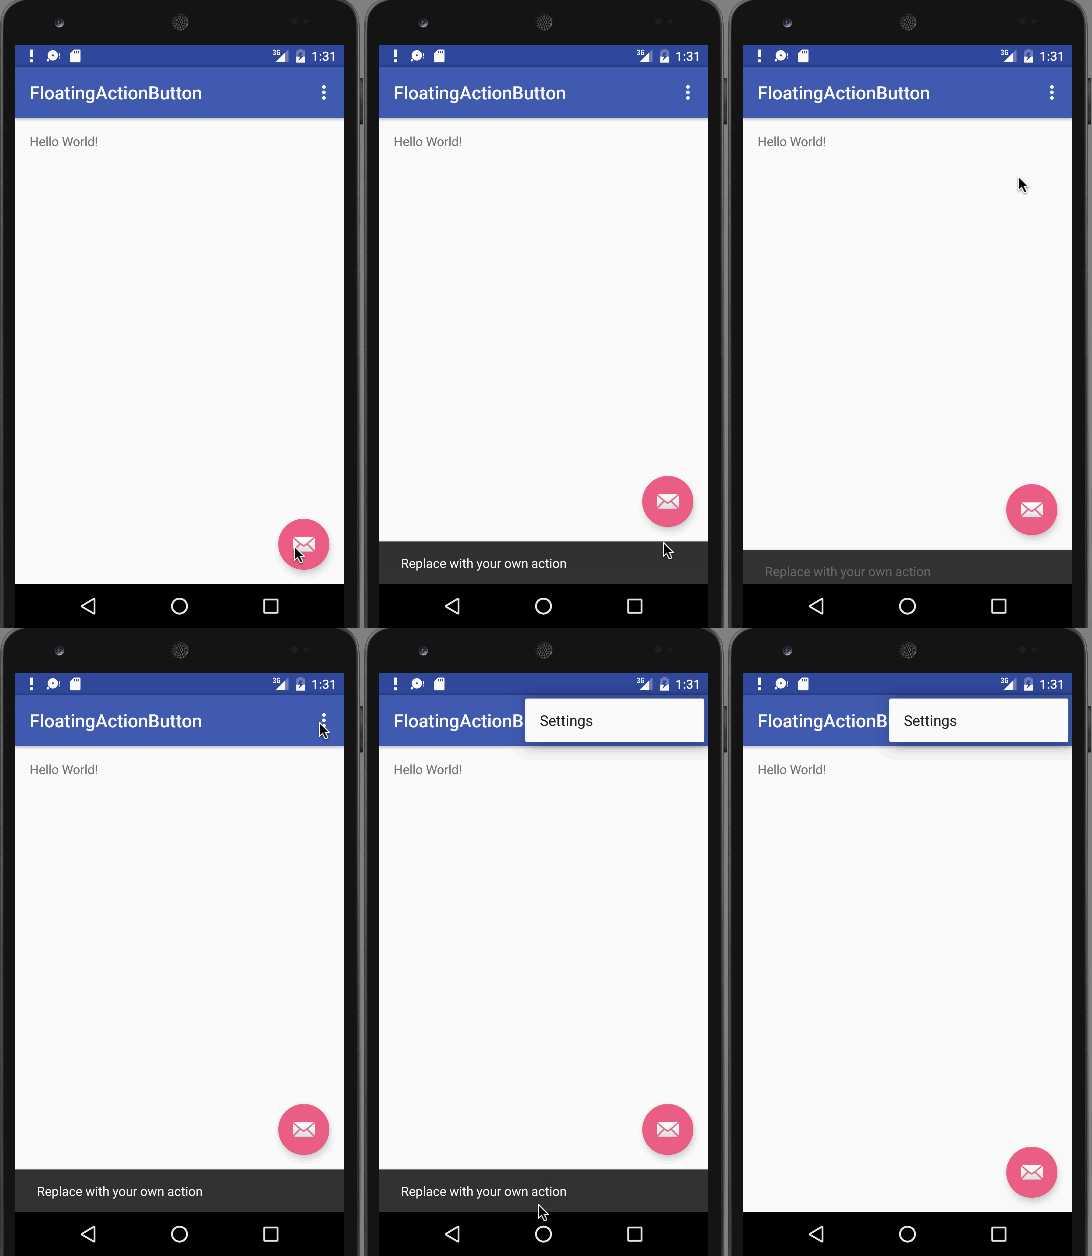
A new attribute is added to the application tag inside the AndroidManifest.xml named android:supportsRtl="true". This enables right to left layouts in the application. Running this default application produces an output like below:  As you can see, on clicking the floating action button, a SnackBar is displayed. This brings an end to this tutorial. You can create a new project in Android Studio and run it to see these features. Note: Make sure that you’re using the latest build tools. Reference: Android Reference Doc
Source:
https://www.digitalocean.com/community/tutorials/android-floating-action-button-example-tutorial


