במדריך זה נממש את תפריט הניווט באפליקציה שלנו ב-אנדרואיד. תפריט הניווט ב-Android הוא תפריט החלקה והוא רכיב ממש חשוב בממשק המשתמש. ישנם רבים מאוד כמעט בכל אפליקציה ל-Android, והוא דומה לתפריטי ניווט באתרי אינטרנט.
תפריט הניווט של Android
תפריט הניווט ב-Android הוא תפריט חלקה המחלק שמשמש להצגת קישורים חשובים באפליקציה. תפריט הניווט הופך את הניווט לקל ונוח בין הקישורים. הוא לא גלוי כבררת מחדל ונדרש להיפתח באמצעות החלקה מהצד השמאלי או לחיצה על הסמל שלו ב-ActionBar. במונחים רחבים יותר, תפריט הניווט הוא לוח הכסאה, שהוא חלופה למסך פעילות שנועד להציג את כל האפשרויות והקישורים באפליקציה. במדריך זה נממש את תפריט הניווט באמצעות ממשק ה-Drawer Layout הזמין בספריית התמיכה של Android. נציג שלוש תצוגות קטע שניתן לפתוח מתוך פריטי התפריט.
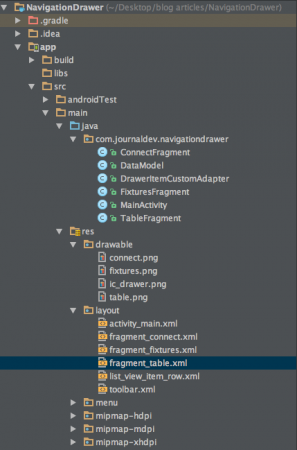
מבנה פרויקט תפריט הניווט ב-Android
דוגמת מזנון לניווט ב- Android
כדי ליישם את מזנון הניווט, נצטרך תחילה להוסיף את android.support.v4.widget.DrawerLayout כשורש של תצורת הפעילות כפי שמוצג למטה. activity_main.xml
<android.support.v4.widget.DrawerLayout
    xmlns:android="https://schemas.android.com/apk/res/android"
    android:id="@+id/drawer_layout"
    android:layout_width="match_parent"
    android:layout_height="match_parent" >


    <LinearLayout
        android:layout_width="match_parent"
        android:layout_height="match_parent"
        android:orientation="vertical">

    <LinearLayout
        android:id="@+id/container_toolbar"
        android:layout_width="match_parent"
        android:layout_height="wrap_content"
        android:orientation="vertical">

        <include
            android:id="@+id/toolbar"
            layout="@layout/toolbar" />
    </LinearLayout>


    <FrameLayout
        android:id="@+id/content_frame"
        android:layout_width="match_parent"
        android:layout_height="match_parent" />

    </LinearLayout>

    <ListView
        android:id="@+id/left_drawer"
        android:layout_width="240dp"
        android:layout_height="match_parent"
        android:layout_gravity="start"
        android:background="#FFFFFF"
        android:choiceMode="singleChoice"
        android:divider="@android:color/darker_gray"
        android:dividerHeight="1dp" />

</android.support.v4.widget.DrawerLayout>
האפשרויות בתפריט הניווט מאוחסנות בצורת ListView. כל אפשרות נפתחת ב-FrameLayout. השתמשנו ב-ToolBar במקום ב-ActionBar כאן. ה-ToolBar הובא לשימוש מאז Android 5.0 כתקן כללי של ActionBar. הוא מעניק לנו יותר שליטה וגמישות לשינוי וזה קל יותר לשלבו עם תצורות אחרות בהיררכיה. פריסת ה-ToolBar מוגדרת בתצורת xml שניתנת למטה. toolbar.xml
<android.support.v7.widget.Toolbar xmlns:android="https://schemas.android.com/apk/res/android"
    xmlns:local="https://schemas.android.com/apk/res-auto"
    android:id="@+id/toolbar"
    android:layout_width="match_parent"
    android:layout_height="wrap_content"
    android:minHeight="?attr/actionBarSize"
    android:background="?attr/colorPrimary"
    local:theme="@style/ThemeOverlay.AppCompat.Dark.ActionBar"
    local:popupTheme="@style/ThemeOverlay.AppCompat.Light" />
אנו צריכים להשתמש בערך עיצוב Theme Theme.AppCompat.NoActionBar בקובץ styles.xml כאשר משתמשים ב-Toolbars. פריסת שורות ה-ListView במזנון הניווט ניתנת למטה. list_view_item_row.xml
<RelativeLayout xmlns:android="https://schemas.android.com/apk/res/android"
    android:layout_width="match_parent"
    android:layout_height="wrap_content"
    android:background="?android:attr/activatedBackgroundIndicator"
    android:minHeight="?android:attr/listPreferredItemHeightSmall"
    android:padding="10dp" >

    <ImageView
        android:id="@+id/imageViewIcon"
        android:layout_width="wrap_content"
        android:layout_height="wrap_content"
        android:layout_alignParentLeft="true"
        android:layout_alignParentTop="true"
        android:paddingRight="10dp" />

    <TextView
        android:id="@+id/textViewName"
        android:layout_width="wrap_content"
        android:layout_height="wrap_content"
        android:layout_centerVertical="true"
        android:layout_toRightOf="@+id/imageViewIcon"
        android:paddingRight="10dp"
        android:text="Item Name"
        android:textColor="@android:color/black"
        android:textAppearance="?android:attr/textAppearanceListItemSmall"
        />

</RelativeLayout>
פריטי מזנון הניווט מופרדים לתוך מערך מחרוזות בקובץ strings.xml כפי שמוצג למטה. strings.xml
<string-array name="navigation_drawer_items_array">
        <item>Connect</item>
        <item>Fixtures</item>
        <item>Table</item>
    </string-array>
המחלקה DataModel.java משמשת להגדרת אובייקטים עבור פריטי רשימת המזנון. DataModel.java
package com.journaldev.navigationdrawer;

public class DataModel {

    public int icon;
    public String name;

    // Constructor.
    public DataModel(int icon, String name) {

        this.icon = icon;
        this.name = name;
    }
}
פריטי המזנון מאוחסנים בצורת ListView. לכן אנו צריכים להשתמש במחלקת מתאם כדי לספק את הנתונים האלה למחלקת הפעילות. DrawerItemCustomAdapter.java
package com.journaldev.navigationdrawer;

import android.app.Activity;
import android.content.Context;
import android.view.LayoutInflater;
import android.view.View;
import android.view.ViewGroup;
import android.widget.ArrayAdapter;
import android.widget.ImageView;
import android.widget.TextView;

public class DrawerItemCustomAdapter extends ArrayAdapter<DataModel> {

    Context mContext;
    int layoutResourceId;
    DataModel data[] = null;

    public DrawerItemCustomAdapter(Context mContext, int layoutResourceId, DataModel[] data) {

        super(mContext, layoutResourceId, data);
        this.layoutResourceId = layoutResourceId;
        this.mContext = mContext;
        this.data = data;
    }

    @Override
    public View getView(int position, View convertView, ViewGroup parent) {

        View listItem = convertView;

        LayoutInflater inflater = ((Activity) mContext).getLayoutInflater();
        listItem = inflater.inflate(layoutResourceId, parent, false);

        ImageView imageViewIcon = (ImageView) listItem.findViewById(R.id.imageViewIcon);
        TextView textViewName = (TextView) listItem.findViewById(R.id.textViewName);

        DataModel folder = data[position];


        imageViewIcon.setImageResource(folder.icon);
        textViewName.setText(folder.name);

        return listItem;
    }
}
הקוד המקורי של MainActivity.java מוצג למטה. MainActivity.java
package com.journaldev.navigationdrawer;

import android.support.v4.app.Fragment;
import android.support.v4.app.FragmentManager;
import android.support.v4.widget.DrawerLayout;
import android.support.v7.app.AppCompatActivity;
import android.os.Bundle;
import android.support.v7.widget.Toolbar;
import android.util.Log;
import android.view.MenuItem;
import android.view.View;
import android.widget.AdapterView;
import android.widget.ListView;

public class MainActivity extends AppCompatActivity {

    private String[] mNavigationDrawerItemTitles;
    private DrawerLayout mDrawerLayout;
    private ListView mDrawerList;
    Toolbar toolbar;
    private CharSequence mDrawerTitle;
    private CharSequence mTitle;
    android.support.v7.app.ActionBarDrawerToggle mDrawerToggle;

    @Override
    protected void onCreate(Bundle savedInstanceState) {
        super.onCreate(savedInstanceState);
        setContentView(R.layout.activity_main);
        mTitle = mDrawerTitle = getTitle();
        mNavigationDrawerItemTitles= getResources().getStringArray(R.array.navigation_drawer_items_array);
        mDrawerLayout = (DrawerLayout) findViewById(R.id.drawer_layout);
        mDrawerList = (ListView) findViewById(R.id.left_drawer);

        setupToolbar();

        DataModel[] drawerItem = new DataModel[3];

        drawerItem[0] = new DataModel(R.drawable.connect, "Connect");
        drawerItem[1] = new DataModel(R.drawable.fixtures, "Fixtures");
        drawerItem[2] = new DataModel(R.drawable.table, "Table");
        getSupportActionBar().setDisplayHomeAsUpEnabled(false);
        getSupportActionBar().setHomeButtonEnabled(true);

        DrawerItemCustomAdapter adapter = new DrawerItemCustomAdapter(this, R.layout.list_view_item_row, drawerItem);
        mDrawerList.setAdapter(adapter);
        mDrawerList.setOnItemClickListener(new DrawerItemClickListener());
        mDrawerLayout = (DrawerLayout) findViewById(R.id.drawer_layout);
        mDrawerLayout.setDrawerListener(mDrawerToggle);
        setupDrawerToggle();

    }

    private class DrawerItemClickListener implements ListView.OnItemClickListener {

        @Override
        public void onItemClick(AdapterView parent, View view, int position, long id) {
            selectItem(position);
        }

    }

    private void selectItem(int position) {

        Fragment fragment = null;

        switch (position) {
            case 0:
                fragment = new ConnectFragment();
                break;
            case 1:
                fragment = new FixturesFragment();
                break;
            case 2:
                fragment = new TableFragment();
                break;

            default:
                break;
        }

        if (fragment != null) {
            FragmentManager fragmentManager = getSupportFragmentManager();
            fragmentManager.beginTransaction().replace(R.id.content_frame, fragment).commit();

            mDrawerList.setItemChecked(position, true);
            mDrawerList.setSelection(position);
            setTitle(mNavigationDrawerItemTitles[position]);
            mDrawerLayout.closeDrawer(mDrawerList);

        } else {
            Log.e("MainActivity", "Error in creating fragment");
        }
    }

    @Override
    public boolean onOptionsItemSelected(MenuItem item) {

        if (mDrawerToggle.onOptionsItemSelected(item)) {
            return true;
        }

        return super.onOptionsItemSelected(item);
    }

    @Override
    public void setTitle(CharSequence title) {
        mTitle = title;
        getSupportActionBar().setTitle(mTitle);
    }

    @Override
    protected void onPostCreate(Bundle savedInstanceState) {
        super.onPostCreate(savedInstanceState);
        mDrawerToggle.syncState();
    }

    void setupToolbar(){
        toolbar = (Toolbar) findViewById(R.id.toolbar);
        setSupportActionBar(toolbar);
        getSupportActionBar().setDisplayShowHomeEnabled(true);
    }

    void setupDrawerToggle(){
        mDrawerToggle = new android.support.v7.app.ActionBarDrawerToggle(this,mDrawerLayout,toolbar,R.string.app_name, R.string.app_name);
        // זה נחוץ כדי לשנות את האייקון של התפריט הנגלל בעת שינוי מצב.
        mDrawerToggle.syncState();
    }
}
בקוד לעיל getSupportActionBar().setDisplayHomeAsUpEnabled(false); משמש להסתיר את הכפתור האחורי הדיפולטי. בקוד זה השתמשנו במחלקה DrawerItemClickListener הטוענת את ה Fragment המתאים לפריט הרשומה ברשימה באמצעות FragmentManager. גם כותרת הToolBar משתנה לפי הפריט בו לוחצים באמצעות setTitle(mNavigationDrawerItemTitles[position]);. המחלקות Fragment והתצורות ה-Layout המתאימות להן מוצגות למטה. ConnectFragment.java
package com.journaldev.navigationdrawer;

import android.os.Bundle;
import android.support.v4.app.Fragment;
import android.view.LayoutInflater;
import android.view.View;
import android.view.ViewGroup;

public class ConnectFragment extends Fragment {

    public ConnectFragment() {
    }

    @Override
    public View onCreateView(LayoutInflater inflater, ViewGroup container, Bundle savedInstanceState) {

        View rootView = inflater.inflate(R.layout.fragment_connect, container, false);

        return rootView;
    }

}
התצורה של ה Fragment לעיל מוגדרת למטה. fragment_connect.xml
<RelativeLayout xmlns:android="https://schemas.android.com/apk/res/android"
    xmlns:tools="https://schemas.android.com/tools"
    android:layout_width="match_parent"
    android:layout_height="match_parent"
    android:orientation="vertical">


    <TextView
        android:id="@+id/label"
        android:layout_alignParentTop="true"
        android:layout_marginTop="100dp"
        android:layout_width="fill_parent"
        android:layout_height="wrap_content"
        android:gravity="center_horizontal"
        android:textSize="45dp"
        android:text="Connect"
        android:textStyle="bold"/>

    <TextView
        android:layout_below="@id/label"
        android:layout_centerInParent="true"
        android:layout_width="fill_parent"
        android:layout_height="wrap_content"
        android:textSize="12dp"
        android:layout_marginTop="10dp"
        android:gravity="center_horizontal"
        android:text="Edit fragment_connect.xml to change the appearance"
        android:id="@+id/textView2" />

</RelativeLayout>
הפריטים הנוספים שוגדרים בדיוק באותה דרך כמו למעלה ולכן אנו עוברים עליהם כאן.
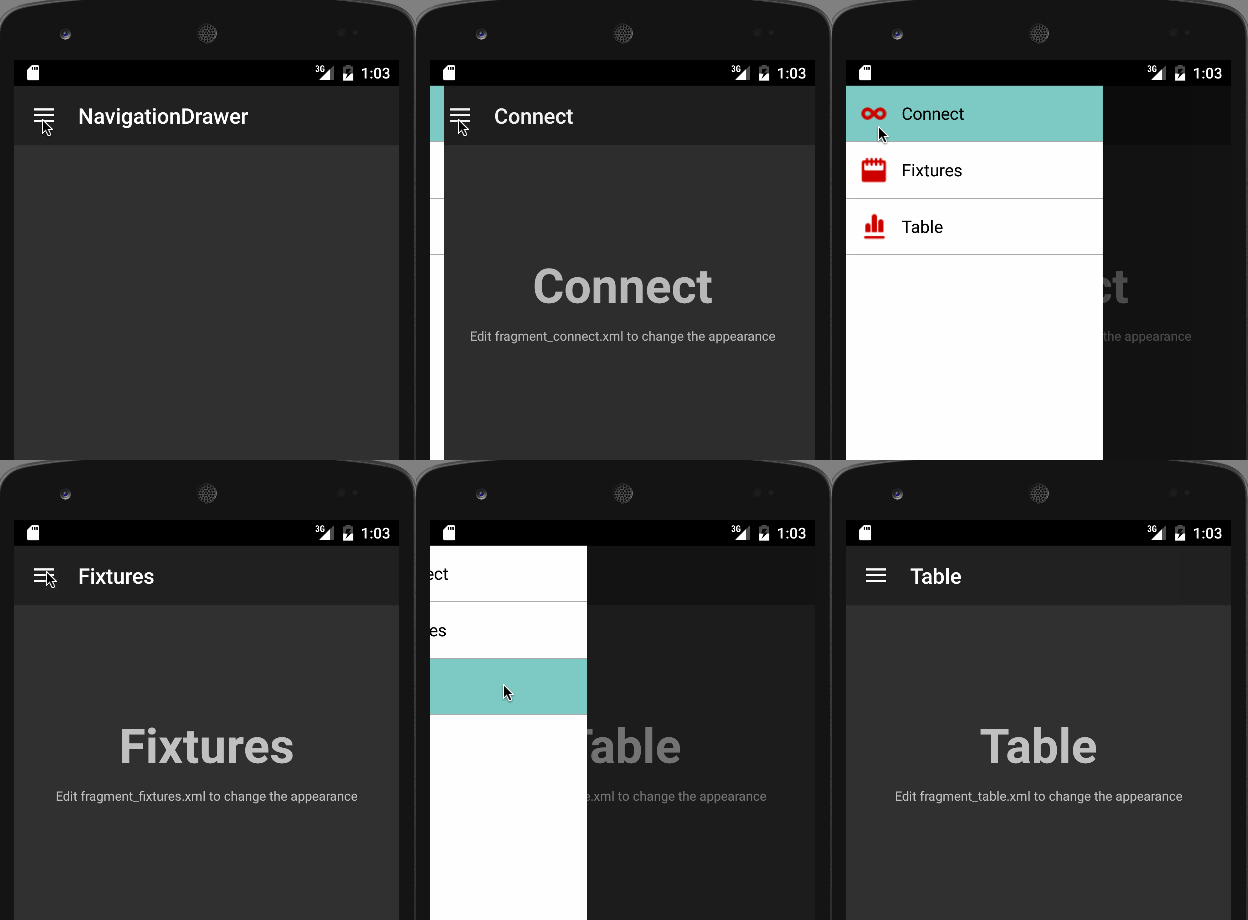
דוגמה לניווט ב-Android Drawer
למטה התמונה הנוצרת על ידי היישום הדוגמא שלנו לניווט ב-Android Drawer.  זה מסיים את מדריך הדוגמא שלנו לניווט ב-Android Drawer. ניתן להוריד את הפרויקט הסופי של Android Navigation Drawer מהקישור למטה.
Source:
https://www.digitalocean.com/community/tutorials/android-navigation-drawer-example-tutorial


